Tkinter Labelframe
Tkinter Labelframe is a widget commonly used to group related widgets together, providing structure and organization to your application. It typically features a border and label to describe its contents or purpose.
By enclosing widgets within a Labelframe, you can visually separate different sections or functionalities of your application, enhancing clarity for users.
While the classic Tkinter Labelframe gets the job done, its appearance may seem a bit outdated. For a more modern and stylish alternative, consider the ttk Labelframe provided by the themed Tkinter (ttk) extension.
Crafting Your First Tkinter Labelframe
Let’s create our first Tkinter Labelframe.
Example:
import tkinter as tk

#  Set the stage
root = tk.Tk()
root.title("Tkinter Labelframe Awesomeness")

#  Create a Labelframe
labelframe = tk.LabelFrame(root, text="My Labelframe")

#  Let's put it in place
labelframe.pack(padx=20, pady=20)

#  Now, let's add a cool label widget inside
label = tk.Label(labelframe, text="Hey, I'm in the Labelframe!")
label.pack()

#  Time to rock the event loop
root.mainloop()
Output:
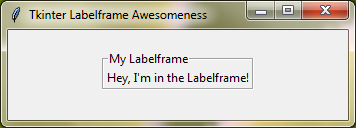
Main Options for Tkinter Labelframe
When working with Tkinter Labelframes, you’ll commonly use several key options to customize their appearance and behavior. Here’s a rundown of the main ones:
text | This option allows you to set the label text displayed on the Labelframe, providing a clear title for the grouped widgets. |
height and width | These options let you specify the size of the Labelframe vertically and horizontally. |
background(bg) and foreground(fg) | These options enable you to customize the colors of the Labelframe’s background and foreground (text) respectively. |
Example:
import tkinter as tk

#  Create the main application window
root = tk.Tk()
root.title("Labelframe Customization")

#  Create a Labelframe with all the cool options
labelframe = tk.LabelFrame(root, text="Custom Labelframe", height=150, width=200, bg="yellow", fg="red")
labelframe.pack(padx=20, pady=20)

#  Start the main event loop
root.mainloop()
Output:

Customize the Label of Tkinter Labelframe
You can easily customize the label of a Tkinter Labelframe by using two options: font and labelanchor. These options allow you to provide a clear description or title for the Labelframe.
font | This option lets you choose the specific style, size, and boldness for your label text. |
labelanchor | With this option, you can decide where the label should be positioned within the Labelframe. It accepts values such as "nw" (northwest), "n" (north), "ne" (northeast), "w" (west), "center" (centered), "e" (east), "sw" (southwest), "s" (south), and "se" (southeast). |
Let me show you how this works with a simple example.
Example:
import tkinter as tk

# Setting up the stage
root = tk.Tk()
root.title("Labelframe Label Vibes")

# Custom label font and position
custom_font = ('Cooper Black', 24, 'italic')

# Prepare the Labelframes
labelframe_1 = tk.LabelFrame(root, text="Labelframe_1", font=custom_font, height=250, width=500, labelanchor="n")
labelframe_1.pack(padx=20, pady=20)

labelframe_2 = tk.LabelFrame(root, text="Labelframe_2", font="georgia 20 bold", height=250, width=500, labelanchor="ws", bg="red", fg="white")
labelframe_2.pack(padx=20, pady=20)

labelframe_3 = tk.LabelFrame(root, text="Labelframe_3", font=custom_font, height=250, width=500, labelanchor="s", bg="yellow", fg="green")
labelframe_3.pack(padx=20, pady=20)

# Let's make it pop!
root.mainloop()
Output:

Labelwidget Option of Labelframe
The Labelframe widget offers a handy feature called the labelwidget option. With this option, you can replace the default text label of a Labelframe with any Tkinter widget you choose.
Using a widget as the label lets you create more interactive labels. For example, you can use Buttons as labels and attach callback functions to them, allowing users to perform actions directly from the Labelframe’s label.
Here’s a simple example demonstrating how to use the labelwidget option:
Example:
import tkinter as tk

#  Creating the main stage
root = tk.Tk()
root.title("Labelframe with Labelwidget")

def show_label_inside_labelframe():
    label=tk.Label(labelframe, text="Hello, I'm in the Tkinter Labelframe")
    label.pack()

#  We will use button widget as a labelwidget
button = tk.Button(root, text="I am a Labelwidget", font=("Times New Roman", 16, "bold"), bg="yellow", fg="red", command=show_label_inside_labelframe)

#  Setting the scene with a Labelframe and a labelwidget
labelframe = tk.LabelFrame(root, labelwidget=button, height=200, width=200)
labelframe.pack(padx=20, pady=20)

#  Cue the applause and let's get this party started!
root.mainloop()
Output:

Additional options available for customizing the Labelframe widget:
borderwidthcursorhighlightbackgroundhighlightcolorhighlightthicknesspadxpadyrelieftakefocus
For further insights into these options, refer to the Tkinter Standard Options.
Different Looks for Tkinter Labelframe
With a bit of creativity and the ability to tweak settings, you can give Tkinter Labelframes various styles to match your design preferences.
Let’s take a look at an example that demonstrates different styles for ttk Labelframes:
Example:
from tkinter import *

# Create the main application window
root = Tk()

# Create the first Labelframe
labelframe1 = LabelFrame(root, background='yellow', text='Frame 1', borderwidth=5, relief="groove", highlightthickness=20, highlightbackground="brown", highlightcolor="blue", padx=20, pady=20)
labelframe1.pack(padx=10, pady=10)

# Add an entry widget inside the first Labelframe
entry_widget = Entry(labelframe1, width=20, font="Georgia 16 bold")
entry_widget.pack()

# Create the second Labelframe
labelframe2 = LabelFrame(root, background='red', font="Arial 16 bold", foreground='white', height=120, width=400, text='Frame 2', labelanchor="ne", borderwidth=5, relief="sunken")
labelframe2.pack(padx=10, pady=10)

# Create the third Labelframe
labelframe3 = LabelFrame(root, background='blue', font="Arial 14 bold", foreground='white', height=200, width=400, labelwidget=Scale(root, from_=10, to=100, orient="horizontal"), labelanchor='nw', borderwidth=5, relief="raised", highlightthickness=20, highlightbackground="purple")
labelframe3.pack(padx=10, pady=10)

# Create a Frame for labelwidget in Labelframe 4
frame_labelwidget = Frame(root)
btn_1 = Button(frame_labelwidget, text="Button 1", font="Georgia 14 bold")
btn_1.grid(row=0, column=0)

btn_2 = Button(frame_labelwidget, text="Button 2", font="Georgia 14 bold")
btn_2.grid(row=0, column=1)

# Create the fourth Labelframe
labelframe4 = LabelFrame(root, background='green', height=120, width=400, labelwidget=frame_labelwidget, labelanchor='s', borderwidth=5, relief="flat")
labelframe4.pack(padx=10, pady=10)

# Start the main event loop
root.mainloop()
Output:

Tkinter Labelframes with Child Widgets
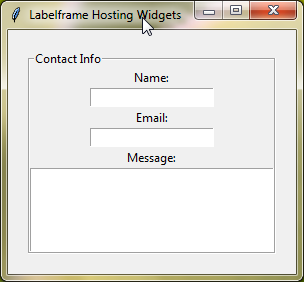
Labelframes serve as containers in Tkinter, allowing you to group and organize other widgets, such as labels, entry fields, buttons, and more. By placing child widgets inside a Labelframe, you create a visually cohesive and structured layout.
Imagine you’re designing a contact form for your application. You’ve got fields for the user’s name, email, and message. Instead of placing these fields randomly across the screen, you can group them neatly inside a Labelframe labeled “Contact Info”. This way, all elements related to contact information are organized within a single, designated area.
Here’s a simple example demonstrating how you can use a Labelframe to organize a contact form:
Example:
import tkinter as tk

#  Creating the main window
root = tk.Tk()
root.title("Labelframe Hosting Widgets")

#  Creating a Labelframe
labelframe = tk.LabelFrame(root, text="Contact Info")
labelframe.pack(padx=20, pady=20)

#  Adding widgets inside the Labelframe
name_label = tk.Label(labelframe, text="Name:")
name_label.pack()

name_entry = tk.Entry(labelframe)
name_entry.pack()

email_label = tk.Label(labelframe, text="Email:")
email_label.pack()

email_entry = tk.Entry(labelframe)
email_entry.pack()

message_label = tk.Label(labelframe, text="Message:")
message_label.pack()

message_entry = tk.Text(labelframe, height=5, width=30)
message_entry.pack()

#  Starting the main event loop
root.mainloop()
Output:
