ttk Progressbar widget
Have you ever wondered how to show progress when your computer is doing something? That’s where ttk Progressbar comes in handy.
What Exactly is ttk Progressbar?
Think of ttk Progressbar as a visual indicator that shows the progress of a task. Whether it’s loading a file, downloading data, or processing information, the progress bar provides users with a clear visual representation of how far along the task has progressed.
Without a progress bar, users might be left in the dark, unsure if the application is still working or has encountered an issue. By incorporating a progress bar, developers can enhance the user experience by providing real-time feedback on the status of ongoing processes. This improves usability and instills confidence in users that their actions are being processed effectively.
In this tutorial, we’ll learn all about ttk Progressbar: what it does, how to use it, and how to make it look just right for your app. Let’s dive in and make your Tkinter apps even better!
Crafting Your First Progress Bar
Excited to get started with ttk Progressbar? Let’s jump right in and create your very first progress bar!
from tkinter import *
from tkinter import ttk

# Create the main application window
root = Tk()
root.title("Adventurer's Progress")

# Create a progressbar widget
progressbar = ttk.Progressbar(root, length=200)

# Pack it onto the window
progressbar.pack()

# Start the main event loop
root.mainloop()
Output:

Great job on making your first progress bar! But if it seems a bit basic, don’t worry. There are ways to make it look cooler.
Understanding Key Options of ttk Progressbar
Let’s explore the most commonly used options for ttk Progressbar.
length:
The length option decides how wide your progress bar appears. You can make it shorter or longer by adjusting it in pixels. Give it a try by changing the length value in the code we used earlier, and see how the progress bar changes size.
orient:
With the orient"horizontal" for a bar that moves from left to right, or "vertical" for one that moves up and down.
variable:
The variable option is like a special connection to the heart of your progress bar! It lets you link your progress bar to a tkinter variable (like IntVar() or DoubleVar()). As the variable’s value changes, the progress bar moves along with it.
mode:
The mode option is a big deal! It decides how your progress bar acts. Choose "determinate" to show specific progress values, or "indeterminate" for a cool animation when the progress is unknown.
value:
Next up is the value option, which lets you set the current progress value when in determinate mode. Just set it anywhere between 0 and the maximum value to track progress accurately.
maximum:
Lastly, the maximum option sets the highest value your progress bar can reach. It’s like setting a target for your progress. Adjust it to match your goal, and watch your progress bar fill up as you get closer!
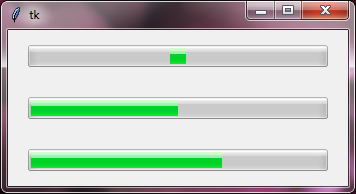
Example – 1: Simple Horizontal Progress bar
from tkinter import *
from tkinter import ttk

root=Tk()
root.grid_anchor('center')

progressbar1=ttk.Progressbar(root, length=300, orient='horizontal', value=50, mode='indeterminate')
progressbar1.grid(row=0, column=0, pady=15, padx=20)

progressbar2=ttk.Progressbar(root, length=300, orient='horizontal', value=50, mode='determinate')
progressbar2.grid(row=1,column=0, pady=15, padx=20)

var=IntVar()
var.set(65)
progressbar3=ttk.Progressbar(root, length=300, orient='horizontal', variable=var)
progressbar3.grid(row=2,column=0, pady=15, padx=20)

root.mainloop()
Output:
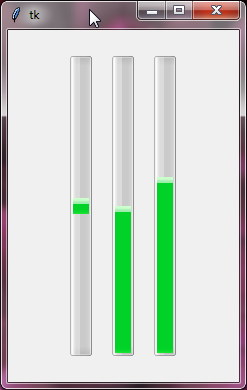
Example – 2: Simple Vertical Progress bar
from tkinter import *
from tkinter import ttk

root=Tk()
root.grid_anchor('center')

progressbar1=ttk.Progressbar(root, length=300, orient='vertical', value=50, mode='indeterminate')
progressbar1.grid(row=0, column=0, padx=10, pady=10)

progressbar2=ttk.Progressbar(root, length=300, orient='vertical', value=50, mode='determinate')
progressbar2.grid(row=0, column=1, padx=10, pady=10)

var=IntVar()
var.set(60)
progressbar3=ttk.Progressbar(root, length=300, orient='vertical', variable=var)
progressbar3.grid(row=0,column=2, padx=10, pady=10)

root.mainloop()
Output:
Additional Standard Options Available for Use:
cursorstyletakefocus
For a deeper understanding of these options, explore the Tkinter Standard Options and ttk and ttk style.
Styling ttk Progressbar
Now, it’s time to learn how to customize the appearance of progress bars.
To begin styling your progress bar, first, you need to know about the class names specific to the ttk Progressbar. These class names enable you to target and customize different aspects of the progress bar’s appearance. Here are the primary class names to keep in mind:
"TProgressbar": This is the main class name for ttk Progressbars."Horizontal.TProgressbar": Use this to style horizontal progress bars."Vertical.TProgressbar": Use this for vertical progress bars.
Now that we know the class names, let’s explore how to style ttk Progressbar using the ttk.style() method:
First, let’s set the theme to "clam" to enjoy its unique visual flair.
# Import necessary modules
import tkinter as tk
from tkinter import ttk

# Create the main application window
root = tk.Tk()
root.title("Adventurer's Progress")

# Access the ttk.Style() object
style = ttk.Style()

# Set the theme to "clam"
style.theme_use("clam")
Next, we’ll use the configure() method of the ttk.Style() object to customize the default appearance. Let’s begin with the Horizontal Progressbar.
# Configure the Horizontal.TProgressbar in "clam" theme
style.configure("Horizontal.TProgressbar",
                background="lightblue",
                troughcolor="lightgray",
                bordercolor="darkblue",
                lightcolor="lightblue",
                darkcolor="darkblue")
Here’s what each option does:
Keep in mind that not all options may apply to every theme.
background | Sets the background color of the progress bar. |
troughcolor | Determines the color of the trough behind the progress bar, providing a backdrop for it. |
bordercolor | Sets the color of the border around the progress bar, defining its edges for visual clarity. |
darkcolor | Defines the color used for darker elements like shadows or highlights within the progress bar. |
lightcolor | Specifies the color used for lighter elements, complementing the darkcolor for balanced visuals. |
Similarly, you can implement these adjustments for the "Vertical.TProgressbar" as well.
# Configure the Vertical.TProgressbar style in "clam" theme
style.configure("Vertical.TProgressbar",
                background="lightyellow",
                troughcolor="lightgray",
                bordercolor="darkorange",
                lightcolor="lightyellow",
                darkcolor="darkorange")
Complete Code:
# Import necessary modules
import tkinter as tk
from tkinter import ttk

# Create the main application window
root = Tk()
root.title("Adventurer's Progress")

# Access the ttk.Style() object
style = ttk.Style()

# Set the theme to "clam"
style.theme_use("clam")

# Configure the Horizontal.TProgressbar style in "clam" theme
style.configure("Horizontal.TProgressbar",
                background="lightblue",
                troughcolor="lightgray",
                bordercolor="darkblue",
                lightcolor="lightblue",
                darkcolor="darkblue")

# Configure the Vertical.TProgressbar style in "clam" theme
style.configure("Vertical.TProgressbar",
                background="lightyellow",
                troughcolor="lightgray",
                bordercolor="darkorange",
                lightcolor="lightyellow",
                darkcolor="darkorange")

horizontal_progressbar = ttk.Progressbar(root, length=200, value=50, orient="horizontal")
horizontal_progressbar.pack()

vertical_progressbar = ttk.Progressbar(root, length=200, value=50, orient="vertical")
vertical_progressbar.pack()

# Start the main event loop
root.mainloop()
Output:

Styling ttk Progressbar using Custom Class Names
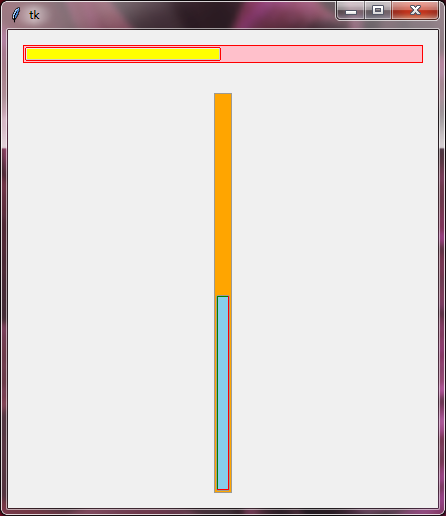
To customize ttk Progressbar widgets further, you can create custom class names like "design.Horizontal.TProgressbar" or "design.Vertical.TProgressbar". These names help you target specific progress bars and give them their unique style.
After that, configure the styles for your custom class names using the ttk.style().configure() method.
Once the custom styles are configured, apply them to your ttk Progressbar widgets using the style parameter.
Here’s an example that shows you how you can style ttk Progressbar using custom class names.
Example:
from tkinter import *
from tkinter import ttk

root=Tk()
root.grid_anchor('center')

style=ttk.Style()

style.theme_use("clam")

style.configure("design.Horizontal.TProgressbar",background='yellow',bordercolor='red',troughcolor='pink')
style.configure("design.Vertical.TProgressbar",background='skyblue',darkcolor='red',lightcolor='green',troughcolor='orange')

progressbar1=ttk.Progressbar(root, length=400, orient='horizontal', style='design.Horizontal.TProgressbar', value=50)
progressbar1.grid(row=0, column=0, padx=15, pady=15)

progressbar2=ttk.Progressbar(root, length=400, orient='vertical', style='design.Vertical.TProgressbar', value=50)
progressbar2.grid(row=1, column=0, padx=15, pady=15)

root.mainloop()
Output:
Different Looks of ttk Progressbar
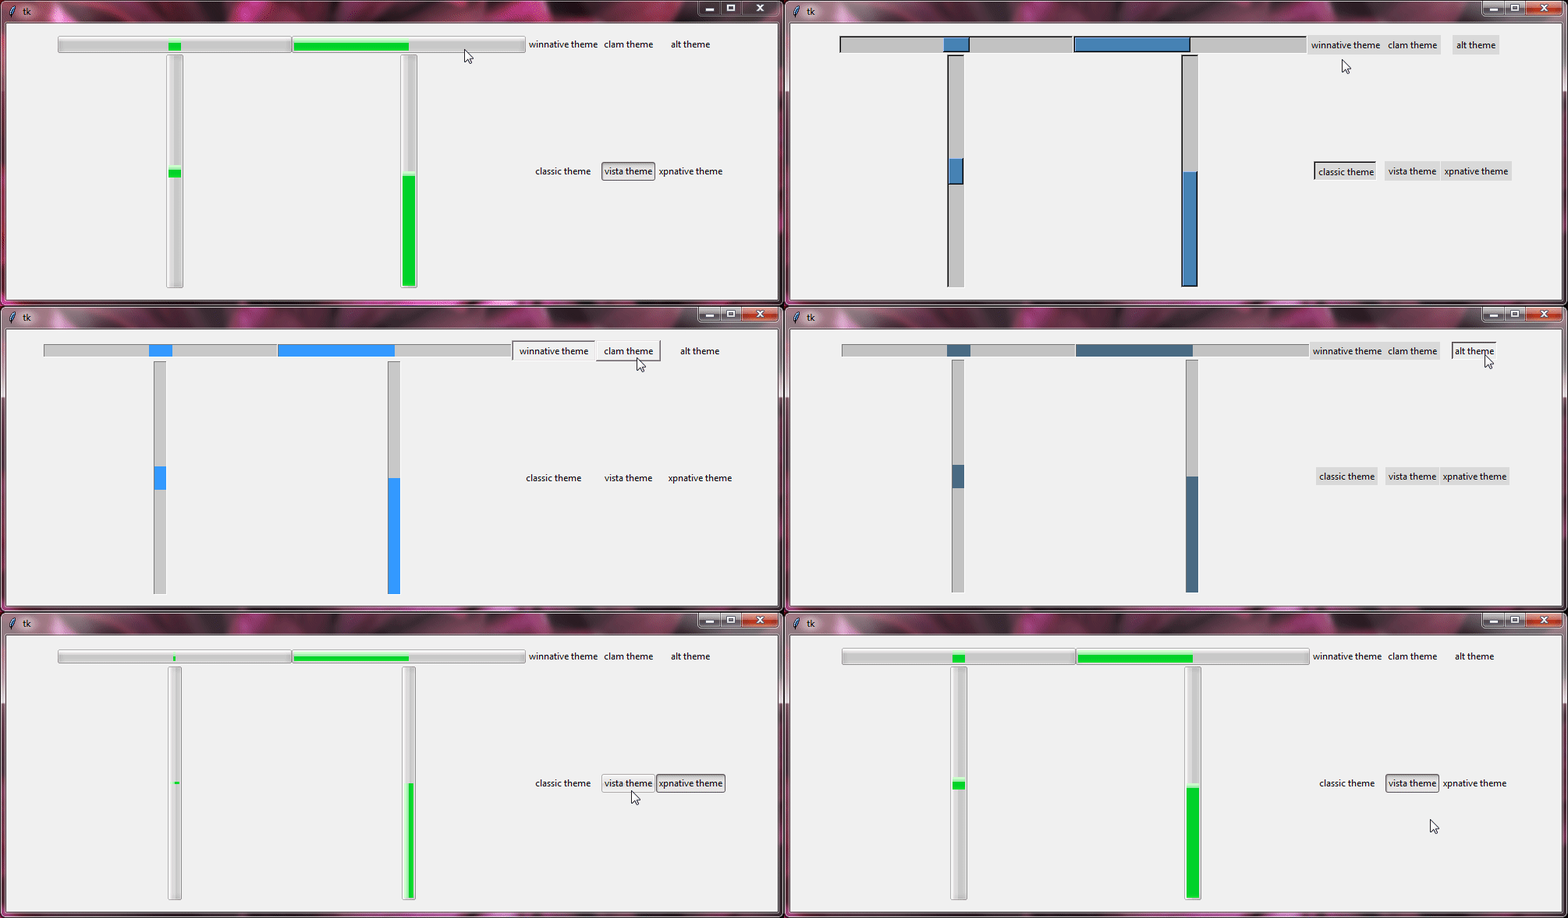
Now, let’s take a look at how our ttk Progressbar appears with different ttk themes.
Example:
from tkinter import *
from tkinter import ttk

root=Tk()
root.grid_anchor('center')

style=ttk.Style()

def changetheme():
    themeval=themevar.get()
    style.theme_use(themeval)

themevar=StringVar()
themevar.set("vista")

btn1=ttk.Radiobutton(root,text='winnative theme',value="winnative",command=changetheme,variable=themevar,style='Toolbutton')
btn2=ttk.Radiobutton(root,text='clam theme',value="clam",command=changetheme,variable=themevar,style='Toolbutton')
btn3=ttk.Radiobutton(root,text='alt theme',value="alt",command=changetheme,variable=themevar,style='Toolbutton')
btn4=ttk.Radiobutton(root,text='classic theme',value="classic",command=changetheme,variable=themevar,style='Toolbutton')
btn5=ttk.Radiobutton(root,text='vista theme',value="vista",command=changetheme,variable=themevar,style='Toolbutton')
btn6=ttk.Radiobutton(root,text='xpnative theme',value="xpnative",command=changetheme,variable=themevar,style='Toolbutton')

btn1.grid(row=0,column=2)
btn2.grid(row=0,column=3)
btn3.grid(row=0,column=4)
btn4.grid(row=1,column=2)
btn5.grid(row=1,column=3)
btn6.grid(row=1,column=4)

changetheme()

progressbar1=ttk.Progressbar(root, length=300, orient='horizontal', value=50, mode='indeterminate')
progressbar1.grid(row=0,column=0)

progressbar2=ttk.Progressbar(root, length=300, orient='vertical', value=50, mode='indeterminate')
progressbar2.grid(row=1,column=0)

progressbar3=ttk.Progressbar(root, length=300, orient='horizontal', value=50, mode='determinate')
progressbar3.grid(row=0,column=1)

progressbar4=ttk.Progressbar(root, length=300, orient='vertical', value=50, mode='determinate')
progressbar4.grid(row=1,column=1)

root.mainloop()
Output:
Main Methods of ttk Progressbar
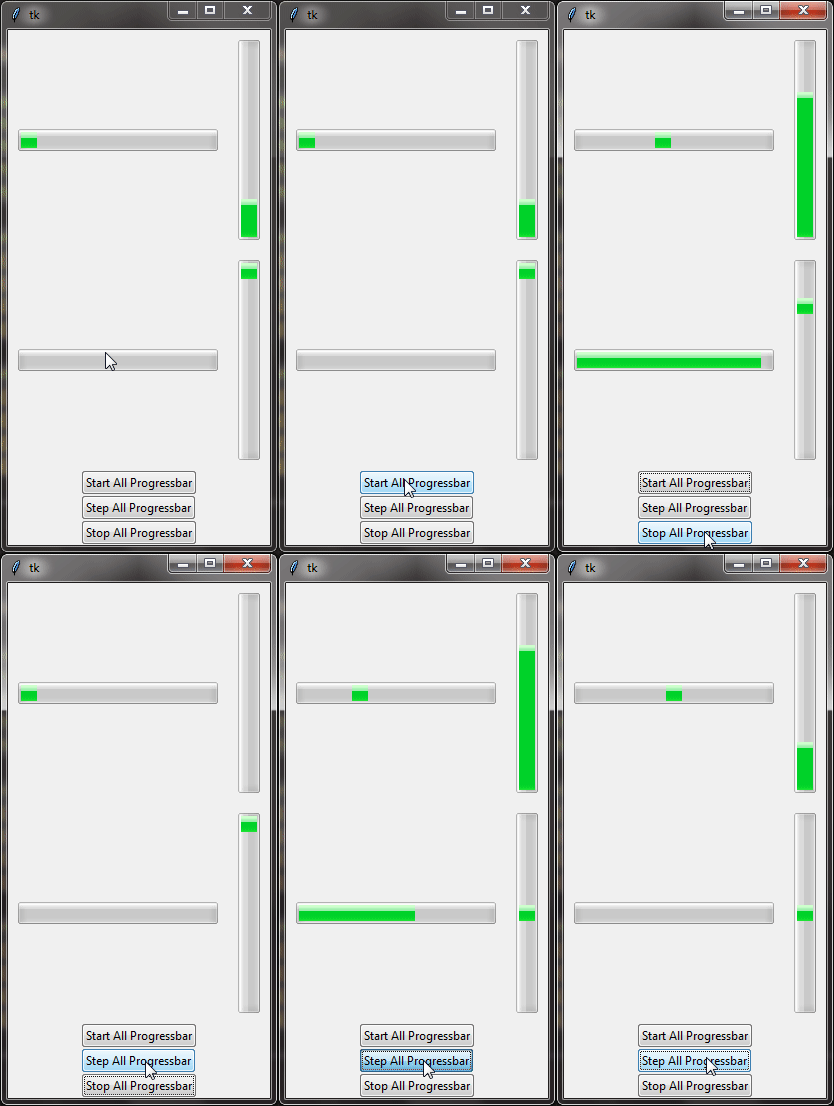
Now, let’s look at the main methods of the ttk Progressbar that help control and animate it. Don’t worry, these methods are easy to understand.
start() Method:
The start() method helps you to start the progress bar’s movement. When you use it, the progress bar begins to move smoothly and continuously. You just need to tell it how fast to move by providing a time interval in milliseconds. This method is perfect for showing ongoing activity, even when you don’t know the exact progress.
step() Method:
The step() method allows you to control the progress of the bar manually. Each time you call this method, the progress bar moves forward by a specified amount. The default amount is 1.0.
This method is handy when you want to control the progress yourself, especially if you know how much progress has been made.
You can also control the speed of the progress by calling step()after()
stop() Method:
Now, stop() is like hitting the brakes on the progress bar. When you call stop(), the progress bar comes to a stop, ending its movement. It’s handy for stopping the animation when it’s no longer needed, like when a task is completed.
Example:
from tkinter import *
from tkinter import ttk

root=Tk()
root.grid_anchor('center')

def startallprogressbar():
    progressbar1.start(5)
    progressbar2.start(10)
    progressbar3.start(5)
    progressbar4.start(10)

def stepallprogressbar():
    progressbar1.step(10)
    progressbar2.step(8)
    progressbar3.step(25)
    progressbar4.step(15)

def stopallprogressbar():
    progressbar1.stop()
    progressbar2.stop()
    progressbar3.stop()
    progressbar4.stop()

progressbar1=ttk.Progressbar(root,length=200,orient='horizontal',mode='indeterminate')
progressbar1.grid(row=0,column=0,pady=10,padx=10)

progressbar2=ttk.Progressbar(root,length=200,orient='horizontal',mode='determinate',maximum=40)
progressbar2.grid(row=1,column=0,pady=10,padx=10)

progressbar3=ttk.Progressbar(root,length=200,orient='vertical',value=20,mode='determinate')
progressbar3.grid(row=0,column=1,pady=10,padx=10)

progressbar4=ttk.Progressbar(root,length=200,orient='vertical',value=20,mode='indeterminate',maximum=10)
progressbar4.grid(row=1,column=1,pady=10,padx=10)

btn1=ttk.Button(root,text="Start All Progressbar",command=startallprogressbar)
btn2=ttk.Button(root,text="Step All Progressbar",command=stepallprogressbar)
btn3=ttk.Button(root,text="Stop All Progressbar",command=stopallprogressbar)

btn1.grid(row=2,column=0,columnspan=2)
btn2.grid(row=3,column=0,columnspan=2)
btn3.grid(row=4,column=0,columnspan=2)

root.mainloop()
Output:
Conclusion
To sum it up, we’ve learned a lot about ttk Progressbar in Tkinter. We now know how to create progress bars that look great and keep users interested. By exploring the basics of customization, we’ve seen how easy it is to make progress bars fit our needs. And with simple methods, we can control how they move and stop.
With these skills, you’re ready to make user interfaces that are both functional and attractive. So go ahead, try out what you’ve learned, and enjoy creating awesome applications with ttk Progressbar in Tkinter.
