ttk PanedWindow
In Tkinter, the ttk Panedwindow serves as an enhanced version of the standard tkinter Panedwindow widget. While both widgets essentially provide a way to create resizable panes within a window, the ttk version offers a more modern look and feel.
If you’re not familiar with resizable panes in a window, let me explain it to you. Resizable panes are like sections in a window that you can adjust in size. This feature is handy because it allows users to customize their workspace according to their needs.
But if you’re still not getting it, that’s okay! We’ll look at a real-life example of paned windows later in this tutorial, which should make things clearer.
This tutorial will show you how to make and change the appearance of paned windows to fit your style. We’ll also cover how to make things happen when you click or interact with the ttk Panedwindow. By the end, you’ll know how to use this tool to make your Python programs look and work better.
Create Your First ttk Panedwindow
Now, let’s get started on making your first ttk Panedwindow!
Example:
# First, we need to import the necessary modules
from tkinter import *
from tkinter import ttk

# Then, we create a Tkinter root window
root = Tk()
root.grid_anchor(anchor='center')  # This centers the window on the screen

# Next, we'll set up some styles for our ttk Panedwindow
style = ttk.Style()

style.theme_use('clam')  # Use the 'clam' theme
style.configure("design1.TFrame", background='black')  # Style for the first frame
style.configure("design2.TFrame", background='grey')   # Style for the second frame

# Now, let's create a horizontal ttk Panedwindow
panewin1 = ttk.Panedwindow(root, height=400, width=600, orient='horizontal')

# Inside the Panedwindow, we'll add two frames with different styles
frame1 = ttk.Frame(panewin1, width=300, style="design1.TFrame")  # First frame with design1 style
frame2 = ttk.Frame(panewin1, width=300, style="design2.TFrame")  # Second frame with design2 style

# Add the frames to the Panedwindow
panewin1.add(frame1)
panewin1.add(frame2)

# Finally, we'll position the horizontal Panedwindow in the root window
panewin1.grid(row=0, column=0)

# Now, let's create a vertical ttk Panedwindow
panewin2 = ttk.Panedwindow(root, height=400, width=600, orient='vertical')

# Inside the vertical Panedwindow, add two frames with different styles
frame3 = ttk.Frame(panewin2, height=200, style="design2.TFrame")  # First frame with design2 style
frame4 = ttk.Frame(panewin2, height=200, style="design1.TFrame")  # Second frame with design1 style

# Add the frames to the vertical Panedwindow
panewin2.add(frame3)
panewin2.add(frame4)

# Position the vertical Panedwindow in the root window
panewin2.grid(row=1, column=0)

# Finally, start the Tkinter event loop
root.mainloop()
Output:
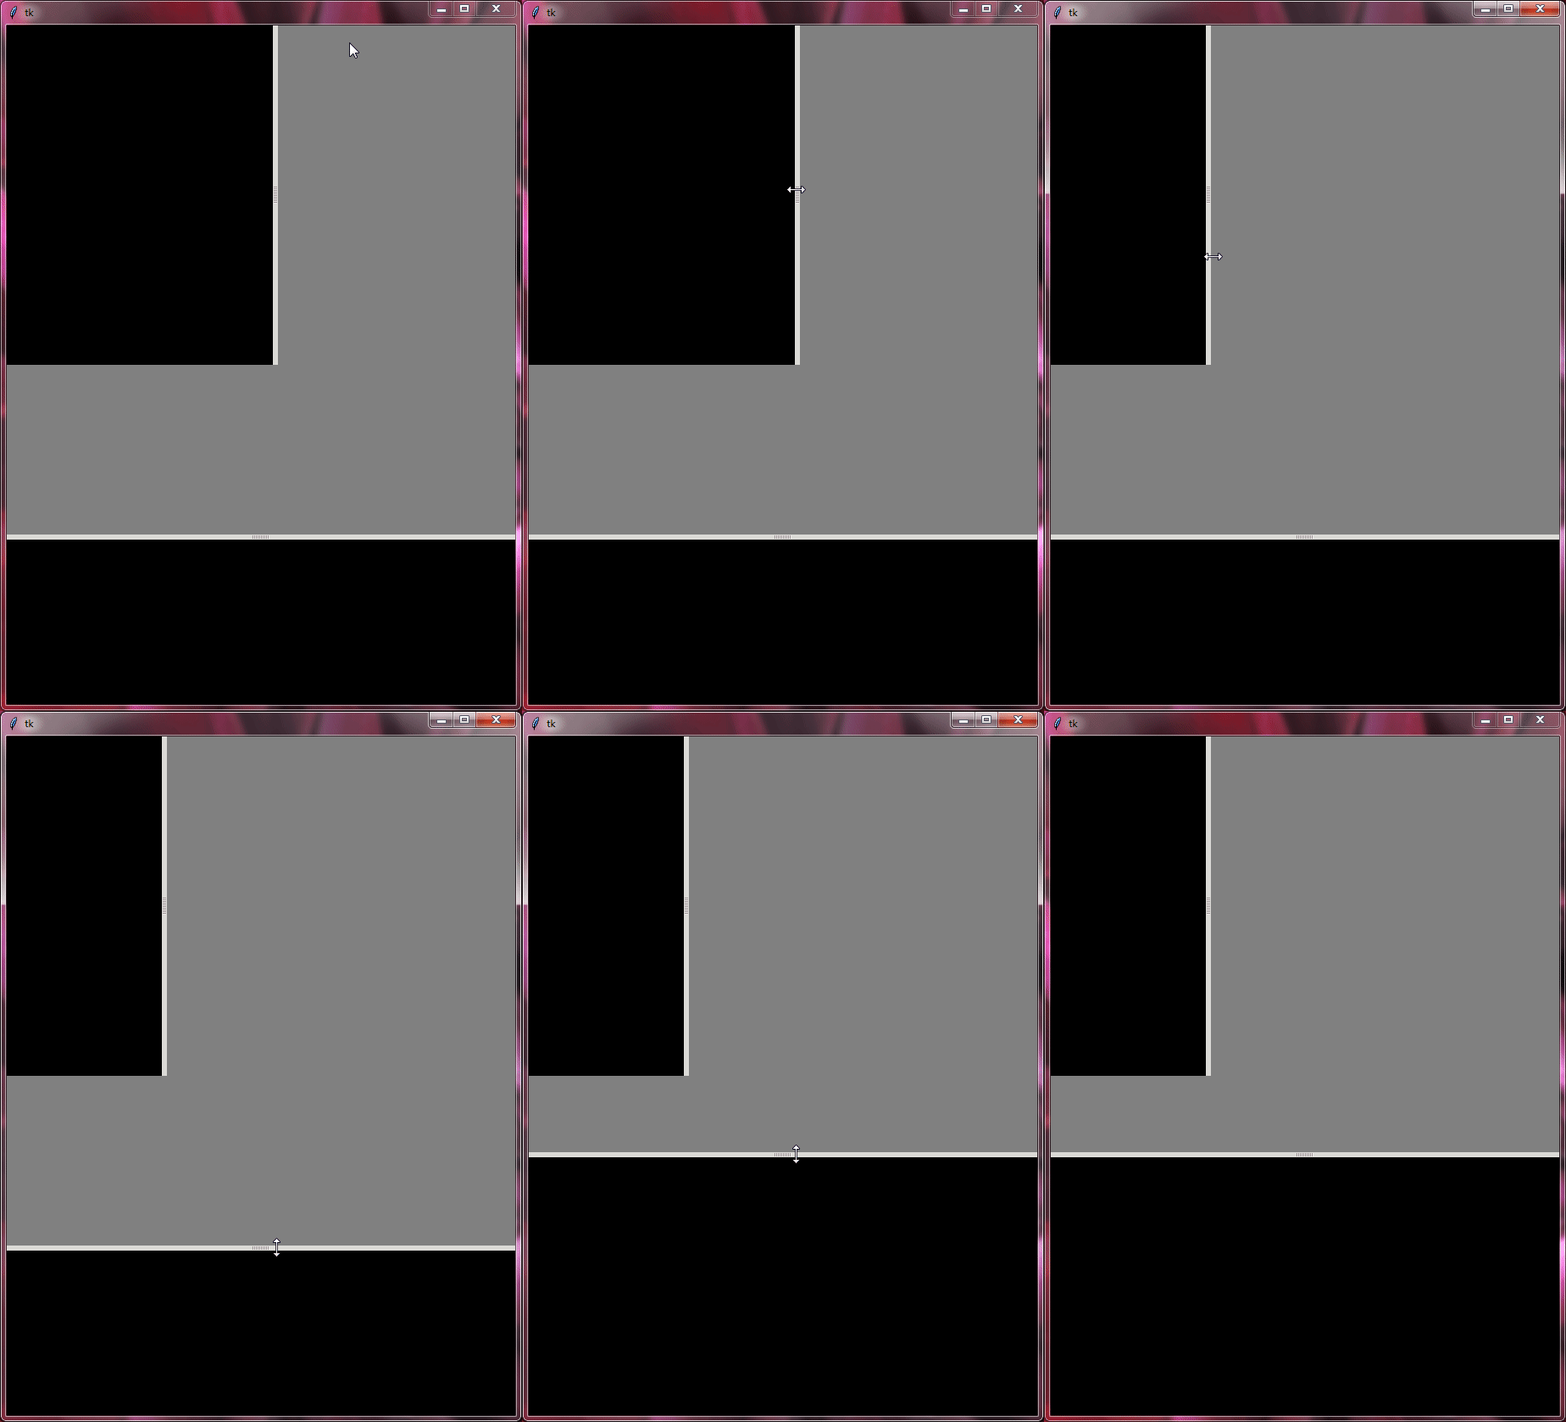
ttk Panedwindow Customization
The most commonly used options for customizing ttk Panedwindow are:
height | Sets the initial height of the paned window. |
width | Determines the initial width of the paned window. |
orient | This option lets you choose how your panels will be arranged—either vertically or horizontally. |
Other Standard Options:
cursorstyletakefocus
If you’re curious to learn more about these options, you should see Tkinter Standard Options and ttk and ttk style.
Styling Your ttk Panedwindow
You can customize the appearance of your ttk Panedwindow using styles. To target the ttk Panedwindow, you can use the class name 'TPanedwindow' within the ttk style.
style = ttk.Style()
style.configure("TPanedwindow", background='yellow')
However, there’s only one style configuration option available for 'TPanedwindow', which is background.
If you want a different background color for certain ttk Panedwindows, you can create custom class names. You can do this by adding a unique name before the base class name. For example:
style = ttk.Style()
style.configure("design.TPanedwindow", background='yellow')
This way, you can apply customized styles to individual ttk Panedwindows.
Additionally, if you wish to style the sash (the divider between panes) of the paned window, you can use the class name "Sash" and adjust its appearance using these style configuration options:
background | Changes the background color of the sash. |
sashpad | Adjusts the padding around the sash. |
sashthickness | Sets the thickness of the sash. |
gripcount | Determines the number of grips (handles) on the sash. |
handlepad | Specifies the padding around the grip (handle) on the sash. |
Remember, all options are not applied to all themes so use themes like “classic” or “clam”.
Example:
from tkinter import *
from tkinter import ttk

root=Tk()
root.grid_anchor(anchor='center')

style=ttk.Style()

style.theme_use('clam')

style.configure("design.TPanedwindow", background='yellow')
style.configure("Sash", gripcount=10, sashthickness=80)

style.configure("design1.TFrame", background='red')
style.configure("design2.TFrame", background='blue')

panewin=ttk.Panedwindow(root, height=500, width=600, orient='horizontal', style='design.TPanedwindow')

frame1=ttk.Frame(panewin, width=300, style="design1.TFrame")
frame2=ttk.Frame(panewin, width=300, style="design2.TFrame")

panewin.add(frame1)
panewin.add(frame2)

panewin.grid(row=0, column=0)

root.mainloop()
Output:
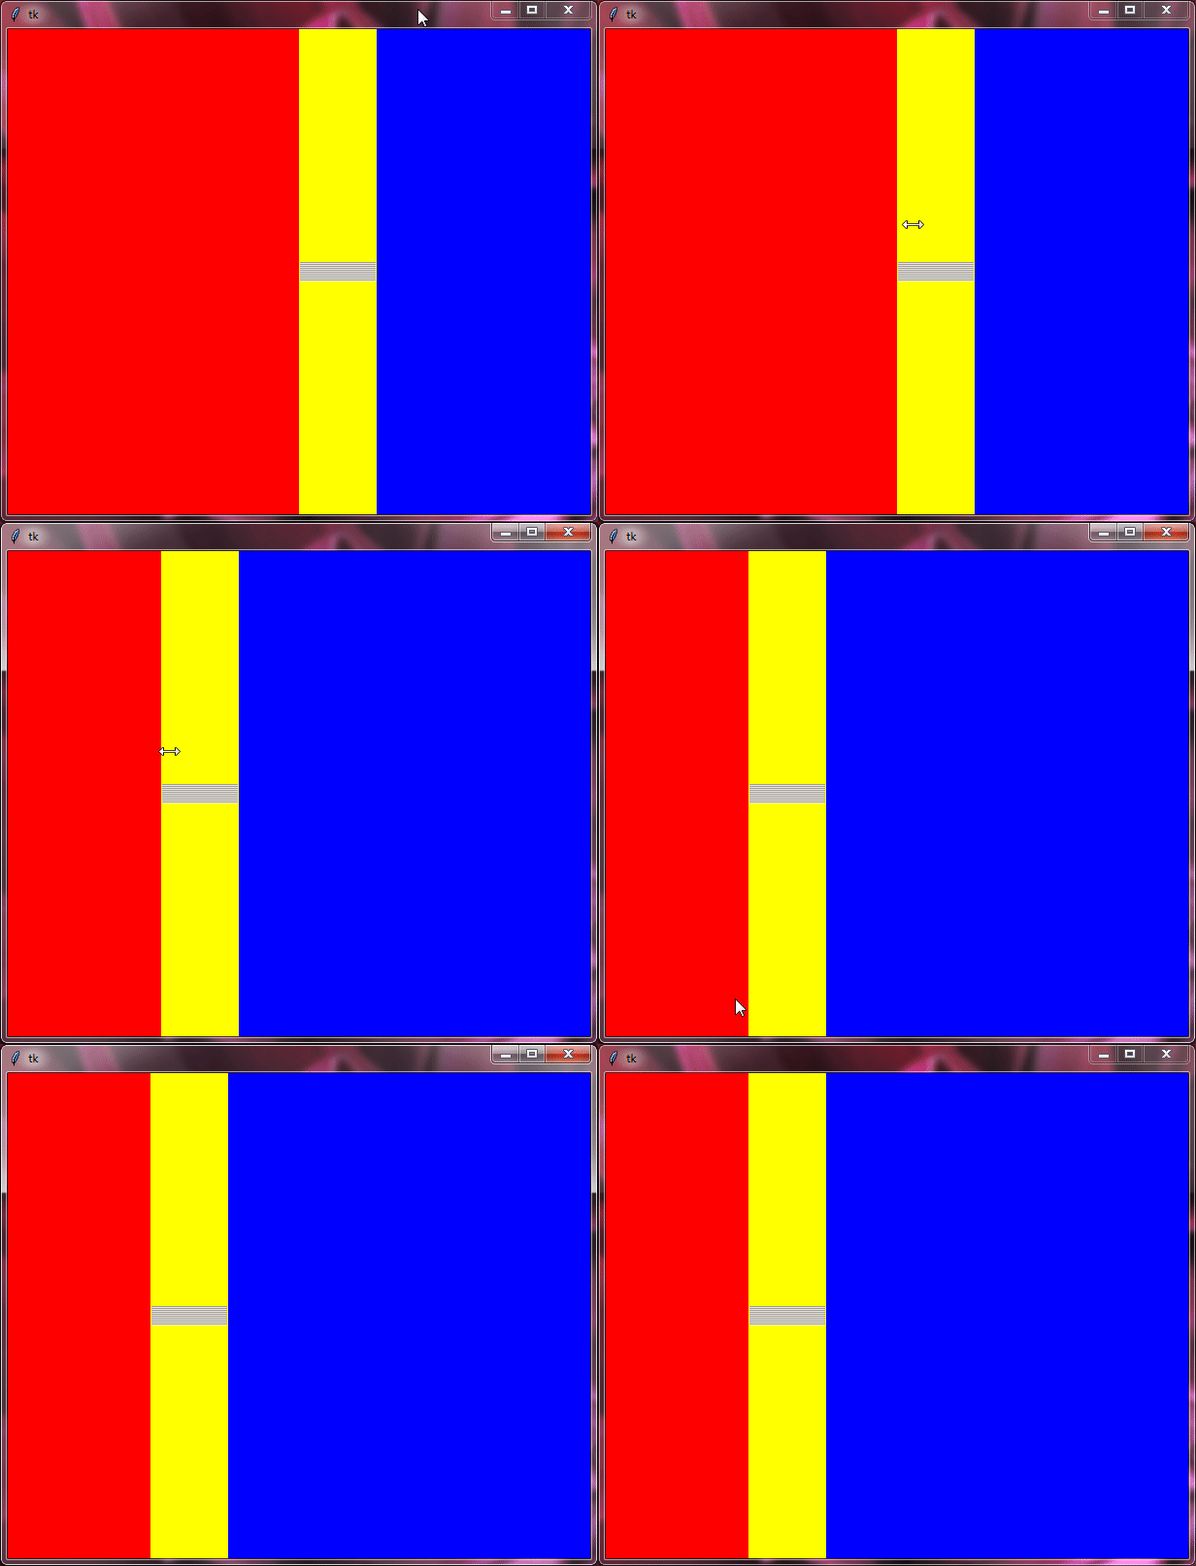
ttk Panedwindow With Different Themes
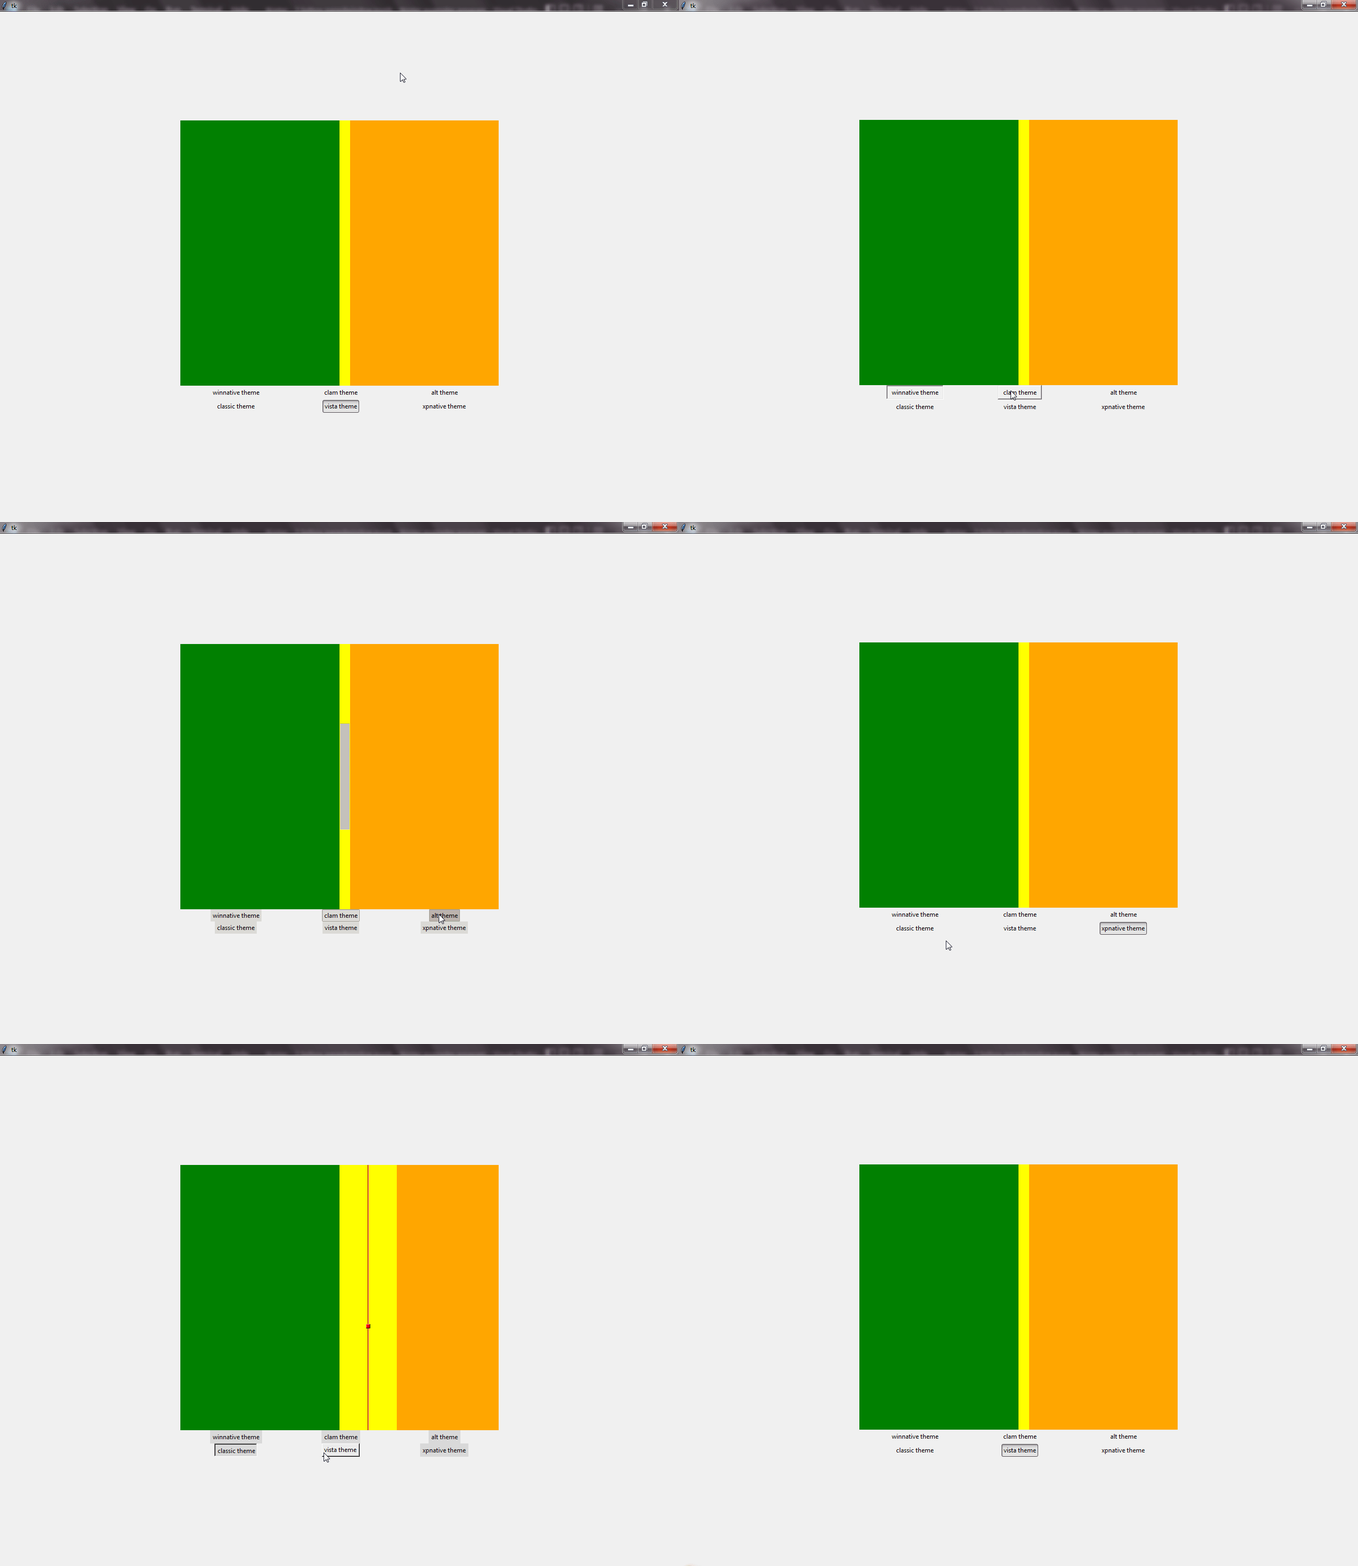
Themes are like different styles or appearances that you can apply to your tkinter application to change its overall look and feel. You can easily switch between different themes to see how they affect the appearance of your paned window.
Example:
from tkinter import *
from tkinter import ttk

root=Tk()
root.grid_anchor(anchor='center')

style=ttk.Style()


def changetheme():
    themeval=themevar.get()
    style.theme_use(themeval)

    style.configure("design.TPanedwindow", background='yellow')
    style.configure("Sash", background='red', handlepad=300, gripcount=100, sashthickness=20, sashpad=50)

    style.configure("design1.TFrame", background='green')
    style.configure("design2.TFrame", background='orange')

themevar=StringVar()
themevar.set("vista")

btn1=ttk.Radiobutton(root,text='winnative theme',value="winnative",command=changetheme,variable=themevar,style='Toolbutton')
btn2=ttk.Radiobutton(root,text='clam theme',value="clam",command=changetheme,variable=themevar,style='Toolbutton')
btn3=ttk.Radiobutton(root,text='alt theme',value="alt",command=changetheme,variable=themevar,style='Toolbutton')
btn4=ttk.Radiobutton(root,text='classic theme',value="classic",command=changetheme,variable=themevar,style='Toolbutton')
btn5=ttk.Radiobutton(root,text='vista theme',value="vista",command=changetheme,variable=themevar,style='Toolbutton')
btn6=ttk.Radiobutton(root,text='xpnative theme',value="xpnative",command=changetheme,variable=themevar,style='Toolbutton')

btn1.grid(row=1,column=0)
btn2.grid(row=1,column=1)
btn3.grid(row=1,column=2)
btn4.grid(row=2,column=0)
btn5.grid(row=2,column=1)
btn6.grid(row=2,column=2)

changetheme()

panewin=ttk.Panedwindow(root, height=500, width=600, orient='horizontal', style='design.TPanedwindow')

frame1=ttk.Frame(panewin, width=300, style="design1.TFrame")
frame2=ttk.Frame(panewin, width=300, style="design2.TFrame")

panewin.add(frame1)
panewin.add(frame2)

panewin.grid(row=0, column=0, columnspan=3)

root.mainloop()
Output:
Some Essential Methods
To make your ttk PanedWindow work smoothly, it’s good to know these key methods:
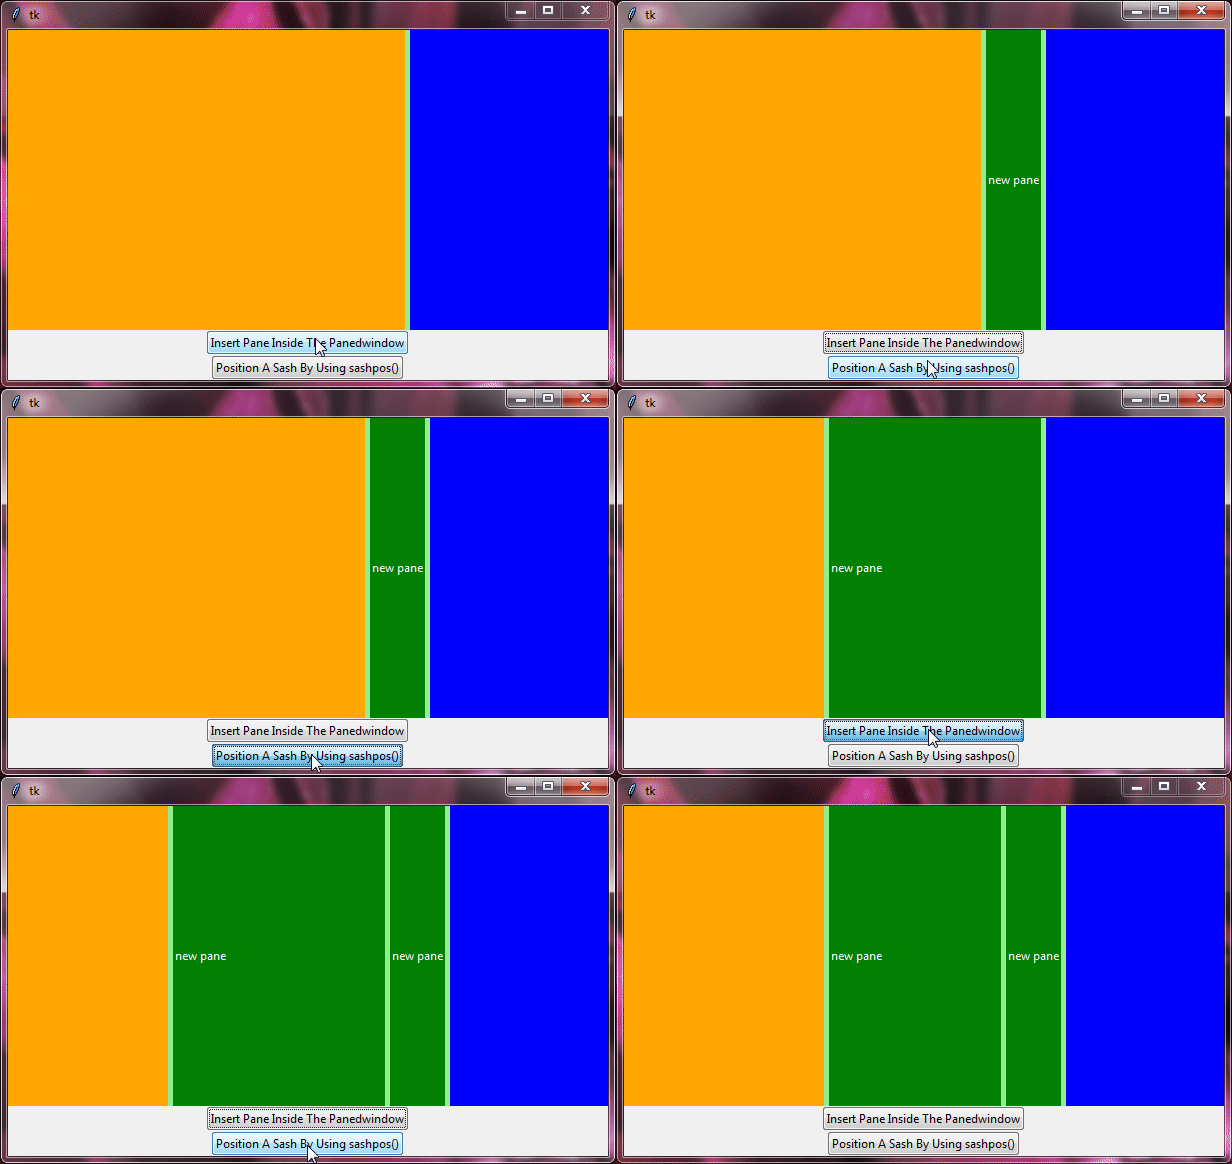
The add() method adds a new section, called a pane, to your PanedWindow. Just tell it which widget you want to add, and you can also decide how much space it should take up. For example: paned_window.add(widget, weight).
Similar to add(), insert() lets you add a new pane at a specific spot in your PanedWindow. You just need to specify the position where you want to add the pane and the widget you want to add. For example: paned_window.insert(0, widget).
The sashpos() method helps you move the divider (called a sash) between panes. You can change its position to adjust the layout of your PanedWindow. For example: paned_window.sashpos(0, new_position).
Example:
from tkinter import *
from tkinter import ttk

root=Tk()
root.grid_anchor(anchor='center')
style=ttk.Style()

style.configure("design1.TPanedwindow",background='lightgreen')

style.configure("design1.TFrame",background='orange')
style.configure("design2.TFrame",background='blue')

panewin1=ttk.Panedwindow(root,height=300,width=600,orient='horizontal',style='design1.TPanedwindow')

frame1=ttk.Frame(panewin1,style="design1.TFrame")
frame2=ttk.Frame(panewin1,style="design2.TFrame")

panewin1.add(frame1,weight=2)
panewin1.add(frame2,weight=1)

panewin1.grid(row=0,column=0)

def insertpane():
    newpane=ttk.Label(panewin1, text="new pane", background="green", foreground='white')
    # insert() method is used to insert a pane at a specific position
    panewin1.insert(frame2,newpane)

insertpanebtn=ttk.Button(root, text="Insert Pane Inside The Panedwindow", command=insertpane)
insertpanebtn.grid()

# sashpos() is used to position a specific sash at a particular position
positionsashbtn=ttk.Button(root, text="Position A Sash By Using sashpos()", command=lambda:panewin1.sashpos(0,200))
positionsashbtn.grid()

root.mainloop()
Output:
In addition to the essential methods we’ve covered, ttk PanedWindow also supports some other handy methods inherited from tkinter PanedWindow:
forget()pane()panes()cget()configure()
If you’re curious to learn more about these methods, you can find detailed explanations in the Tkinter Panedwindow.
Binding Events with ttk PanedWindow
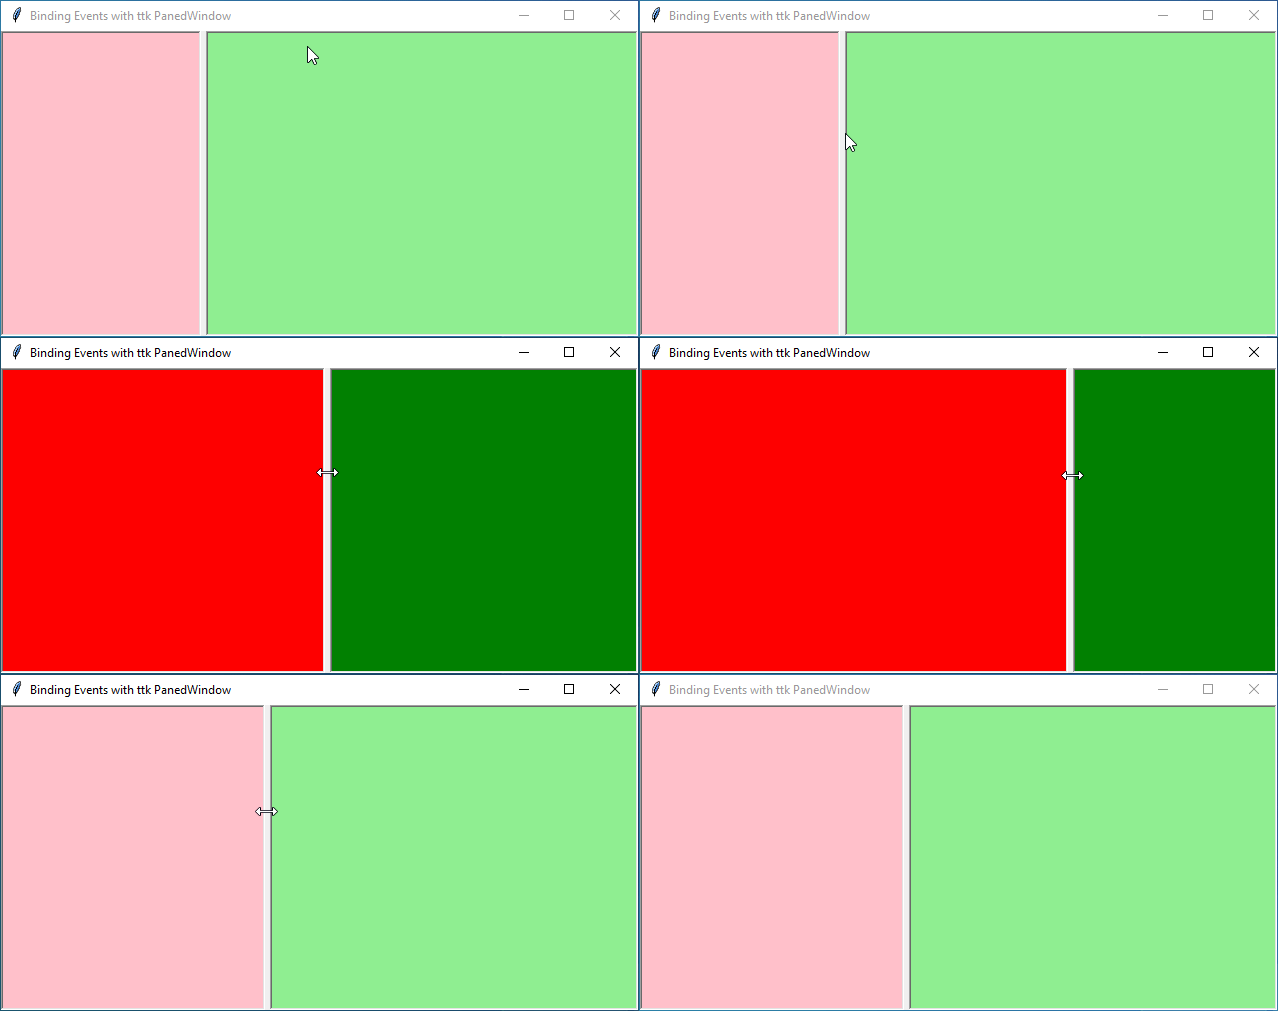
Let’s explore how to add interactivity to a ttk PanedWindow in Tkinter by binding events. In this example, we’ll create a fun feature where the panes change colors while resizing. And when you stop resizing, the colors will go back to their original ones!
Example:
import tkinter as tk
from tkinter import ttk

def handle_resize(event):
    style.configure("custom1.TFrame", background="red")
    style.configure("custom2.TFrame", background="green")

def handle_release(event):
    style.configure("custom1.TFrame", background="pink")
    style.configure("custom2.TFrame", background="lightgreen")

root = tk.Tk()
root.title("Binding Events with ttk PanedWindow")

style = ttk.Style()
style.configure("custom1.TFrame", background="pink")
style.configure("custom2.TFrame", background="lightgreen")

# Create a ttk PanedWindow with horizontal orientation
paned_window = ttk.PanedWindow(root, orient=tk.HORIZONTAL)
paned_window.pack(expand=True, fill=tk.BOTH)

# Create two frames to be added as panes in the PanedWindow
pane1 = ttk.Frame(paned_window, width=200, height=200, relief=tk.SUNKEN, style="custom1.TFrame")
pane2 = ttk.Frame(paned_window, width=200, height=200, relief=tk.SUNKEN, style="custom2.TFrame")

# Add the frames as panes in the PanedWindow
paned_window.add(pane1)
paned_window.add(pane2)

# Bind the <B1-Motion> event to the handle_resize function
paned_window.bind("<B1-Motion>", handle_resize)

# Bind the <ButtonRelease-1> event to the handle_release function
paned_window.bind("<ButtonRelease-1>", handle_release)

root.mainloop()
Output:
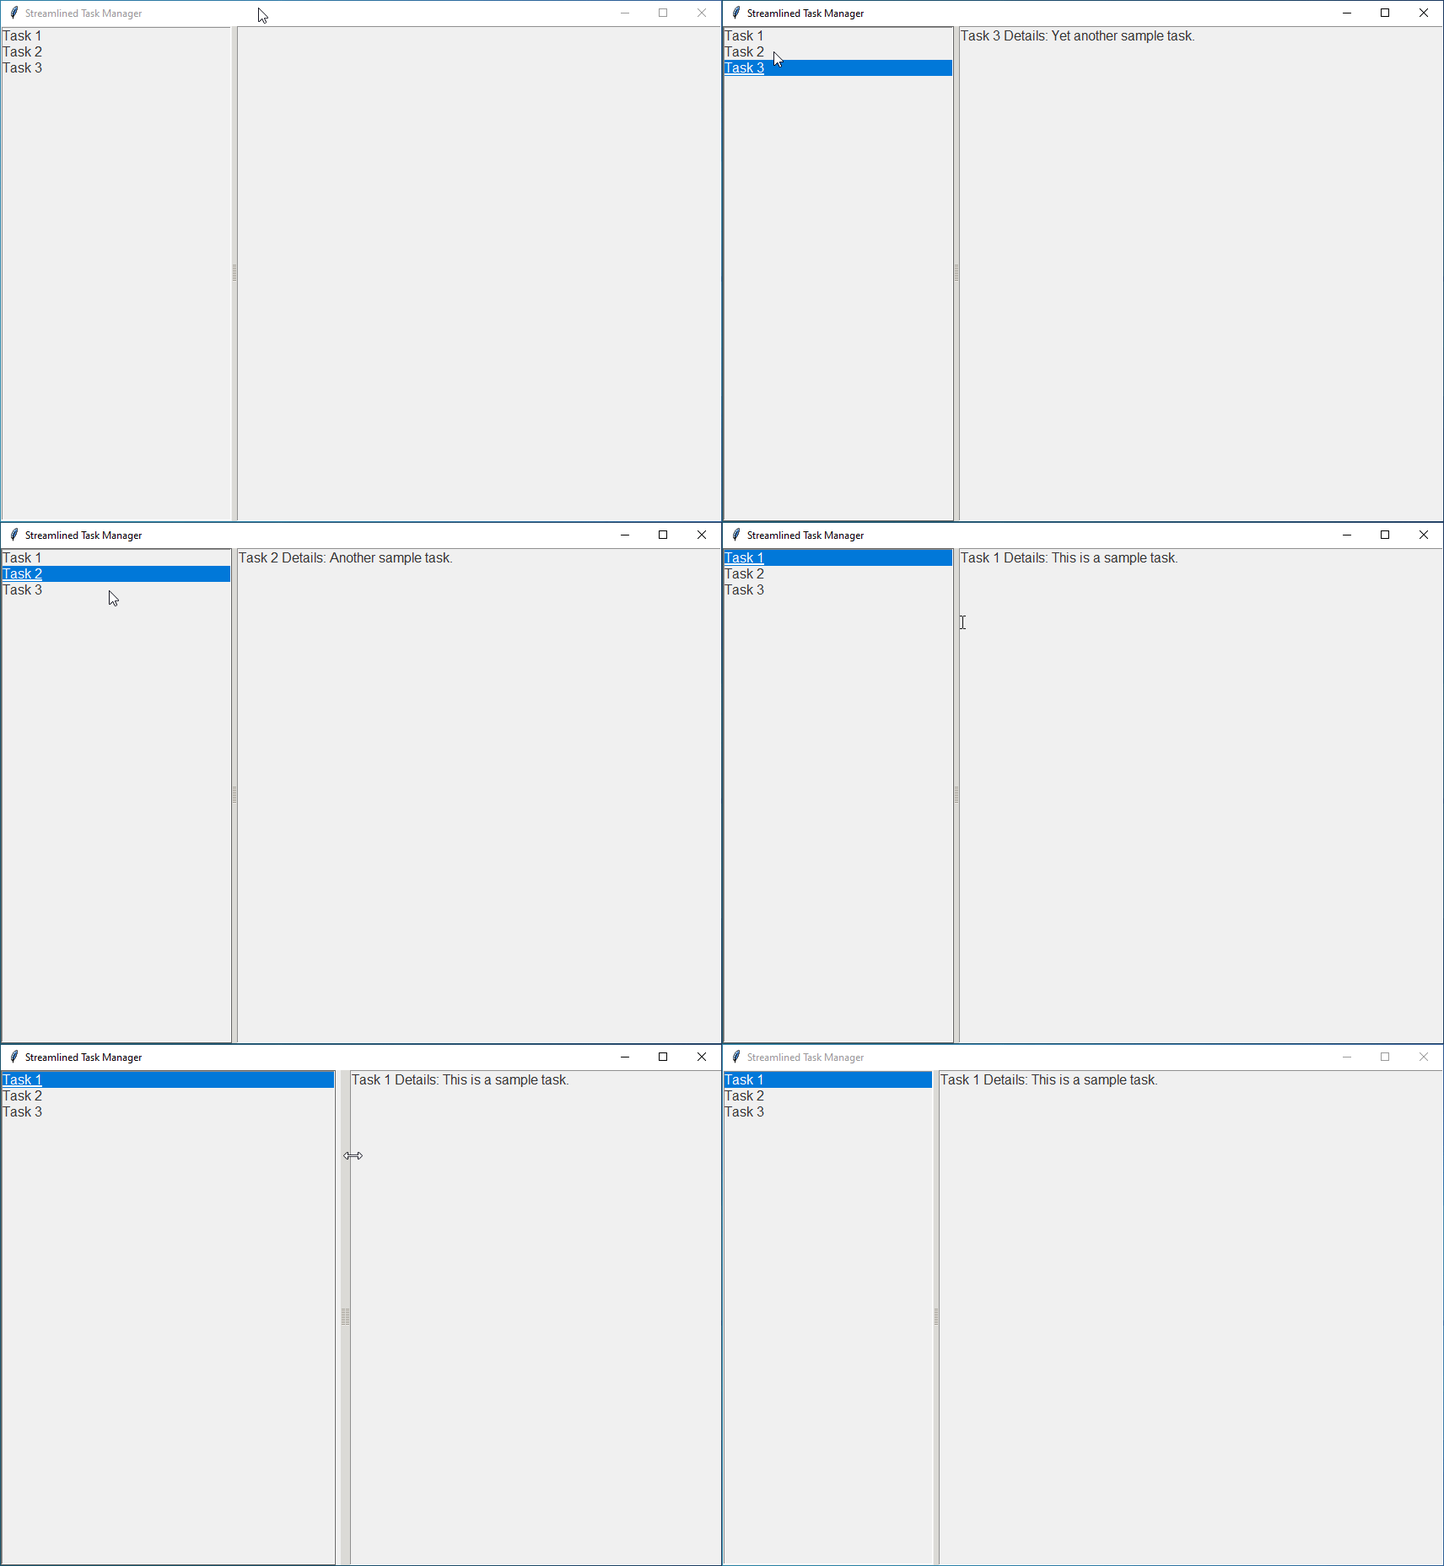
Real World Example : Modern Task Manager with Resizable Panes
Imagine a task manager that helps you keep track of your daily tasks. With Tkinter and ttk PanedWindow, we can make it happen! Our task manager will let you change the size of different sections so you can set it up just how you like it.
Example:
import tkinter as tk
from tkinter import ttk

def select_task(event):
    selected_task = task_listbox.curselection()
    if selected_task:
        task_details_text.delete("1.0", "end")
        task_details_text.insert("end", task_data[selected_task[0]])

# Sample task data
task_data = [
    "Task 1 Details: This is a sample task.",
    "Task 2 Details: Another sample task.",
    "Task 3 Details: Yet another sample task."
]

# Create main window
root = tk.Tk()
root.title("Streamlined Task Manager")

# Configure style
style = ttk.Style()
style.theme_use("clam")
style.configure("TFrame", background="#f0f0f0")
style.configure("TLabel", background="#f0f0f0", foreground="#333", font=("Helvetica", 12))
style.configure("TButton", background="#4CAF50", foreground="white", font=("Helvetica", 12))
style.map("TButton", background=[("active", "#45a049")])

# Create ttk PanedWindow
paned_window = ttk.PanedWindow(root, orient=tk.HORIZONTAL)
paned_window.pack(expand=True, fill=tk.BOTH)

# Task list pane
task_list_pane = ttk.Frame(paned_window)
paned_window.add(task_list_pane)

# Task details pane
task_details_pane = ttk.Frame(paned_window)
paned_window.add(task_details_pane)

# Task list
task_listbox = tk.Listbox(task_list_pane, width=30, height=10, bg="#f0f0f0", fg="#333", font=("Helvetica", 12))
task_listbox.pack(expand=True, fill=tk.BOTH)
for task in range(len(task_data)):
    task_listbox.insert(tk.END, f"Task {task+1}")

# Task details
task_details_text = tk.Text(task_details_pane, width=50, height=10, bg="#f0f0f0", fg="#333", font=("Helvetica", 12))
task_details_text.pack(expand=True, fill=tk.BOTH)

# Bind events
task_listbox.bind("<<ListboxSelect>>", select_task)

root.mainloop()
Explanation:
- We’ve created a stylish and modern task manager GUI using Tkinter and ttk PanedWindow.
- The task manager features two resizable panes: one for the task list and the other for task details.
- You can select a task from the list, and its details will be displayed in the adjacent pane.
- The GUI is styled using the “clam” theme from ttk, with custom colors, fonts, and button styles.
Output:
