ttk Label
The ttk Label widget works just like the regular Tkinter Label widget. It lets you show text or images in your Tkinter apps. But unlike Tkinter Labels, ttk Labels blend seamlessly with your app’s theme, keeping a consistent look across platforms. You can easily customize the appearance of all ttk Labels using the ttk style system.
Creating Your First ttk Label
Here’s a simple example that shows how to create a ttk Label.
Example:
from tkinter import *
from tkinter import ttk

root=Tk()
root.grid_anchor('center')

ttklabel=ttk.Label(root,text="Simple Ttk Label", padding=20)
ttklabel.grid(row=0, column=0)

root.mainloop()
Output:

Ttk Label Options
Now that we have our first ttk label, let’s explore some familiar options you can use with it:
| Option | Description |
|---|---|
text | The text option lets you specify the text displayed on the label. Just set it to the text you want to show. |
compound | With the compound option, you decide how to display both text and image content on the label. Choose from options like “text” for text only, “image” for the image only, or “top”, “bottom”, “left”, or “right” to position the image relative to the text. |
anchor | This option determines where the label’s content is positioned within its allocated space. You can anchor it to the “n”, “s”, “e”, “w”, “center”, “ne”, “nw”, “se”, “sw”. |
style | Using this option, you can apply a specific ttk style to the label, controlling its appearance. |
Below are additional standard options available for the Ttk Label widget:
cursorimagepaddingstatetakefocustextvariableunderlinewidth
For more details on these options, refer to Tkinter Standard Options.
Example :
from tkinter import *
from tkinter import ttk

root=Tk()
root.grid_anchor('center')

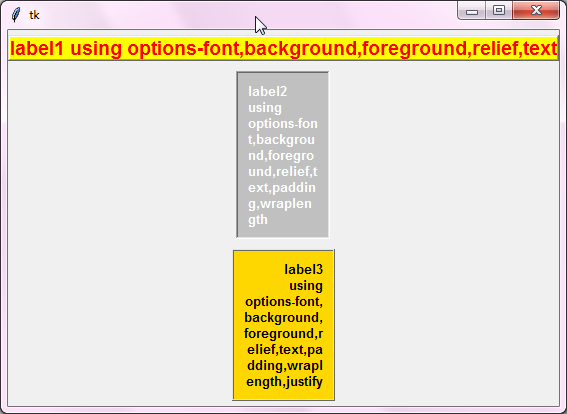
ttklabel1=ttk.Label(root,background='yellow',foreground='red',text="label1 using options-font,background,foreground,relief,text",font='Arial 14 bold',relief='raised')
ttklabel1.grid(row=0, column=0, pady=5)

ttklabel2=ttk.Label(root,background='silver',foreground='white',text="label2 using options-font,background,foreground,relief,text,padding,wraplength",font='Arial 10 bold',relief='sunken',padding=10,wraplength=70)
ttklabel2.grid(row=1, column=0, pady=5)

ttklabel3=ttk.Label(root,background='gold',foreground='black',text="label3 using options-font,background,foreground,relief,text,padding,wraplength,justify",font='Arial 10 bold',relief='ridge',padding=10,justify='right',wraplength=80)
ttklabel3.grid(row=2, column=0, pady=5)

root.mainloop()
Output :
Styling ttk Label Widgets
You can make ttk labels look better in your Tkinter app by using the ttk.Style(). To style all ttk labels uniformly, you need to use the "TLabel" class name. By configuring the style options for "TLabel", you can apply consistent styling across all ttk labels in your application.
Example:
from tkinter import *
from tkinter import ttk

# Create the main window
root = Tk()

# Set the grid anchor to center
root.grid_anchor("center")

# Configure ttk style for labels
style = ttk.Style()
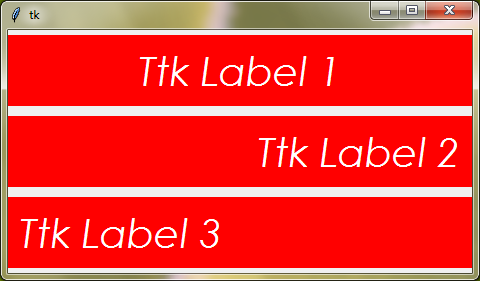
style.configure("TLabel", font=("century gothic", 30, "italic"), foreground="white", background="red")

# Create ttk labels
ttk_label_1 = ttk.Label(root, text="Ttk Label 1", padding=10, width=20, anchor="center")
ttk_label_1.grid(row=0, column=0, pady=5)

ttk_label_2 = ttk.Label(root, text="Ttk Label 2", padding=10, width=20, anchor="e")
ttk_label_2.grid(row=1, column=0, pady=5)

ttk_label_3 = ttk.Label(root, text="Ttk Label 3", padding=10, width=20, anchor="w")
ttk_label_3.grid(row=2, column=0, pady=5)

root.mainloop()
Output:
If you wish to learn more about ttk styles, refer to the ttk and ttk style.
Style Specific ttk Labels
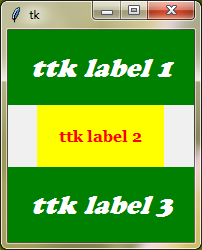
If you want to style only certain ttk labels differently, you can create custom class names. To create a custom class name, add your desired name before the "TLabel" class name. For example, "Custom.TLabel". After configuring the style options for this class name, apply the custom class name to the targeted ttk label.
Example:
from tkinter import *
from tkinter import ttk

# Create the main window
root = Tk()
root.grid_anchor('center')

# Create a ttk style object
style = ttk.Style()

# Configure styles for ttk labels
style.configure('TLabel', background='yellow', foreground='red', font='Georgia 12 bold')
style.configure('custom.TLabel', background='green', foreground='white', font=("Cooper Black", 20, "italic"))

# Create ttk labels with different styles
ttklabel1 = ttk.Label(root, text='ttk label 1', padding=20, style='custom.TLabel', anchor='e')
ttklabel1.grid(row=0, column=0)

ttklabel2 = ttk.Label(root, text='ttk label 2', padding=20, anchor='center')
ttklabel2.grid(row=1, column=0)

ttklabel3 = ttk.Label(root, text='ttk label 3', padding=20, style='custom.TLabel', anchor='w')
ttklabel3.grid(row=2, column=0)

root.mainloop()
Output:
Style Configuration Options
Use these options to customize the appearance of ttk labels in your Tkinter application.
padding | Specifies the amount of padding around the label’s text or image. |
justify | Defines how the text is aligned within the label. Options: “left”, “right”, “center”. |
relief | Determines the appearance of the label’s border. Options: “flat”, “raised”, “sunken”, “solid”, “ridge”, “groove”. |
background | Sets the background color of the label. |
foreground | Sets the text color of the label. |
Here are some more standard options you can use to style ttk label.
anchorfontwraplengthwidth
Example:
from tkinter import *
from tkinter import ttk

# Create the main window
root = Tk()
root.grid_anchor('center')

# Create a ttk style object and configure label style
style = ttk.Style()
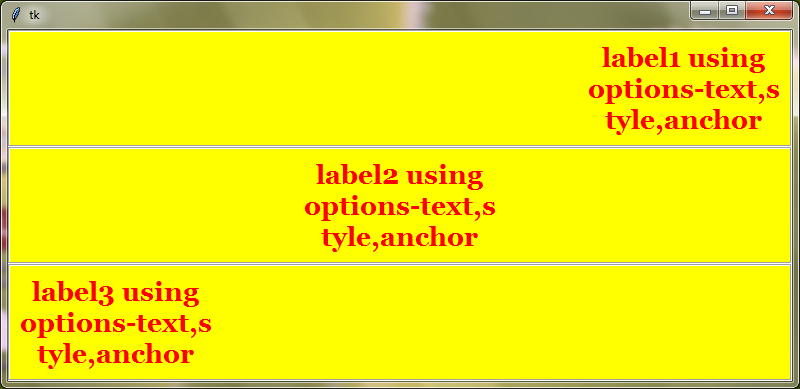
style.configure('samedesign.TLabel', background='yellow', foreground='red', wraplength=200, padding=10, font='Georgia 20 bold', justify='center', relief='groove', width=40)

# Create ttk labels with specified options
ttklabel1 = ttk.Label(root, text='label1 using options-text,style,anchor', style='samedesign.TLabel', anchor='e')
ttklabel1.grid(row=0, column=0)

ttklabel2 = ttk.Label(root, text='label2 using options-text,style,anchor', style='samedesign.TLabel', anchor='center')
ttklabel2.grid(row=1, column=0)

ttklabel3 = ttk.Label(root, text='label3 using options-text,style,anchor', style='samedesign.TLabel', anchor='w')
ttklabel3.grid(row=2, column=0)

root.mainloop()
Output:
Displaying Images with Ttk Labels
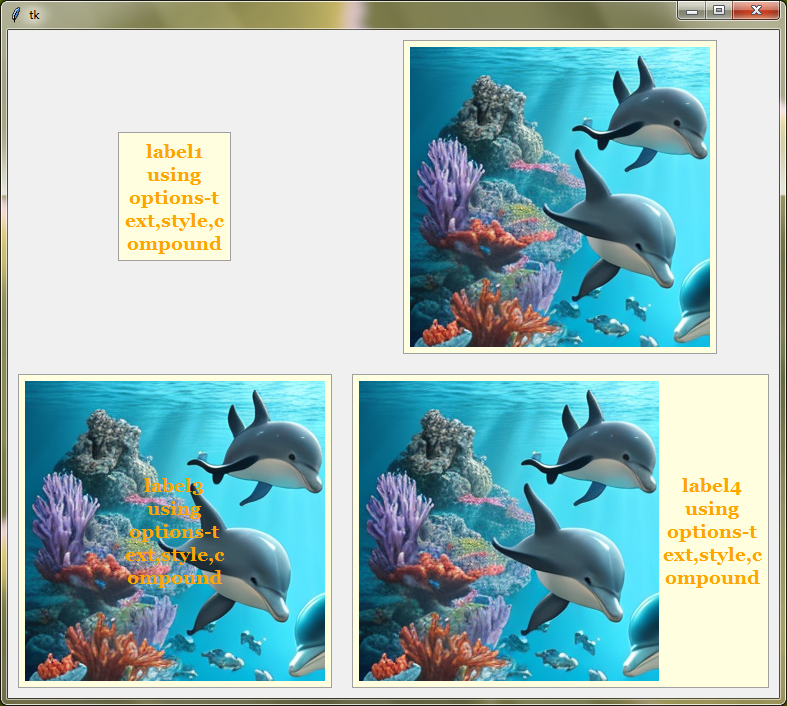
You can easily display images using ttk Labels. To do this, first load the image files that you want to display using the PhotoImage() class and then set the image option of the ttk Label to the loaded image. Optionally, use the compound option to specify how to display both text and image content on the label.
Example:
from tkinter import *
from tkinter import ttk

root=Tk()
root.grid_anchor('center')

style=ttk.Style()

image=PhotoImage(file='fishes.png', width=300, height=300)

style.configure('labelwithimg.TLabel', background='lightyellow', foreground='orange', wraplength=100, padding=5, font='Georgia 14 bold', justify='center', relief='solid', image=image)

ttklabel1=ttk.Label(root, text='label1 using options-text,style,compound', style='labelwithimg.TLabel', compound='text')
ttklabel1.grid(row=0, column=0, padx=10, pady=10)

ttklabel2=ttk.Label(root, text='label2 using options-text,style,compound', style='labelwithimg.TLabel', compound='image')
ttklabel2.grid(row=0, column=1, padx=10, pady=10)

ttklabel3=ttk.Label(root, text='label3 using options-text,style,compound', style='labelwithimg.TLabel', compound='center')
ttklabel3.grid(row=1, column=0, padx=10, pady=10)

ttklabel4=ttk.Label(root, text='label4 using options-text,style,compound', style='labelwithimg.TLabel', compound='left')
ttklabel4.grid(row=1, column=1, padx=10, pady=10)

root.mainloop()
Output:
Binding Events with Ttk Labels
With the help of the bind() method, you can bind events to your ttk labels to make them respond to user actions.
Example:
from tkinter import *
from tkinter import ttk

root=Tk()

def on_label_click(event):
    label.config(text="Wow, you clicked me!")

label = ttk.Label(root, text="Click me!", font="arial 30 bold", padding=10, background="yellow")
label.bind("<Button-1>", on_label_click)
label.pack()

root.mainloop()
Output:

