ttk Button
Hey Python Learner,
In this tutorial, we’ll check out ttk buttons, which are like the fancier version of regular Tkinter buttons. They have cool features and options that can make your buttons look better and work smoother in your apps.
What’s different about ttk buttons compared to Tkinter buttons?
Well, ttk buttons look more modern and stylish. They match the look of your computer’s operating system, so they blend in nicely with how everything else on your screen looks.
Creating Your First ttk Button Program
Let’s dive right in and create our first ttk button program! First, you need to import the ttk module from Tkinter. Then, you can create a ttk button using the ttk.Button() class.
Example:
from tkinter import *
from tkinter import ttk

root=Tk()
root.grid_anchor("center")

i=0
def function1():
    global i
    i=i+1
    btn1.configure(text=f"Button Clicked {i}")

btn1=ttk.Button(root,text='Button 1',padding=10,width=20,command=function1)
btn1.grid(row=0,column=0)

root.mainloop()
Output :

Exploring ttk Button Options
Let’s start by understanding two important options for the ttk button: text and command.
With the text option, you can decide what words or messages show up on the ttk button. You get to pick whatever text you want for your button.
And the command option lets you pick a function that runs when someone clicks the ttk button.
Here are some more standard options you can use with ttk buttons:
compoundcompound"text"and"image"cursorimagestatestyletakefocustextvariableunderlinewidth
For further information about the options mentioned above, refer to Tkinter Standard Options and ttk and ttk Style.
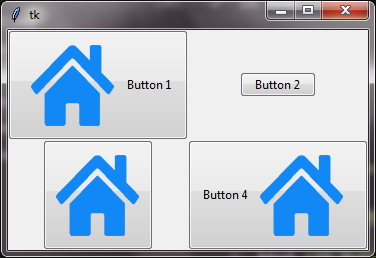
Enhancing ttk Buttons with Images
You can make ttk buttons even cooler by adding images to them. Tkinter gives you a way to do this using the tk.PhotoImage class. Once you load your images with this class, you can simply assign them to your ttk button using the image option.
Example:
from tkinter import *
from tkinter import ttk
root=Tk()
root.grid_anchor("center")

img=PhotoImage(file="HOME.png")

btn1=ttk.Button(root, text='Button 1', image=img, compound='left')
btn1.grid(row=0,column=0)

btn2=ttk.Button(root, text='Button 2', image=img, compound='text')
btn2.grid(row=0,column=1)

btn3=ttk.Button(root, text='Button 3', image=img, compound='image')
btn3.grid(row=1,column=0)

btn4=ttk.Button(root, text='Button 4', image=img, compound='right')
btn4.grid(row=1,column=1)

root.mainloop()
Output :
Binding Events with ttk Button
Want to do more with your ttk buttons than just clicking? How about reacting to other actions, like when you hover your mouse over them? You can do this using the bind() function. Let’s set up an event so that when you hover your mouse over the ttk button, it prints a message.
Example:
from tkinter import *
from tkinter import ttk

root=Tk()

def on_hover(event):
    label = Label(root, text="Mouse is hovering!", fg="green", font="georgia 20 bold")
    label.pack()

button = ttk.Button(root, text="Hover Over Me!", width=30, padding=30)
button.pack(padx=10, pady=10)

button.bind("<Enter>", on_hover)

root.mainloop()
Output:

Styling ttk Buttons
So you have learned to create a basic ttk button, now we’ll learn how to make ttk buttons look just the way we want using the 'TButton' class name in Tkinter.
The 'TButton' class name is a key element in styling ttk buttons. By applying styles to this class name, you can modify various aspects of the button’s appearance, such as its color, size, font, and more.
Example:
from tkinter import *
from tkinter import ttk

root=Tk()
root.grid_anchor("center")

style = ttk.Style()

style.theme_use("clam")
style.configure("TButton", font=("algerian", 20, "bold"), foreground="blue", background="yellow")

btn1 = ttk.Button(root,text='Button 1', padding=10, width=20)
btn1.grid(row=0, column=0, pady=5)

btn2 = ttk.Button(root,text='Button 2', padding=10, width=20)
btn2.grid(row=1, column=0, pady=5)

btn3 = ttk.Button(root,text='Button 3', padding=10, width=20)
btn3.grid(row=2, column=0, pady=5)

root.mainloop()
Output:

Creating Custom Styles
We can also create a custom style for our ttk buttons using a unique class name, like "Fancy.TButton".
Now you ask, why do we need to create it?
If we change the default style directly, it affects all ttk buttons. Using "Fancy.TButton" lets us customize only specific buttons without messing up the rest.
To use our custom style, we add style parameter when making the ttk button. We set it to 'Fancy.TButton', which is the name of our custom style. This way, Tkinter knows to use the special look we created just for this button.
Example:
from tkinter import *
from tkinter import ttk

root=Tk()
root.grid_anchor("center")

style = ttk.Style()

style.theme_use("clam")
style.configure("Fancy.TButton", font=("Cooper Black", 30), foreground="white", background="green")

btn1 = ttk.Button(root, text='Button 1', padding=10, width=20, style="Fancy.TButton")
btn1.grid(row=0, column=0, pady=5)

btn2 = ttk.Button(root, text='Button 2', padding=10, width=20)
btn2.grid(row=1, column=0, pady=5)

btn3 = ttk.Button(root, text='Button 3', padding=10, width=20, style="Fancy.TButton")
btn3.grid(row=2, column=0, pady=5)

root.mainloop()
Output:

Style Configuration Options for TButton
foreground | Choose the text color on the button. |
background | Set the color behind the button. |
bordercolor | Select the border color around the button. |
lightcolor | With the “clam” theme, this adds a subtle highlight to the button’s border. |
darkcolor | Also with the “clam” theme, this adds a soft shadow effect to the button’s border. |
width | Adjust the button’s width. |
image | Add an image to the button. |
Additional Standard Options available for TButton.
anchorfontrelief
For further information about the options mentioned above, refer to Tkinter Standard Options.
Example:
from tkinter import *
from tkinter import ttk

root=Tk()
root.grid_anchor("center")

img=PhotoImage(file="HOME.png")

style=ttk.Style()
style.theme_use("clam")

# ttk Button style for Button 1
style.configure('buttondesign1.TButton', font="georgia 20 bold",width=20,bordercolor="lightgreen")
style.map('buttondesign1.TButton',background=[('active','red'),('!disabled',"yellow")],foreground=[('active','white'),('!disabled',"red")])

# ttk Button style for Button 2
style.configure('buttondesign2.TButton',darkcolor="red",lightcolor='blue', width=20, font="arial 18 bold",anchor='center',image=img, padding=20)

btn1=ttk.Button(root,text='Button 1', padding=20, style='buttondesign1.TButton')
btn1.grid(row=0,column=0)

btn2=ttk.Button(root,text='Button 2', style='buttondesign2.TButton', compound="right")
btn2.grid(row=1,column=0)

root.mainloop()
Output :

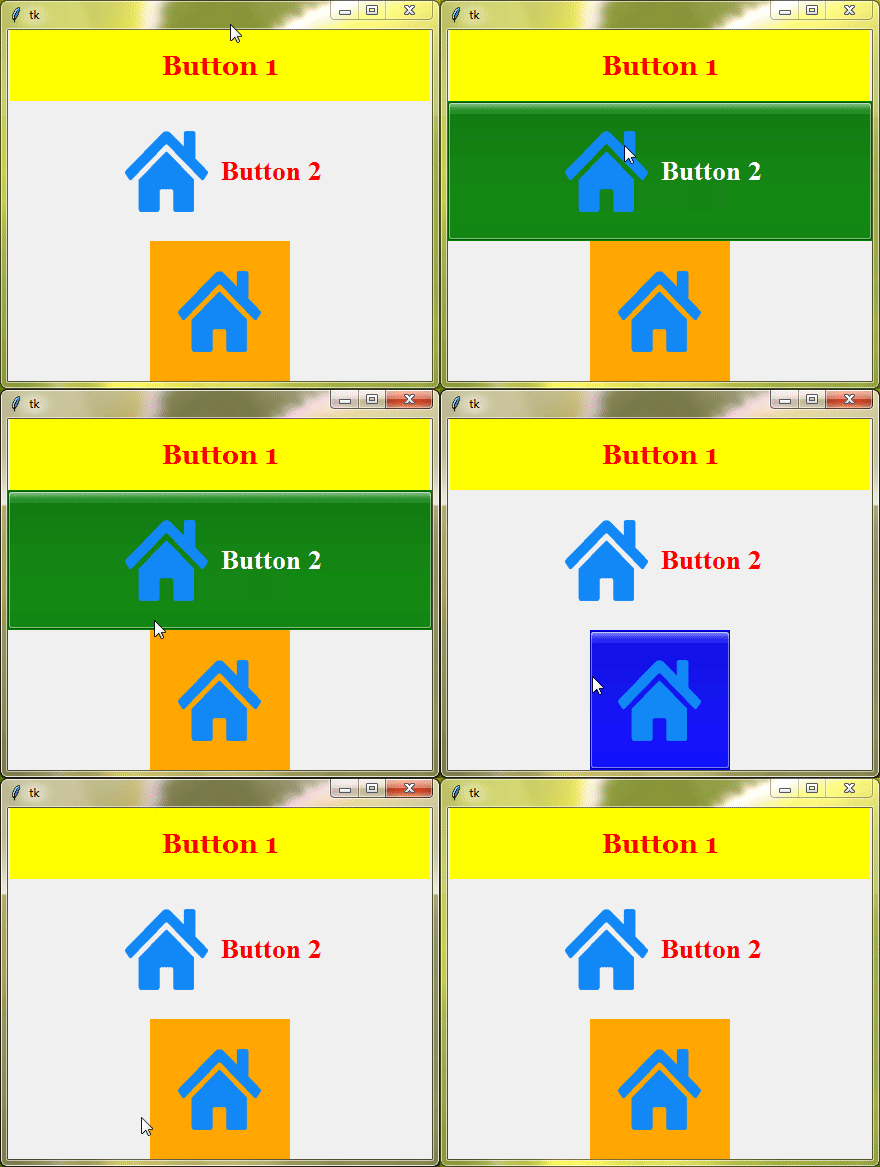
Sleek Toolbars: Creating ttk Buttons with Toolbutton Style
Let’s talk about making special ttk buttons that are perfect for toolbars. These buttons are compact and look cool. We will use something called the 'Toolbutton' style instead of 'TButton' to create them.
Example :
from tkinter import *
from tkinter import ttk

root = Tk()
root.grid_anchor("center")

# Load image
img = PhotoImage(file="HOME.png")

# Create a style object
style = ttk.Style()

# Define style for Button 1
style.configure('ButtonDesign1.Toolbutton', font="Georgia 20 bold", width=20, anchor="center")
style.map('ButtonDesign1.Toolbutton', background=[('active', 'red'), ('!disabled', "yellow")],
          foreground=[('active', 'white'), ('!disabled', "red")])

# Define style for Button 2
style.configure('ButtonDesign2.Toolbutton', width=20, font="Times 20 bold", anchor='center', image=img, padding=20)
style.map('ButtonDesign2.Toolbutton', background=[('active', 'green')],
          foreground=[('active', 'white'), ('!disabled', "red")])

# Define style for Button 3
style.configure('ButtonDesign3.Toolbutton', image=img, padding=20)
style.map('ButtonDesign3.Toolbutton', background=[('active', 'blue'), ('!disabled', "orange")])

# Create and place buttons
btn1 = ttk.Button(root, text='Button 1', padding=20, style='ButtonDesign1.Toolbutton')
btn1.grid(row=0, column=0)

btn2 = ttk.Button(root, text='Button 2', padding=20, style='ButtonDesign2.Toolbutton', compound="left")
btn2.grid(row=1, column=0)

btn3 = ttk.Button(root, text='Button 3', padding=20, style='ButtonDesign3.Toolbutton')
btn3.grid(row=2, column=0)

root.mainloop()
Output :
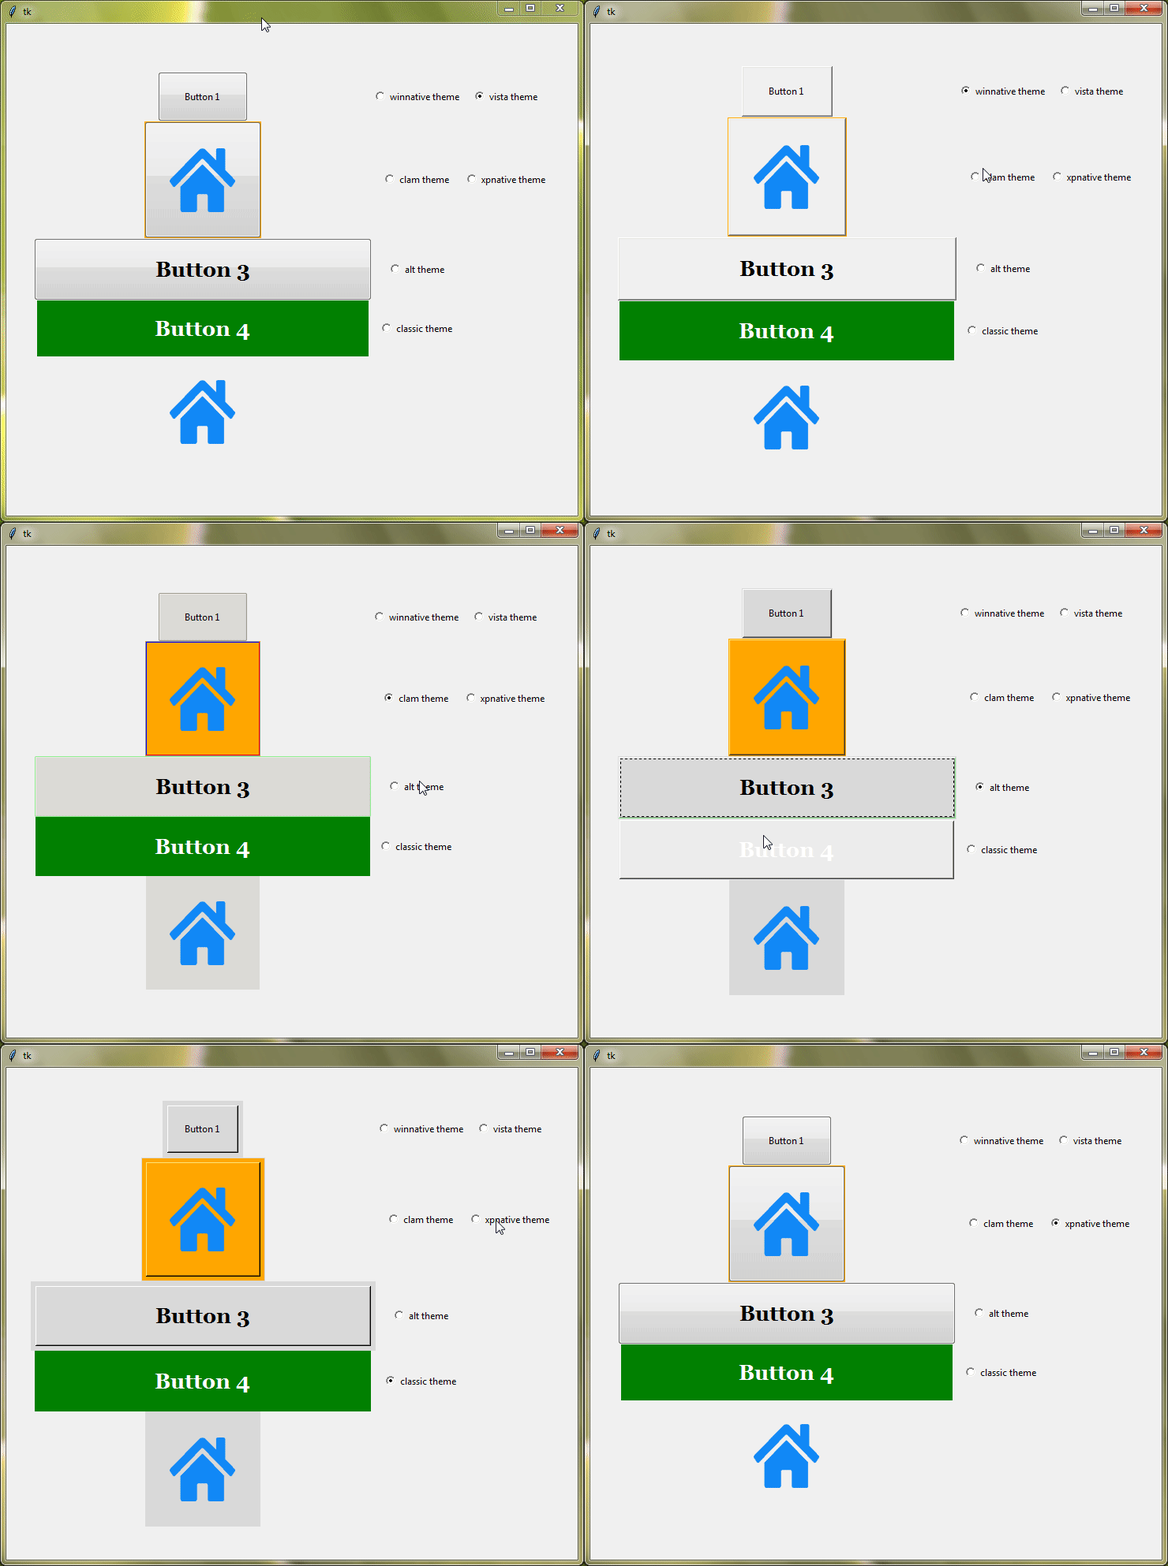
Implementing ttk Buttons with Different Style Themes
Whether you go for a fresh, classic, or modern style like "clam", "default", "classic", or "vista", each one gives your app a different look and feel.
Example :
from tkinter import *
from tkinter import ttk

root=Tk()
root.grid_anchor("center")

img=PhotoImage(file="HOME.png")
style=ttk.Style()

def changetheme():
    themeval=themevar.get()
    style.theme_use(themeval)

    # Style For Button 1 And Button 2
    style.configure('buttondesign1.TButton', background="orange" , darkcolor="red", lightcolor='blue', width=20, font="georgia 20 bold", anchor='center', image=img, padding=20)
    style.configure('buttondesign2.TButton', font="georgia 20 bold", width=20, bordercolor="lightgreen", padding=20)

    # Toolbutton Designs For Button 3 And Button 4
    style.configure('buttondesign1.Toolbutton', font="georgia 20 bold", width=20, anchor="center", background="green", foreground="white")
    style.configure('buttondesign2.Toolbutton', image=img, padding=20)

themevar=StringVar()
themevar.set("vista")

radio_btn1=Radiobutton(root,text='winnative theme',value="winnative",command=changetheme,variable=themevar)
radio_btn2=Radiobutton(root,text='clam theme',value="clam",command=changetheme,variable=themevar)
radio_btn3=Radiobutton(root,text='alt theme',value="alt",command=changetheme,variable=themevar)
radio_btn4=Radiobutton(root,text='classic theme',value="classic",command=changetheme,variable=themevar)
radio_btn5=Radiobutton(root,text='vista theme',value="vista",command=changetheme,variable=themevar)
radio_btn6=Radiobutton(root,text='xpnative theme',value="xpnative",command=changetheme,variable=themevar)

radio_btn1.grid(row=0,column=1)
radio_btn2.grid(row=1,column=1)
radio_btn3.grid(row=2,column=1)
radio_btn4.grid(row=3,column=1)
radio_btn5.grid(row=0,column=2)
radio_btn6.grid(row=1,column=2)

changetheme()

# -----------------------------------------------------

btn1=ttk.Button(root,text='Button 1', padding=20)
btn1.grid(row=0,column=0)

btn2=ttk.Button(root,text='Button 2', padding=20, style='buttondesign1.TButton')
btn2.grid(row=1,column=0)

btn3=ttk.Button(root,text='Button 3', style='buttondesign2.TButton', compound="right")
btn3.grid(row=2,column=0)

btn4=ttk.Button(root,text='Button 4', padding=20, style='buttondesign1.Toolbutton')
btn4.grid(row=3,column=0)

btn5=ttk.Button(root,text='Button 5', padding=20, style='buttondesign2.Toolbutton')
btn5.grid(row=4,column=0)

root.mainloop()
Output :
Conclusion
Great job! You’ve become a pro at using ttk buttons in Tkinter. You’ve covered the basics, tried out different styles, and even made buttons for toolbars. With ttk buttons, you can create apps that look awesome and are easy for users to navigate.
