Tkinter Radiobuttons
Tkinter Radiobuttons are handy little widgets that let users choose only one option from a set of options.
Imagine you’re making a quiz app or a settings menu for your program. You want users to pick one option from a list, like choosing their favorite color or selecting a difficulty level. That’s where Radiobuttons come in handy.
These Tkinter Radiobuttons have a classic appearance. If you’re aiming for a more modern look, consider checking out the Ttk Radiobuttons.
In this tutorial, we’ll cover everything about using Radiobuttons in Tkinter. We’ll start with the basics: how to create and customize Radiobuttons for your app. Then, we’ll explore adding images to Radiobuttons and using them in toolbars. Lastly, we’ll learn how to bind events with Radiobuttons.
Creating Your First Tkinter Radiobutton
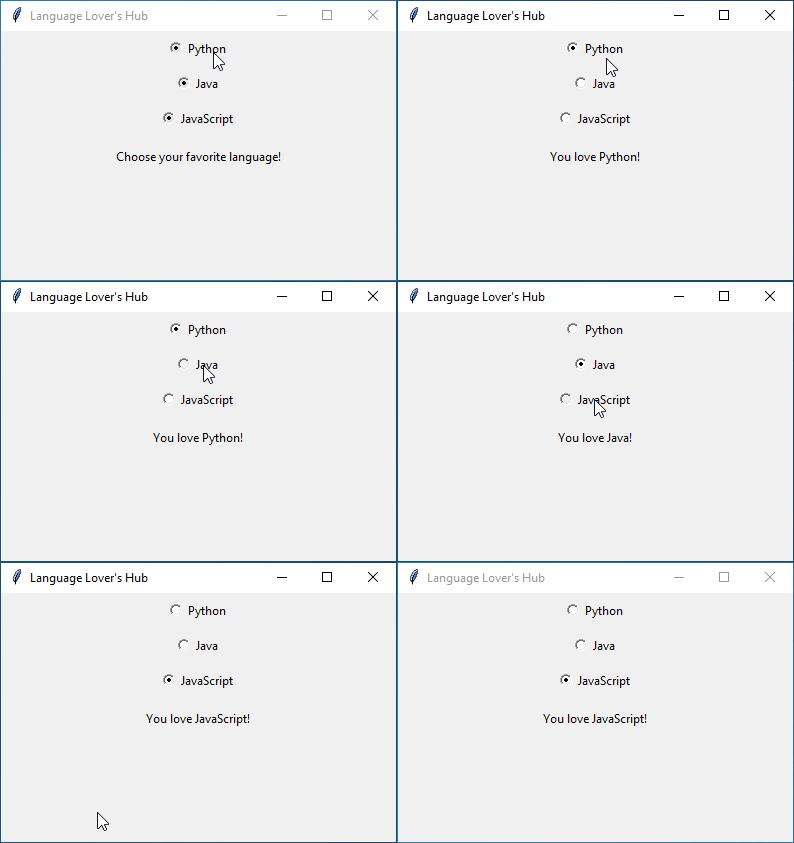
Let’s get started on creating your very first Tkinter Radiobutton.
Example:
import tkinter as tk

# Create the main window
root = tk.Tk()
root.title("Language Lover's Hub")
root.geometry("300x200")  # Set your preferred window size

# Variable to store the selected language
selected_language = tk.StringVar()

# Function to display the selected language
def display_language():
    selected_label.config(text=f"You love {selected_language.get()}!")

# Radiobuttons for language choices
python_button = tk.Radiobutton(root, text="Python", variable=selected_language, value="Python", command=display_language)
python_button.pack(pady=5)

java_button = tk.Radiobutton(root, text="Java", variable=selected_language, value="Java", command=display_language)
java_button.pack(pady=5)

javascript_button = tk.Radiobutton(root, text="JavaScript", variable=selected_language, value="JavaScript", command=display_language)
javascript_button.pack(pady=5)

# Label to display the selected language
selected_label = tk.Label(root, text="Choose your favorite language!")
selected_label.pack(pady=10)

# Run the GUI
root.mainloop()
Output:
Tkinter Radiobutton Options
Let’s start by understanding the main options you can use to customize Tkinter Radiobuttons.
height and width : You can adjust the height and width of your Radiobutton to make it bigger or smaller. This helps you fit them nicely into your app’s layout.
command : With the command option, you can decide what happens when someone clicks on a Radiobutton. You can make it trigger an action, like showing a message or updating a value.
value : Each Radiobutton can have a unique value assigned to it. When someone picks a Radiobutton, the value connected to it gets returned.
variable : For Radiobuttons, the variable option allows you to associate a single Tkinter variable with multiple Radiobuttons in a group. This setup ensures that only one Radiobutton can be selected at a time within the group.
The variable keeps track of which Radiobutton is selected. So, whenever a user chooses a Radiobutton, the linked variable updates automatically and stores the value of the selected Radiobutton.
Some other standard options available for the Radiobutton widget :
activebackgroundactiveforegroundanchorbackgroundbitmapborderwidthcompoundcursordisabledforegroundfontforegroundhighlightbackgroundhighlightcolorhighlightthicknessimagejustifypadxpadyrelieftakefocustexttextvariableunderlinewraplength
If you’re curious to learn more about the options mentioned above, take a look at the Tkinter Standard Options.
Sleek Radiobutton Styling
Let’s explore how to give your Radiobuttons a modern and sleek appearance by getting rid of the standard circle indicators. Sometimes, simplicity can make a design look more elegant.
Here are some easy ways to achieve a polished look:
The “No Circle” Look
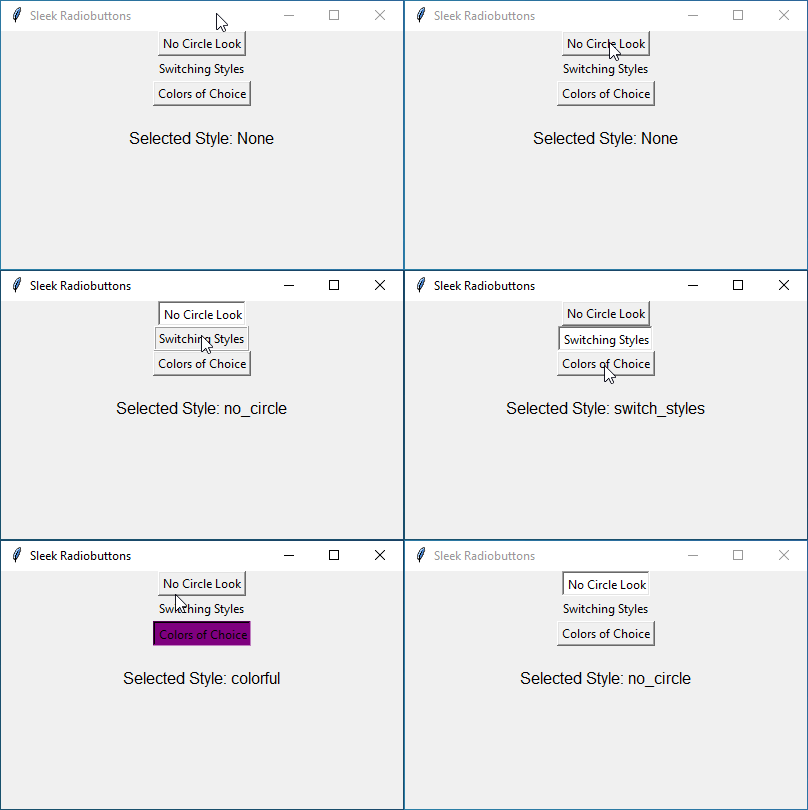
You can make your Radiobuttons flat by setting the indicatoron option to 0. This removes the circle indicator, giving your Radiobutton a clean and sophisticated look.
Code:
# The "No Circle" Look
sleek_button = Radiobutton(root, text="No Circle Look", variable=style_var, value="no_circle", indicatoron=0, command=show_selected_style)
sleek_button.pack()
Changing Styles with Offrelief and Overrelief
If you want your Radiobutton to stand out when the mouse hovers over it, you can adjust the settings for offrelief and overrelief.
For example, setting offrelief to "flat" keeps it sleek when not selected, while overrelief set to "ridge" gives it a different raised appearance when the mouse is over it.
Code:
# Switching Styles with Offrelief and Overrelief
stylish_button = Radiobutton(root, text="Switching Styles", variable=style_var, value="switch_styles", indicatoron=0, offrelief="flat", overrelief="ridge", command=show_selected_style)
stylish_button.pack()
Colors of Choice
To add some color to your Radiobuttons when selected, use the selectcolor option. For example, setting selectcolor to "purple" will give your Radiobutton a purple hue when chosen, adding a fun element to your sleek design.
Code:
# Colors of Choice
colorful_button = Radiobutton(root, text="Colors of Choice", variable=style_var, value="colorful", indicatoron=0, selectcolor="purple", command=show_selected_style)
colorful_button.pack()
Complete Code:
from tkinter import *

# Create the main window
root = Tk()
root.title("Sleek Radiobuttons")

# Variable to store the selected style
style_var = StringVar()

# Function to display the selected style
def show_selected_style():
    selected_style = style_var.get()
    style_label.config(text=f"Selected Style: {selected_style}")

# The "No Circle" Look
sleek_button = Radiobutton(root, text="No Circle Look", variable=style_var, value="no_circle", indicatoron=0, command=show_selected_style)
sleek_button.pack()

# Switching Styles with Offrelief and Overrelief
stylish_button = Radiobutton(root, text="Switching Styles", variable=style_var, value="switch_styles", indicatoron=0, offrelief="flat", overrelief="ridge", command=show_selected_style)
stylish_button.pack()

# Colors of Choice
colorful_button = Radiobutton(root, text="Colors of Choice", variable=style_var, value="colorful", indicatoron=0, selectcolor="purple", command=show_selected_style)
colorful_button.pack()

# Label to display the selected style
style_label = Label(root, text="Selected Style: None", font=('Arial', 12))
style_label.pack(pady=20)

# Run the GUI
root.mainloop()
Output:
Radiobuttons with Images and Style
Tkinter Radiobuttons don’t have to be limited to text – you can make them visually engaging by incorporating images.
Here’s how you can do it:
First, gather a collection of images that correspond to the choices you want to offer with your Radiobuttons. Whether they’re icons, symbols, or illustrations, choose images that best represent each option.
Then, use the image and selectimage options to assign images to your Radiobuttons. The image option sets the picture for when the Radiobutton is unselected, while the selectimage option determines the image that appears when the Radiobutton is selected.
Example:
Imagine you’re making a quiz app where users pick emojis for different questions. Each Radiobutton could feature a different emoji to represent the choice. By using images with the image and selectimage options, you can make your Radiobuttons more fun and visually appealing.
from tkinter import *

# Create the main window
root = Tk()
root.title("Expressive Radiobuttons")
root.geometry("400x300")  # Set your preferred window size

# Emoji images for Radiobuttons
happy_image = PhotoImage(file="happy.png")  # Replace "happy.png" with your image file
excited_image = PhotoImage(file="excited.png")  # Replace "excited.png" with your image file
cool_image = PhotoImage(file="cool.png")  # Replace "cool.png" with your image file

# Variable to store the selected emoji
selected_emoji = StringVar()

# Function to display the selected emoji
def display_selected_emoji():
    selected_label.config(text=f"Selected Emoji: {selected_emoji.get()}")

# Radiobuttons with images
happy_button = Radiobutton(root, image=happy_image, variable=selected_emoji, value="happy", command=display_selected_emoji)
excited_button = Radiobutton(root, image=excited_image, variable=selected_emoji, value="excited", command=display_selected_emoji)
cool_button = Radiobutton(root, image=cool_image, selectimage=excited_image, variable=selected_emoji, value="cool", command=display_selected_emoji)

# Display labels
selected_label = Label(root, text="Selected Emoji: None")
selected_label.pack(pady=10)

# Pack Radiobuttons
happy_button.pack(pady=5)
excited_button.pack(pady=5)
cool_button.pack(pady=5)

# Run the GUI
root.mainloop()
Output:
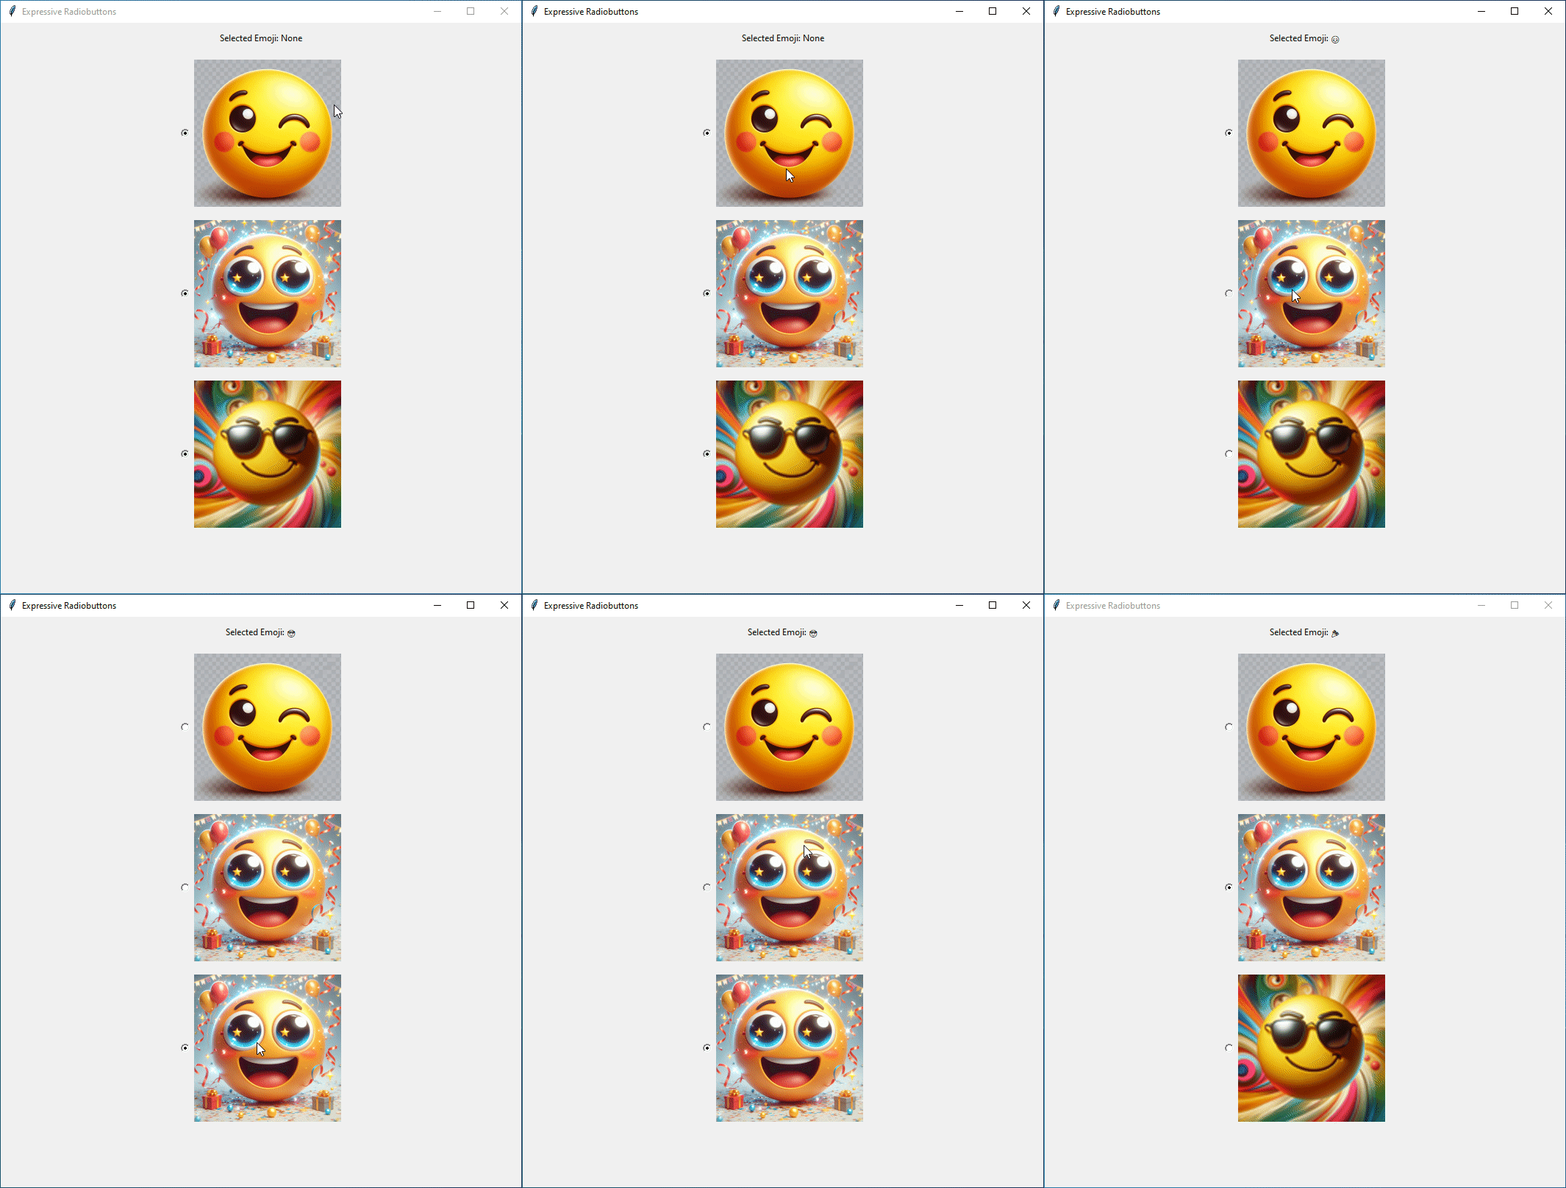
Now, you can convey ideas, emotions, and concepts through visuals. If you’re building a weather app, imagine Radiobuttons adorned with sun, cloud, and raindrop images.
Tkinter Radiobuttons for Toolbars
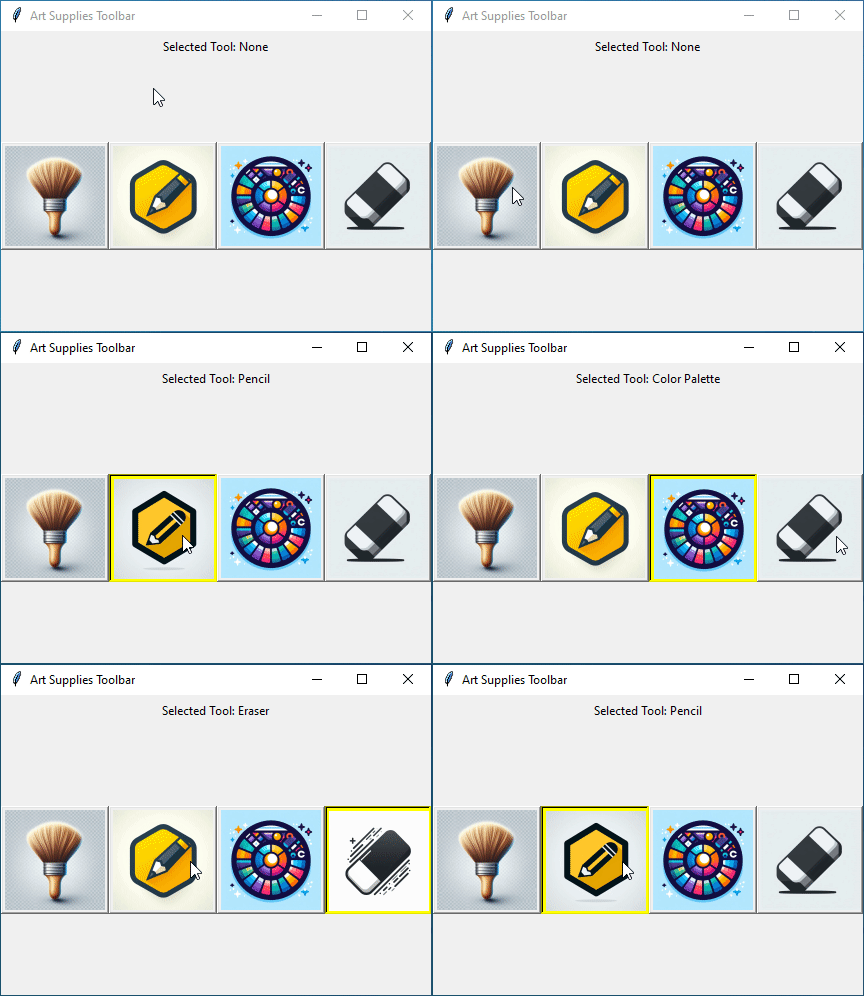
Now that we know how to use Tkinter Radiobuttons, let’s put that knowledge to work and create some Radiobuttons for a toolbar.
Example:
Imagine we’re making a digital art program. We want to build a toolbar where users can pick different art tools easily. Each Radiobutton on the toolbar will stand for a different tool, making it simple for users to switch between them.
To make the toolbar more understandable, we’ll use images along with the Radiobuttons. This way, users can see what each tool looks like, making it even easier to choose the right one.
from tkinter import *

# Create the main window
root = Tk()
root.title("Art Supplies Toolbar")
root.geometry("430x300")  # Set your preferred window size

# Variable to store the selected art supply
selected_supply = StringVar()

# Function to display the selected art supply
def display_selected_supply():
    selected_label.config(text=f"Selected Tool: {selected_supply.get()}")

# Radiobuttons tailored for the toolbar
brush_button = Radiobutton(root, variable=selected_supply, value="Paint Brush", command=display_selected_supply, indicatoron=0, selectcolor="yellow")
pencil_button = Radiobutton(root, variable=selected_supply, value="Pencil", command=display_selected_supply, indicatoron=0, selectcolor="yellow")
palette_button = Radiobutton(root, variable=selected_supply, value="Color Palette", command=display_selected_supply, indicatoron=0, selectcolor="yellow")
eraser_button = Radiobutton(root, variable=selected_supply, value="Eraser", command=display_selected_supply, indicatoron=0, selectcolor="yellow")


# Images for Radiobuttons
brush_image = PhotoImage(file="brush-1.png")  # Replace "brush-1.png" with your image file
brush_image_2 = PhotoImage(file="brush-2.png")  # Replace "brush-2.png" with your image file

pencil_image = PhotoImage(file="pencil-1.png")  # Replace "pencil-1.png" with your image file
pencil_image_2 = PhotoImage(file="pencil-2.png")  # Replace "pencil-1.png" with your image file

palette_image = PhotoImage(file="colorpalette.png")  # Replace "palette.png" with your image file

eraser_image = PhotoImage(file="eraser-1.png")  # Replace "eraser-1.png" with your image file
eraser_image_2 = PhotoImage(file="eraser-2.png")  # Replace "eraser-2.png" with your image file


# Setting images for Radiobuttons
brush_button.config(image=brush_image, compound=LEFT, selectimage=brush_image_2)
pencil_button.config(image=pencil_image, compound=LEFT, selectimage=pencil_image_2)
palette_button.config(image=palette_image, compound=LEFT)
eraser_button.config(image=eraser_image, compound=LEFT, selectimage=eraser_image_2)

# Display labels
selected_label = Label(root, text="Selected Tool: None")
selected_label.pack(pady=5)

# Pack Radiobuttons
brush_button.pack(side=LEFT)
pencil_button.pack(side=LEFT)
palette_button.pack(side=LEFT)
eraser_button.pack(side=LEFT)

# Run the GUI
root.mainloop()
Output:
Tkinter Radiobutton Methods
Radiobuttons in Tkinter come with some useful methods that allow you to control their behavior dynamically.
select() and deselect()
The select() method allows you to programmatically select a Radiobutton. This means you can mark a specific Radiobutton as selected without any user interaction.
On the flip side, the deselect() method lets you programmatically deselect a Radiobutton. This is useful when you want to clear the selection from a Radiobutton that was previously chosen.
Example:
from tkinter import *

# Create the main window
root = Tk()
root.title("Radiobutton Magic")

# Variable to track the chosen option
choice_var = StringVar()

# Radiobuttons for Options
radiobutton1 = Radiobutton(root, text="Option 1", variable=choice_var, value="Option 1")
radiobutton1.pack()

radiobutton2 = Radiobutton(root, text="Option 2", variable=choice_var, value="Option 2")
radiobutton2.pack()

radiobutton2.select()

# Button to select Option 1
select_button = Button(root, text="Select Option 1", command=lambda: radiobutton1.select())
select_button.pack(pady=10)

# Button to deselect Option 2
deselect_button = Button(root, text="DeSelect Option 2", command=lambda: radiobutton2.deselect())
deselect_button.pack(pady=10)

root.mainloop()
Output:

flash()
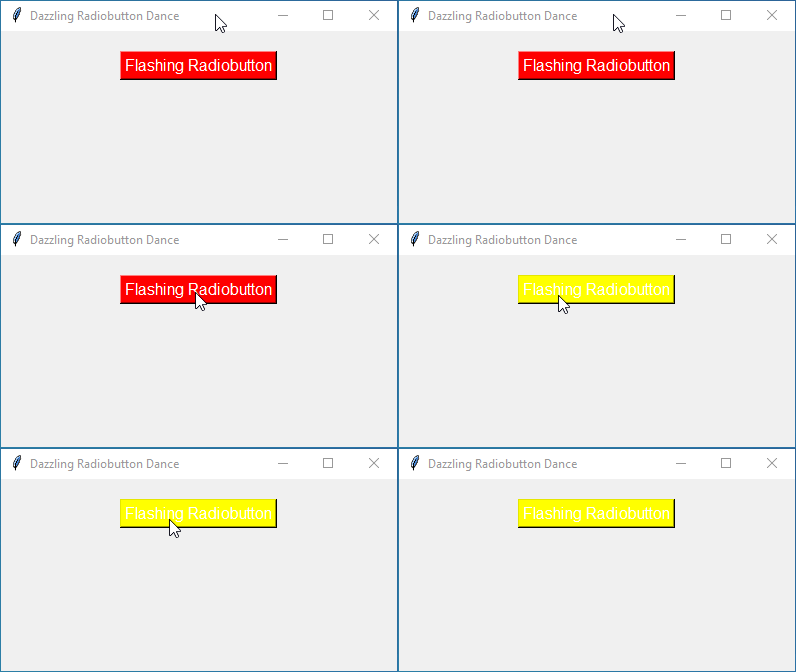
When you call the flash() method on a Radiobutton, it quickly changes its appearance to draw attention to it, and then reverts to its original state.
Example:
from tkinter import *

# Create the main window
root = Tk()
root.title("Dazzling Radiobutton Dance")
root.geometry("400x200")  # Set your preferred window size

# Variable to keep track of the selected style
style_var = StringVar()

# Function to flash and change color
def flash():
    current_color = flash_button.cget("bg")
    new_color = "yellow" if current_color == "red" else "red"
    flash_button.config(bg=new_color)
    root.after(500, flash)  # Flash every 500 milliseconds

# Create a Radiobutton with flashing colors
flash_button = Radiobutton(root, text="Flashing Radiobutton", variable=style_var, value="flash", indicatoron=0, bg="red", fg="white", font=("Arial", 12))
flash_button.pack(pady=20)

# Bind the flash function to the Radiobutton
flash_button.bind("<Enter>", lambda event: flash())

# Run the GUI
root.mainloop()
Output:
invoke()
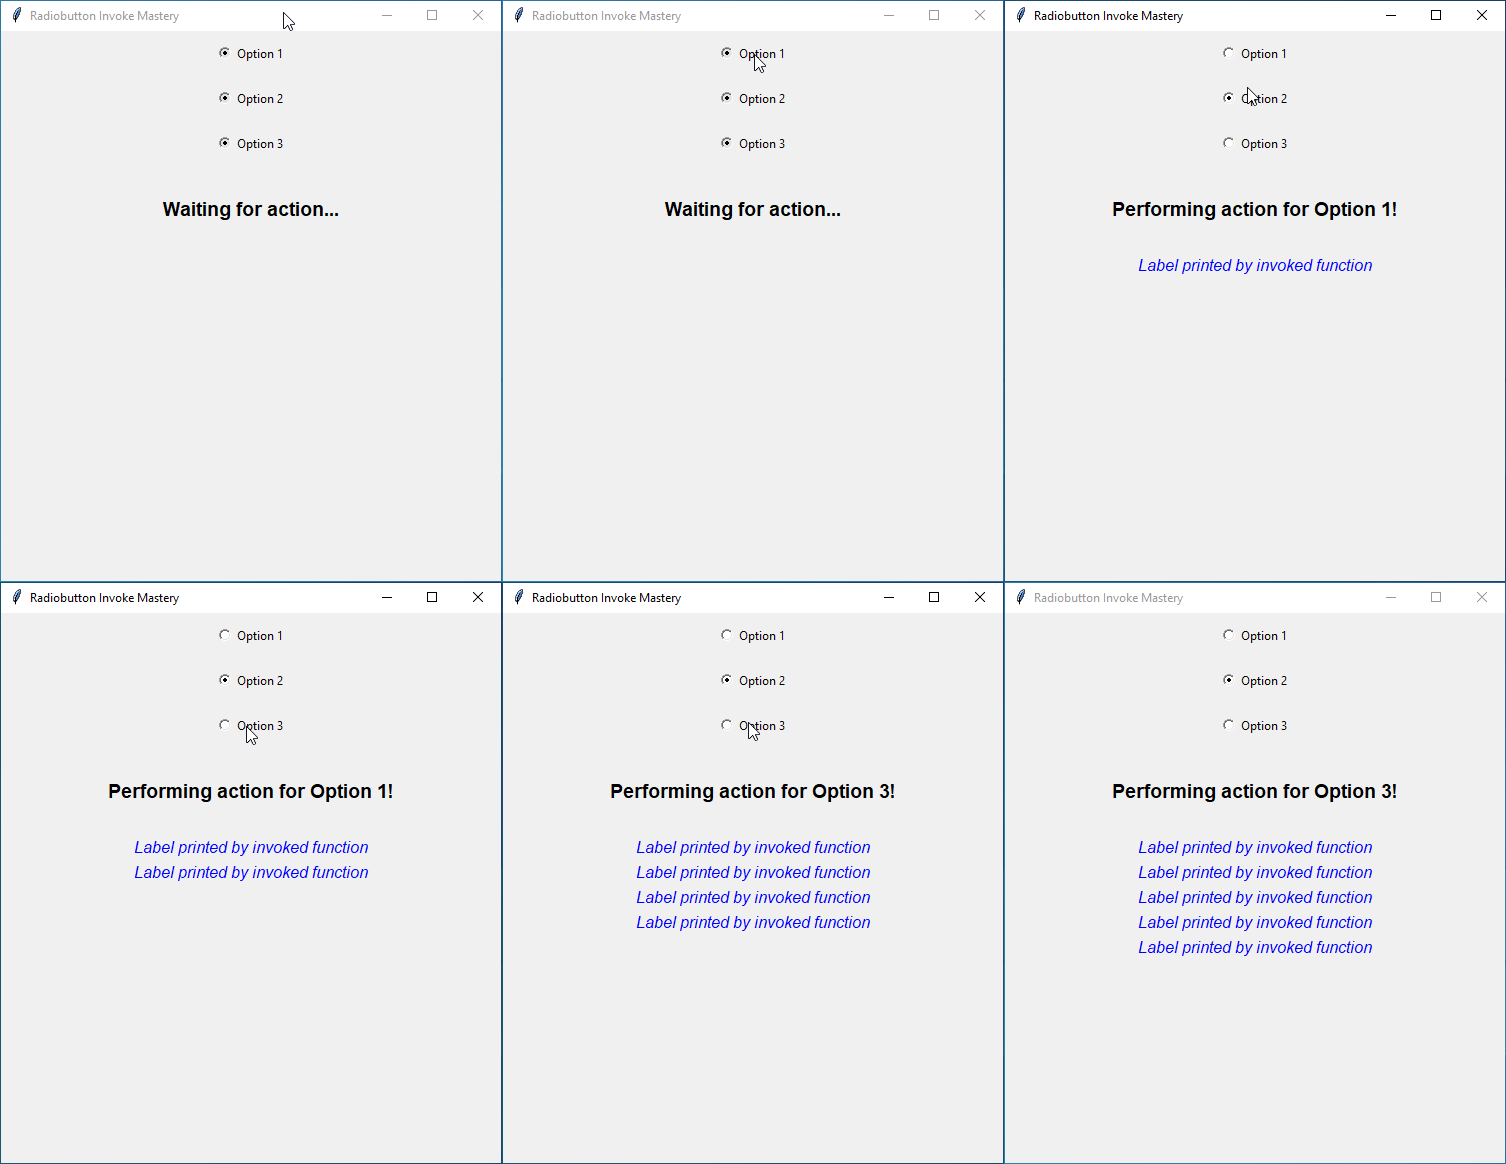
Lastly, the invoke() method simulates a user’s click on the Radiobutton. This means you can trigger the associated command or action as if the Radiobutton were clicked by the user.
Example:
from tkinter import *

# Create the main window
root = Tk()
root.title("Radiobutton Invoke Mastery")
root.geometry("500x550")  # Set your preferred window size

# Variable to keep track of the selected option
selected_option = StringVar()

# Function to perform an action
def perform_action():
    selected_value = selected_option.get()
    action_label.config(text=f"Performing action for {selected_value}!")
    option2.invoke()  # Invoke the function associated with Option 2

def invoked_function():
    new_label = Label(root, text="Label printed by invoked function", fg="blue", font=("Arial", 12, "italic"))
    new_label.pack()

# Radiobuttons with different options
option1 = Radiobutton(root, text="Option 1", variable=selected_option, value="Option 1", command=perform_action)
option2 = Radiobutton(root, text="Option 2", variable=selected_option, value="Option 2", command=invoked_function)
option3 = Radiobutton(root, text="Option 3", variable=selected_option, value="Option 3", command=perform_action)

# Label to display the action performed
action_label = Label(root, text="Waiting for action...", font=("Arial", 14, "bold"), pady=10)

# Arrange widgets in the layout
option1.pack(pady=10)
option2.pack(pady=10)
option3.pack(pady=10)
action_label.pack(pady=20)

# Run the GUI
root.mainloop()
Output:
Binding Events with Tkinter Radiobuttons
You can make Radiobuttons more interactive by using event binding. This means you can set up actions or functions that happen when certain events occur.
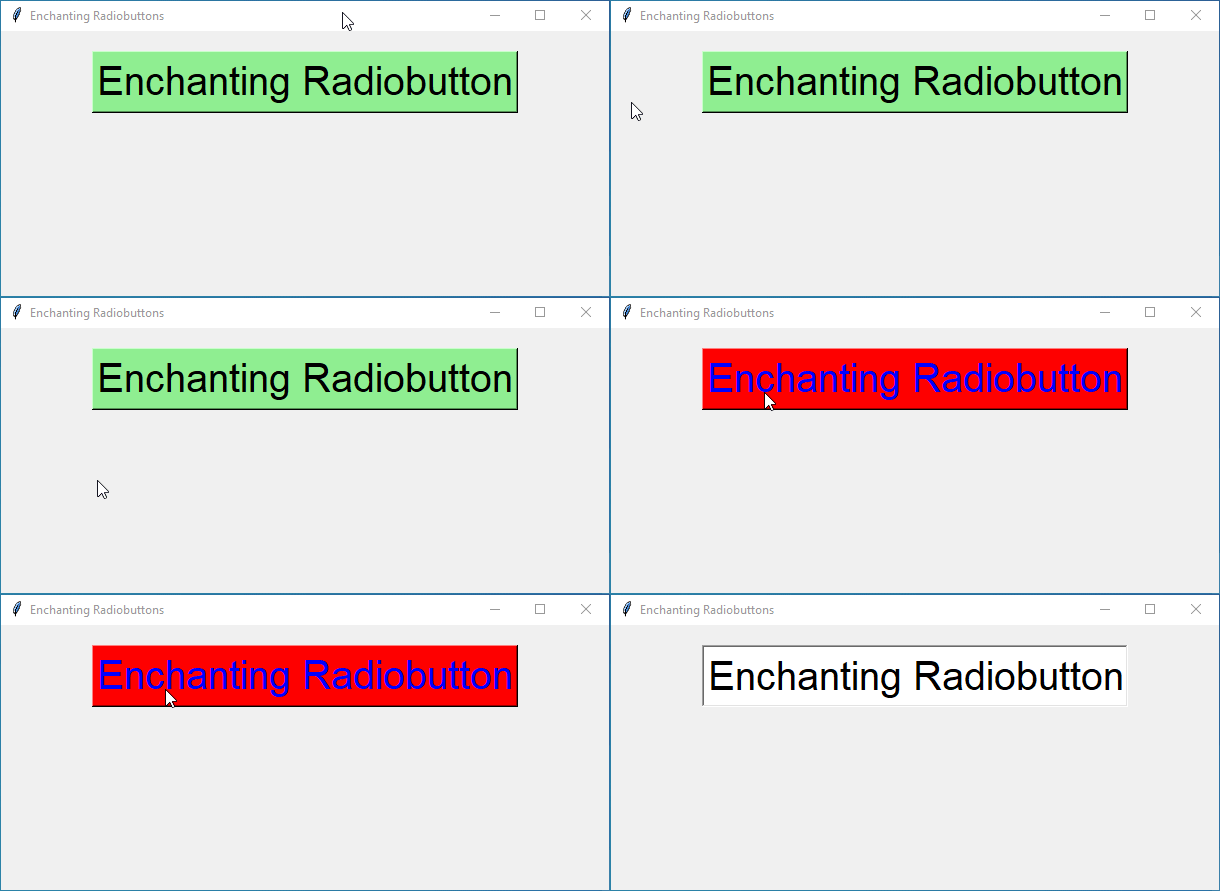
For example, by binding the "<Enter>" event to your Radiobuttons, you can trigger a color change when the mouse cursor enters the area of the Radiobutton.
Example:
from tkinter import *

# Create the main window
root = Tk()
root.title("Enchanting Radiobuttons")
root.geometry("400x200")  # Set your preferred window size

# Variable to keep track of the selected style
style_var = StringVar()

# Function to change color on enter and leave
def color_change(event):
    if event.type == "7":  # Event code for mouse enter
        enchant_button.config(bg="red", fg="blue")
    elif event.type == "8":  # Event code for mouse leave
        enchant_button.config(bg="lightgreen", fg="black")

# Create a Radiobutton with enchanting color changes
enchant_button = Radiobutton(root, text="Enchanting Radiobutton", variable=style_var, value="enchant", indicatoron=0, bg="lightgreen", fg="black", font=("Arial", 30))
enchant_button.pack(pady=20)

# Bind the color_change function to mouse enter and leave events
enchant_button.bind("<Enter>", color_change)
enchant_button.bind("<Leave>", color_change)

# Run the GUI
root.mainloop()
Output:
