Tkinter PanedWindow
Tkinter PanedWindow is a useful tool for creating sections in your window that can be resized by the user. These sections are called panes, each of which can hold other widgets like buttons, labels, or frames. And we can resize these panes by dragging the divider between them.
Imagine you’re designing an application with multiple sections, like a chat window with a list of contacts on one side and the conversation pane on the other. With Tkinter PanedWindow, you can easily create these resizable sections, allowing users to adjust the size according to their preferences. This not only enhances the user experience but also makes your application more versatile and user-friendly.
In this tutorial, we’ll explore the basics of using Tkinter PanedWindow to create dynamic and resizable layouts in your Python applications. We’ll cover how to set up and configure PanedWindow widgets, manage their resizing behavior.
Creating Your First PanedWindow
Let’s get started by creating your very first Tkinter PanedWindow.
Example:
from tkinter import *

# Create the main window
root = Tk()
root.title("My First PanedWindow")
root.geometry("400x300")

# Create the PanedWindow
paned_window = PanedWindow(root, orient=HORIZONTAL)
paned_window.pack(expand=True, fill='both')

# Add panes to the PanedWindow
pane1 = Label(paned_window, text="Pane 1", bg="lightblue")
pane2 = Label(paned_window, text="Pane 2", bg="lightgreen")

paned_window.add(pane1)
paned_window.add(pane2)

# Start the tkinter event loop
root.mainloop()
Output:

Main Options for PanedWindow
When you’re working with Tkinter PanedWindow, there are a few important options to know about:
orient
This option decides how the panes inside the PanedWindow will be arranged. You can choose "horizontal" if you want them side by side, or "vertical" if you prefer them stacked on top of each other.
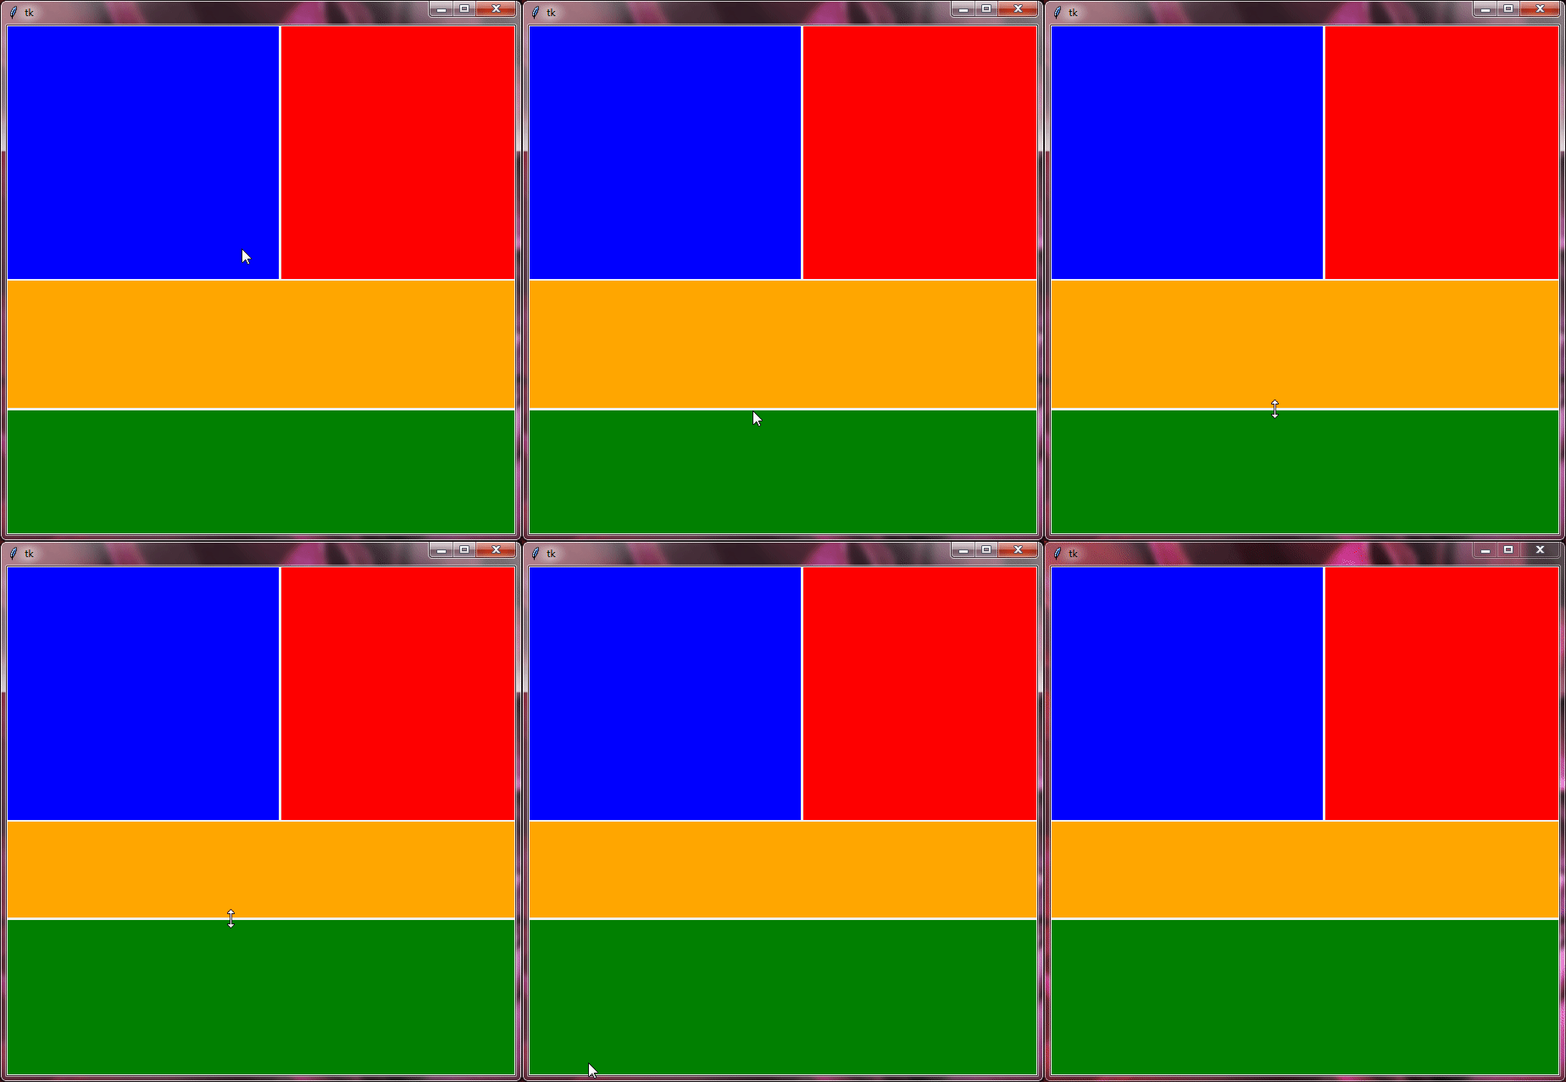
height and width
These options let you set how big the PanedWindow will be when it first appears on the screen. You can specify the initial height or width to make sure it fits nicely into your layout.
Example:
from tkinter import *

root=Tk()
root.grid_anchor(anchor='center')

# horizontal paned window
panedwin1=PanedWindow(root, height=300, width=600, orient='horizontal')
panedwin1.grid()

frame1=Frame(panedwin1, width=300, background='blue')
frame2=Frame(panedwin1, width=300, background='red')

panedwin1.add(frame1)
panedwin1.add(frame2)

# vertical paned window
panedwin2=PanedWindow(root, height=300, width=600, orient='vertical')
panedwin2.grid()

frame3=Frame(panedwin2, height=150, background='orange')
frame4=Frame(panedwin2, height=150, background='green')

panedwin2.add(frame3)
panedwin2.add(frame4)

root.mainloop()
Output:
Customizing Your PanedWindow Sash
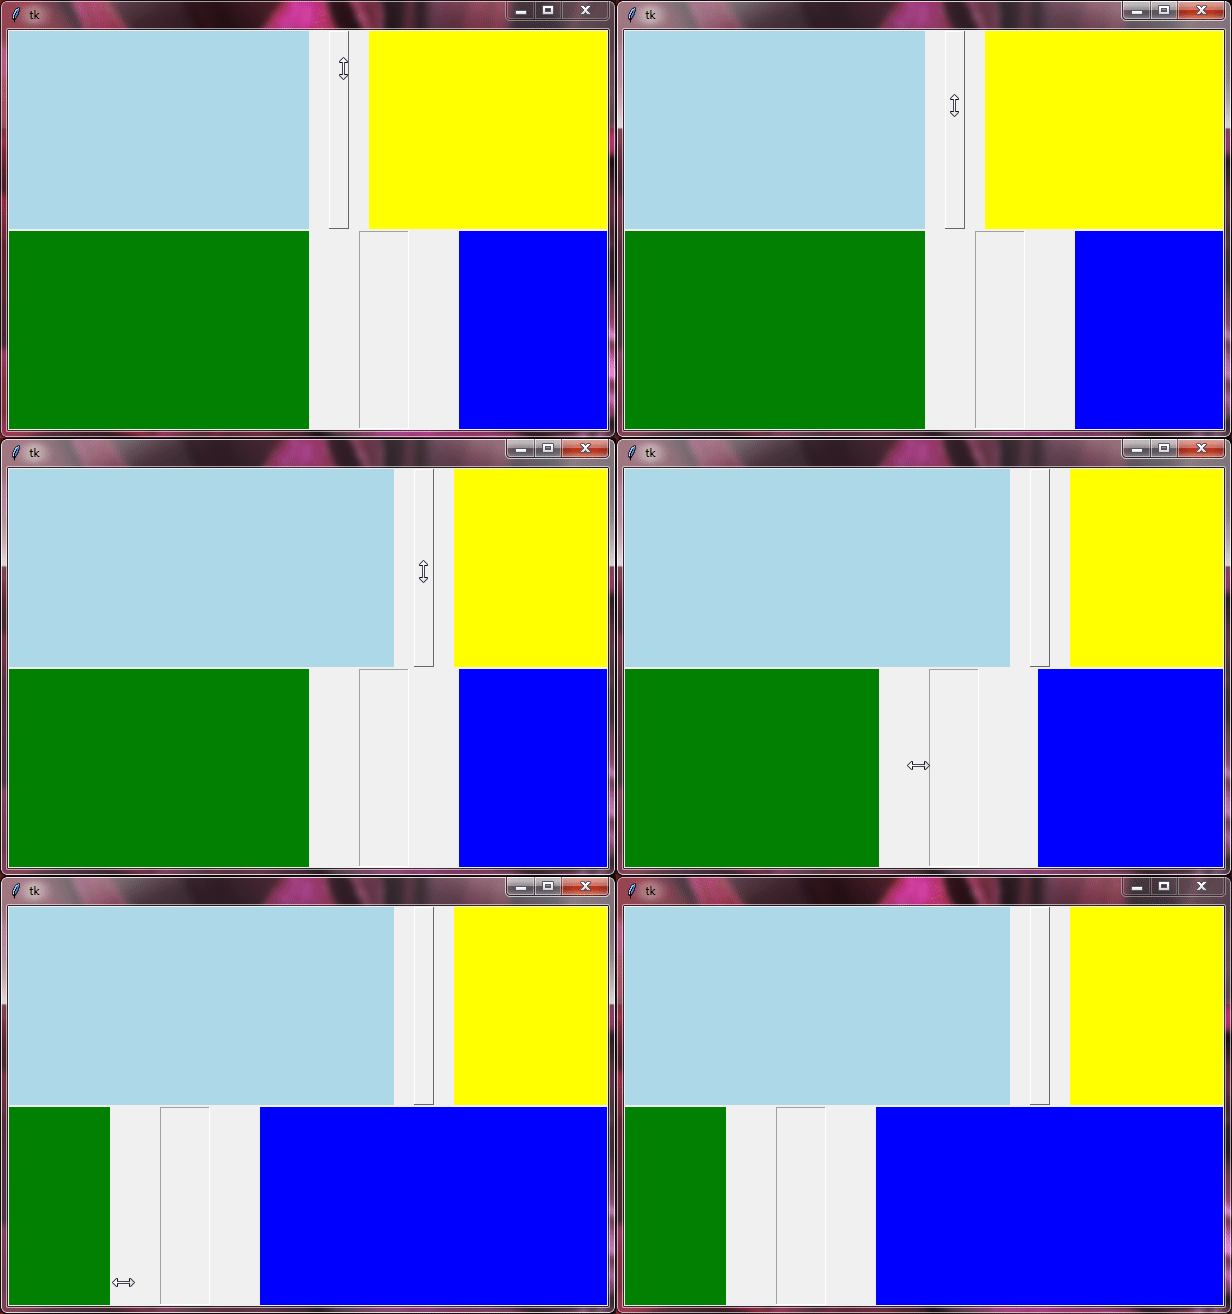
In Tkinter’s PanedWindow, the sash is that handy draggable line or grip that sits between the resizable panes, allowing users to adjust the pane sizes as they see fit.
If you want, you can tweak its appearance and behavior. Here are the options you can use:
sashwidth : This lets you make the sash thicker or thinner, so it’s easier to see and grab.
sashrelief : With this, you can make the sash look raised, sunken, or flat, depending on your preference.
sashpad : You can set the padding around the sash, controlling the space between the sash and the edges of the panes.
sashcursor : This option allows you to change the cursor style when hovering over the sash, giving users a visual cue that it’s draggable.
Example:
from tkinter import *

root=Tk()
root.grid_anchor(anchor='center')

panedwin1=PanedWindow(root, height=200, width=600, sashwidth=20, sashrelief="raised", sashcursor='sb_v_double_arrow', sashpad=20)
panedwin1.grid()

frame1=Frame(panedwin1, width=300, background='lightblue')
frame2=Frame(panedwin1, width=300, background='yellow')

panedwin1.add(frame1)
panedwin1.add(frame2)

panedwin2=PanedWindow(root, height=200, width=600, sashwidth=50, sashrelief="groove", sashpad=50)
panedwin2.grid()

frame3=Frame(panedwin2, width=300, background='green')
frame4=Frame(panedwin2, width=300, background='blue')

panedwin2.add(frame3)
panedwin2.add(frame4)

root.mainloop()
Output:
Customizing the Handle of Tkinter PanedWindow
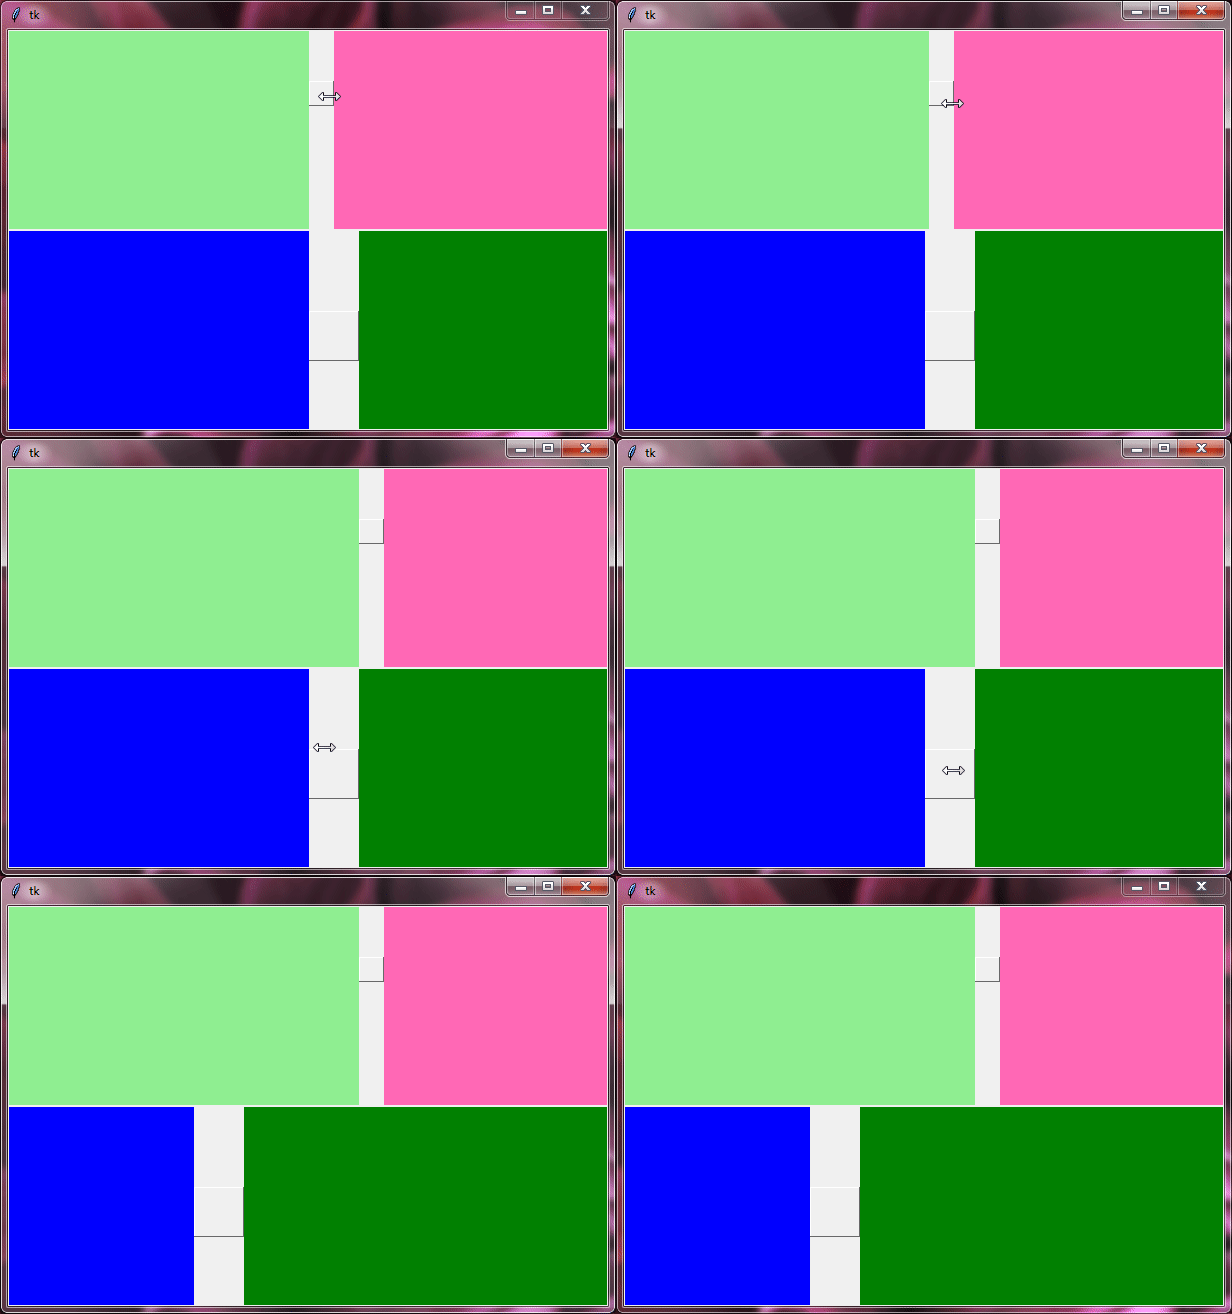
The handle in tkinter PanedWindow is like a grip or knob that lets you resize the panes. It’s a small but important part of the widget.
Here are the main options you can use to tweak how this handle looks and behaves:
showhandle : This option allows you to show or hide the handle. You can decide whether you want users to see it or not.
handlesize : By using this, you can adjust the size of the handle, making it bigger or smaller depending on your preferences.
handlepad : This option lets you set the padding around the handle, controlling the space between the handle and the edges of the panes.
Example:
from tkinter import *

root=Tk()
root.grid_anchor(anchor='center')

panedwin1=PanedWindow(root, height=200, width=600, showhandle=1, handlesize=25, handlepad=50)
panedwin1.grid()

frame1=Frame(panedwin1, width=300, background='lightgreen')
frame2=Frame(panedwin1, width=300, background='hotpink')

panedwin1.add(frame1)
panedwin1.add(frame2)

panedwin2=PanedWindow(root, height=200, width=600, showhandle=1, handlesize=50, handlepad=80)
panedwin2.grid()

frame3=Frame(panedwin2, width=300, background='blue')
frame4=Frame(panedwin2, width=300, background='green')

panedwin2.add(frame3)
panedwin2.add(frame4)

root.mainloop()
Output:
Additional Standard Options Available for Use With The PanedWindow:
backgroundborderwidthcursorrelief
For a deeper understanding of these options, explore the Tkinter Standard Options.
Example:
from tkinter import *

root=Tk()
root.grid_anchor(anchor='center')

panedwin1=PanedWindow(root, height=300, width=600, showhandle=1, handlesize=40, handlepad=100, sashrelief='groove', sashwidth=20, sashpad=10, background='yellow', borderwidth=15, relief='sunken')
panedwin1.grid()

frame1=Frame(panedwin1, width=300, background='lightyellow')
frame2=Frame(panedwin1, width=300, background='magenta')

panedwin1.add(frame1)
panedwin1.add(frame2)

panedwin2=PanedWindow(root, height=300, width=600, orient='vertical', showhandle=1, handlesize=40, handlepad=250, sashrelief='raised', sashwidth=30, sashpad=20, background='red', borderwidth=10, relief='groove')
panedwin2.grid()

button1=Button(panedwin2, text='Button 1', background='yellow')
button2=Button(panedwin2, text='Button 2', background='orange')

panedwin2.add(button1)
panedwin2.add(button2)

root.mainloop()
Output:
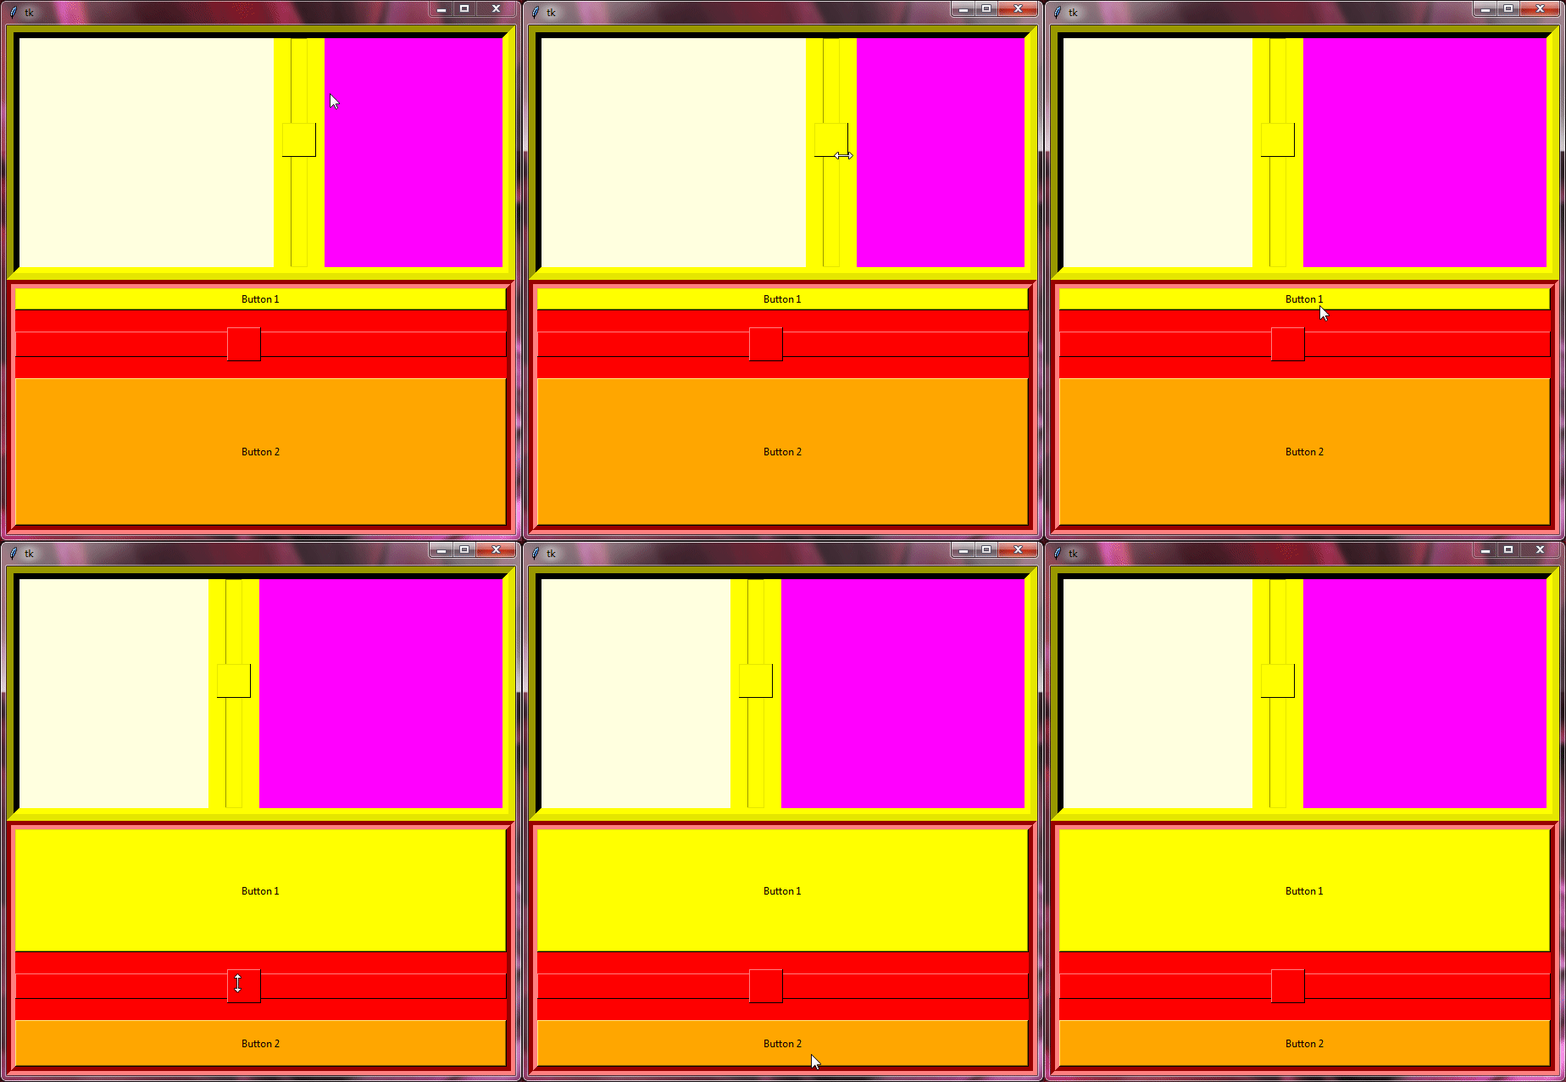
Proxy Sash in Tkinter PanedWindow
In Tkinter PanedWindow, a “proxy sash” serves as a placeholder for the actual sash that divides the panes. It acts as a visual representation of where the sash would be when the user resizes the panes.
opaqueresize : When set to True, this makes the proxy sash fully visible during resizing, so users can see exactly where they’re dragging it.
proxybackground : This lets you choose the color of the proxy sash, so you can match it to the rest of your interface.
proxyborderwidth : You can adjust the thickness of the border around the proxy sash to make it more noticeable.
proxyrelief : This setting allows you to change the style of the proxy sash’s border like flat or raised to make it stand out.
Example:
from tkinter import *

root=Tk()
root.grid_anchor(anchor='center')

panedwin1=PanedWindow(root, height=250, width=600, background='red', sashwidth=30, opaqueresize=0, proxybackground='white', proxyborderwidth=5, proxyrelief='sunken')
panedwin1.grid()

frame1=Frame(panedwin1, width=300, background='lightyellow')
frame2=Frame(panedwin1, width=300, background='skyblue')

panedwin1.add(frame1)
panedwin1.add(frame2)

panedwin2=PanedWindow(root, height=250, width=600, background='yellow', sashwidth=30, opaqueresize=0, proxybackground='green', proxyborderwidth=20, proxyrelief='raised')
panedwin2.grid()

frame3=Frame(panedwin2, width=300, background='pink')
frame4=Frame(panedwin2, width=300, background='red')

panedwin2.add(frame3)
panedwin2.add(frame4)

root.mainloop()
Output:
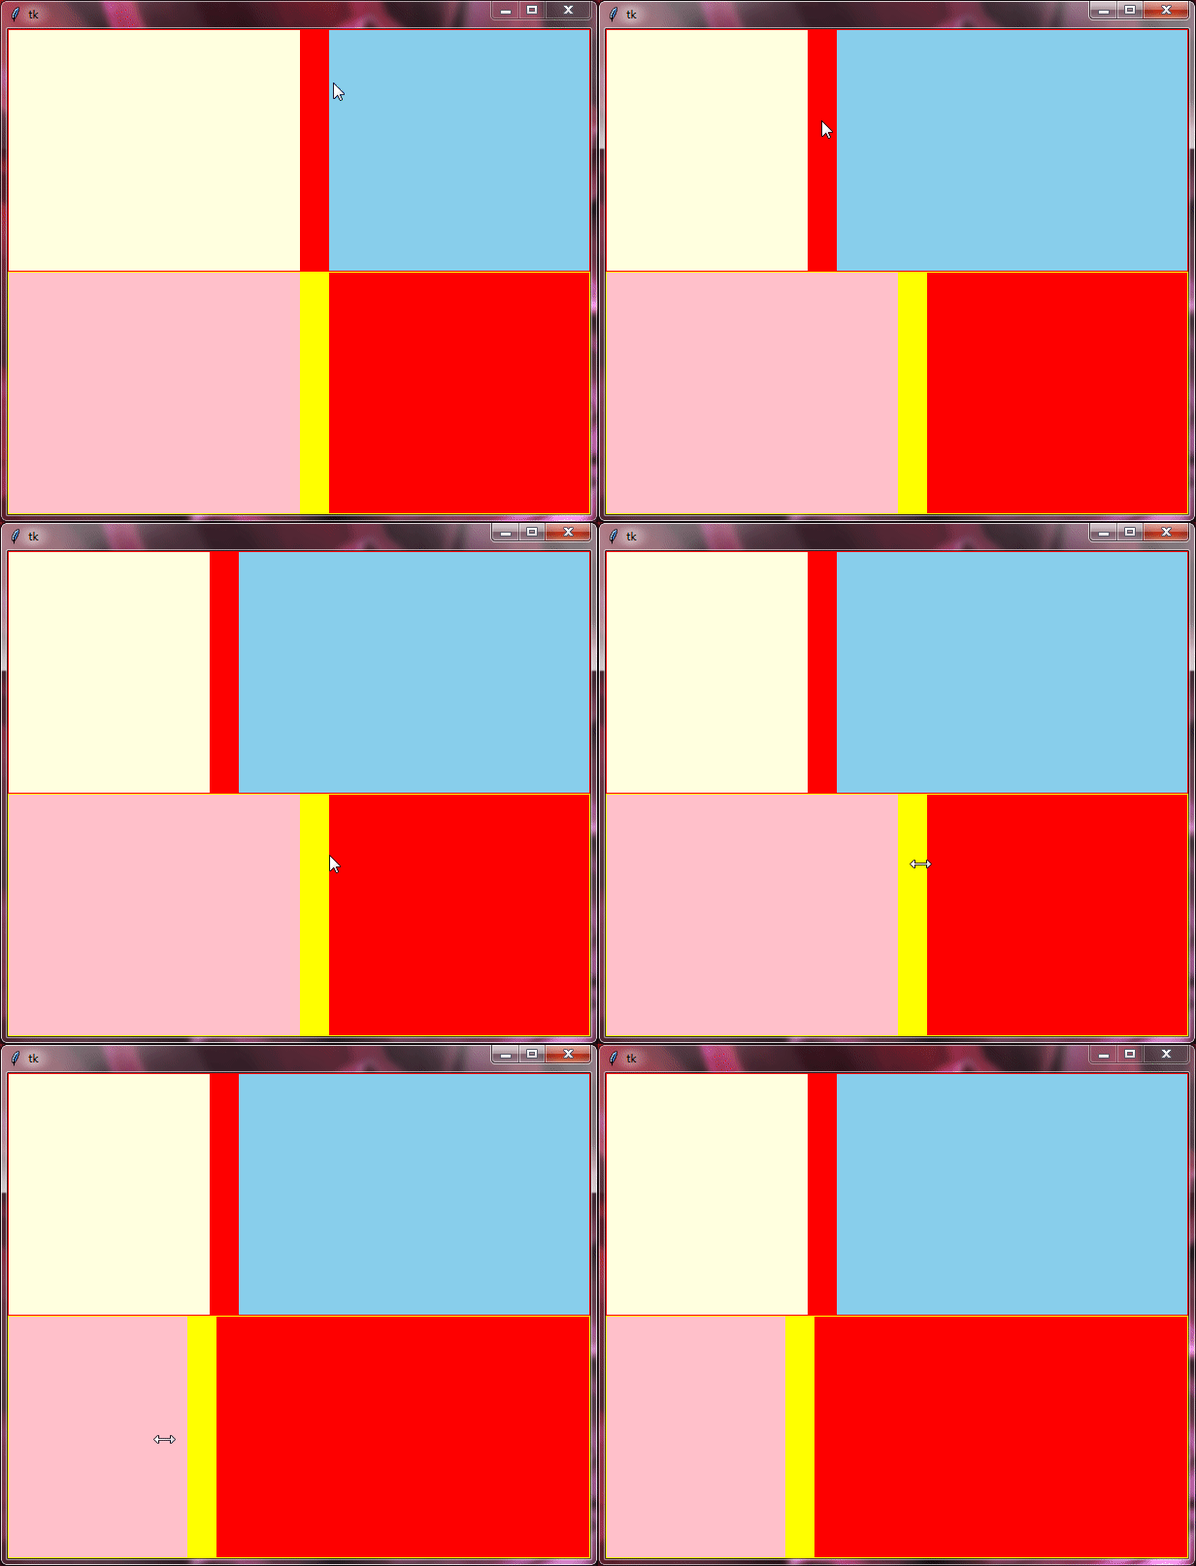
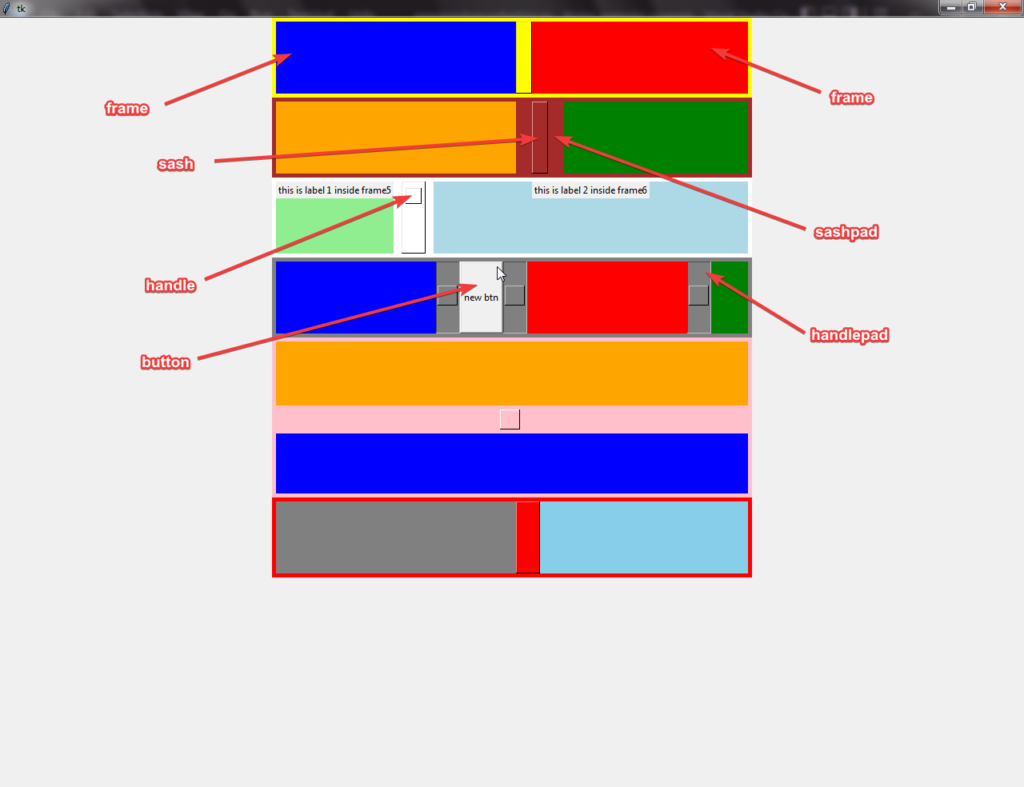
Different PanedWindow Layouts
Now, we’ll see how different settings affect the appearance and behavior of the PanedWindow, allowing for versatile and customized layouts in Tkinter applications.
Example:
from tkinter import *
root=Tk()

# panedwin1 is showing the use of- height, width, background, sashwidth, sashrelief, bd - options of panedwindow
panedwin1=PanedWindow(root,height=100,width=600,background='yellow',sashwidth=20,sashrelief="raised",bd=5)
panedwin1.pack()

# These frame widgets are the child of panedwindow
frame1=Frame(panedwin1,width=300,background='blue')
frame2=Frame(panedwin1,width=300,background='red')

# add method is used to insert widget inside the panedwindow
panedwin1.add(frame1)
panedwin1.add(frame2)

# panedwin2 is showing the use of- height, width, background, sashwidth, sashrelief,sashcursor,sashpad, bd - options of panedwindow
panedwin2=PanedWindow(root,height=100,width=600,background='brown',sashwidth=20,sashrelief="raised",bd=5,sashcursor='sb_v_double_arrow', sashpad=20)
panedwin2.pack()

frame3=Frame(panedwin2,width=300,background='orange')
frame4=Frame(panedwin2,width=300,background='green')

panedwin2.add(frame3)
panedwin2.add(frame4)

# panedwin3 is showing the use of- height, width, background, sashwidth, sashrelief, showhandle, handlesize, sashpad, bd - options of panedwindow
panedwin3=PanedWindow(root,height=100,width=600,background='white',sashwidth=30,bd=5,showhandle=1,handlesize=20,sashrelief='raised',sashpad=10)
panedwin3.pack()

frame5=Frame(panedwin3,width=300,background='lightgreen')
frame6=Frame(panedwin3,width=300,background='lightblue')

# this is a label which will display inside the frame5
lab1=Label(frame5,text='this is label 1 inside frame5')
lab1.pack()

# this is a label which will display inside the frame6
lab2=Label(frame6,text='this is label 2 inside frame6')
lab2.pack()

panedwin3.add(frame5)
panedwin3.add(frame6)

# panedwin4 is showing the use of- height, width, background, sashwidth, sashrelief, showhandle, handlesize,handlepad, sashpad, bd - options of panedwindow
# this is the panedwindow of three frames and one button you can add more frame widget or any other widget if you want
panedwin4=PanedWindow(root,height=100,width=600,background='grey',sashwidth=30,bd=5,showhandle=1,handlesize=25,handlepad=30,sashrelief='sunken')
panedwin4.pack()

frame7=Frame(panedwin4,width=200,background='red')
frame8=Frame(panedwin4,width=200,background='green')
frameextra=Frame(panedwin4,width=200,background='blue')
btn=Button(panedwin4,text='new btn')

panedwin4.add(frameextra)
panedwin4.add(btn)
panedwin4.add(frame7)
panedwin4.add(frame8)

# panedwin5 is showing the use of- height, width, background, sashwidth, sashrelief, showhandle, handlesize,handlepad, sashpad, bd, orient - options of panedwindow
panedwin5=PanedWindow(root,height=200,width=600,background='pink',sashwidth=35,bd=5,showhandle=1,handlesize=25,handlepad=280,sashrelief='flat',orient='vertical')
panedwin5.pack()

frame9=Frame(panedwin5,height=80,background='orange')
frame10=Frame(panedwin5,height=100,background='blue')

panedwin5.add(frame9)
panedwin5.add(frame10)

# panedwin6 is showing the use of- height, width, background, sashwidth, sashrelief,  opaqueresize, proxybackground, proxyborderwidth, proxyrelief,  bd - options of panedwindow
panedwin6=PanedWindow(root,height=100,width=600,background='red',sashwidth=30,bd=5,sashrelief='raised',opaqueresize=0,proxybackground='white',proxyborderwidth=5,proxyrelief='sunken')
panedwin6.pack()

frame11=Frame(panedwin6,width=300,background='grey')
frame12=Frame(panedwin6,width=300,background='skyblue')

panedwin6.add(frame11)
panedwin6.add(frame12)

root.mainloop()
Output:
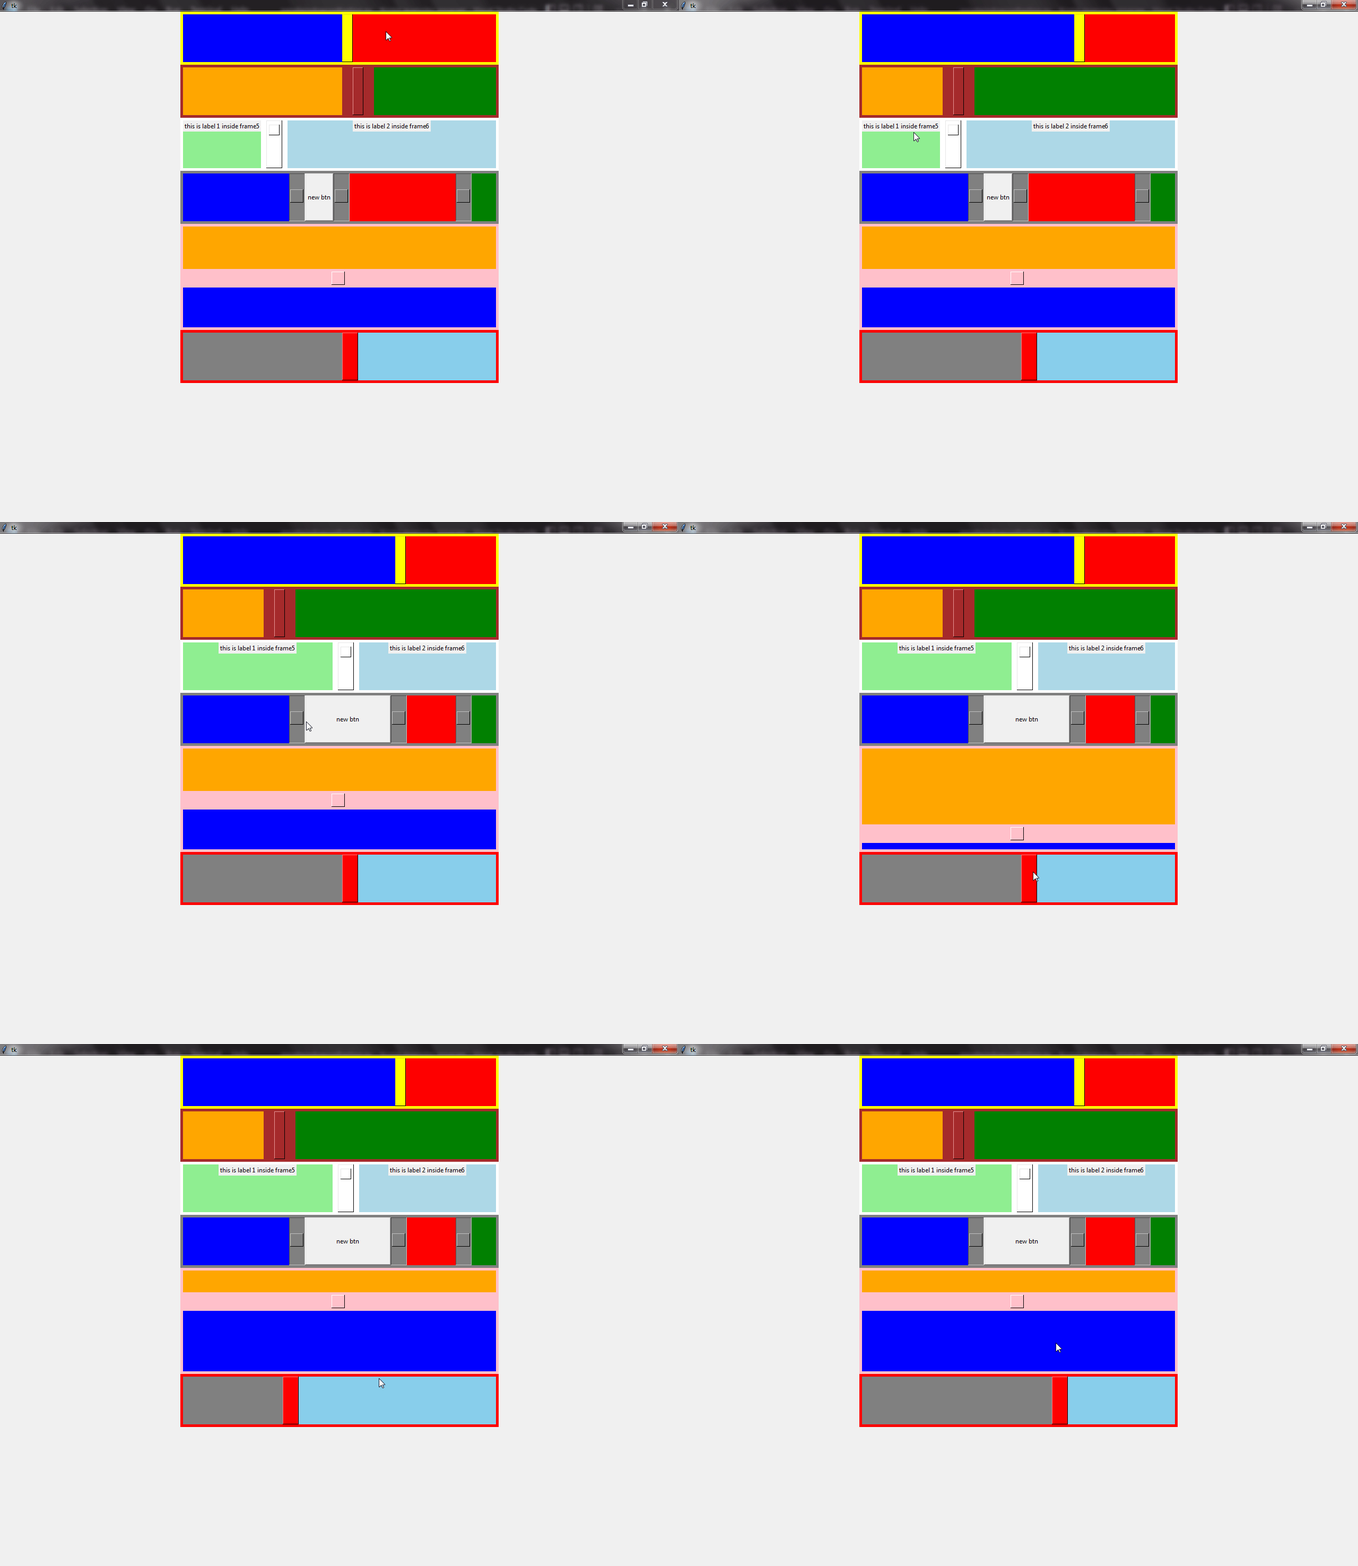
How to Add Panes using add()
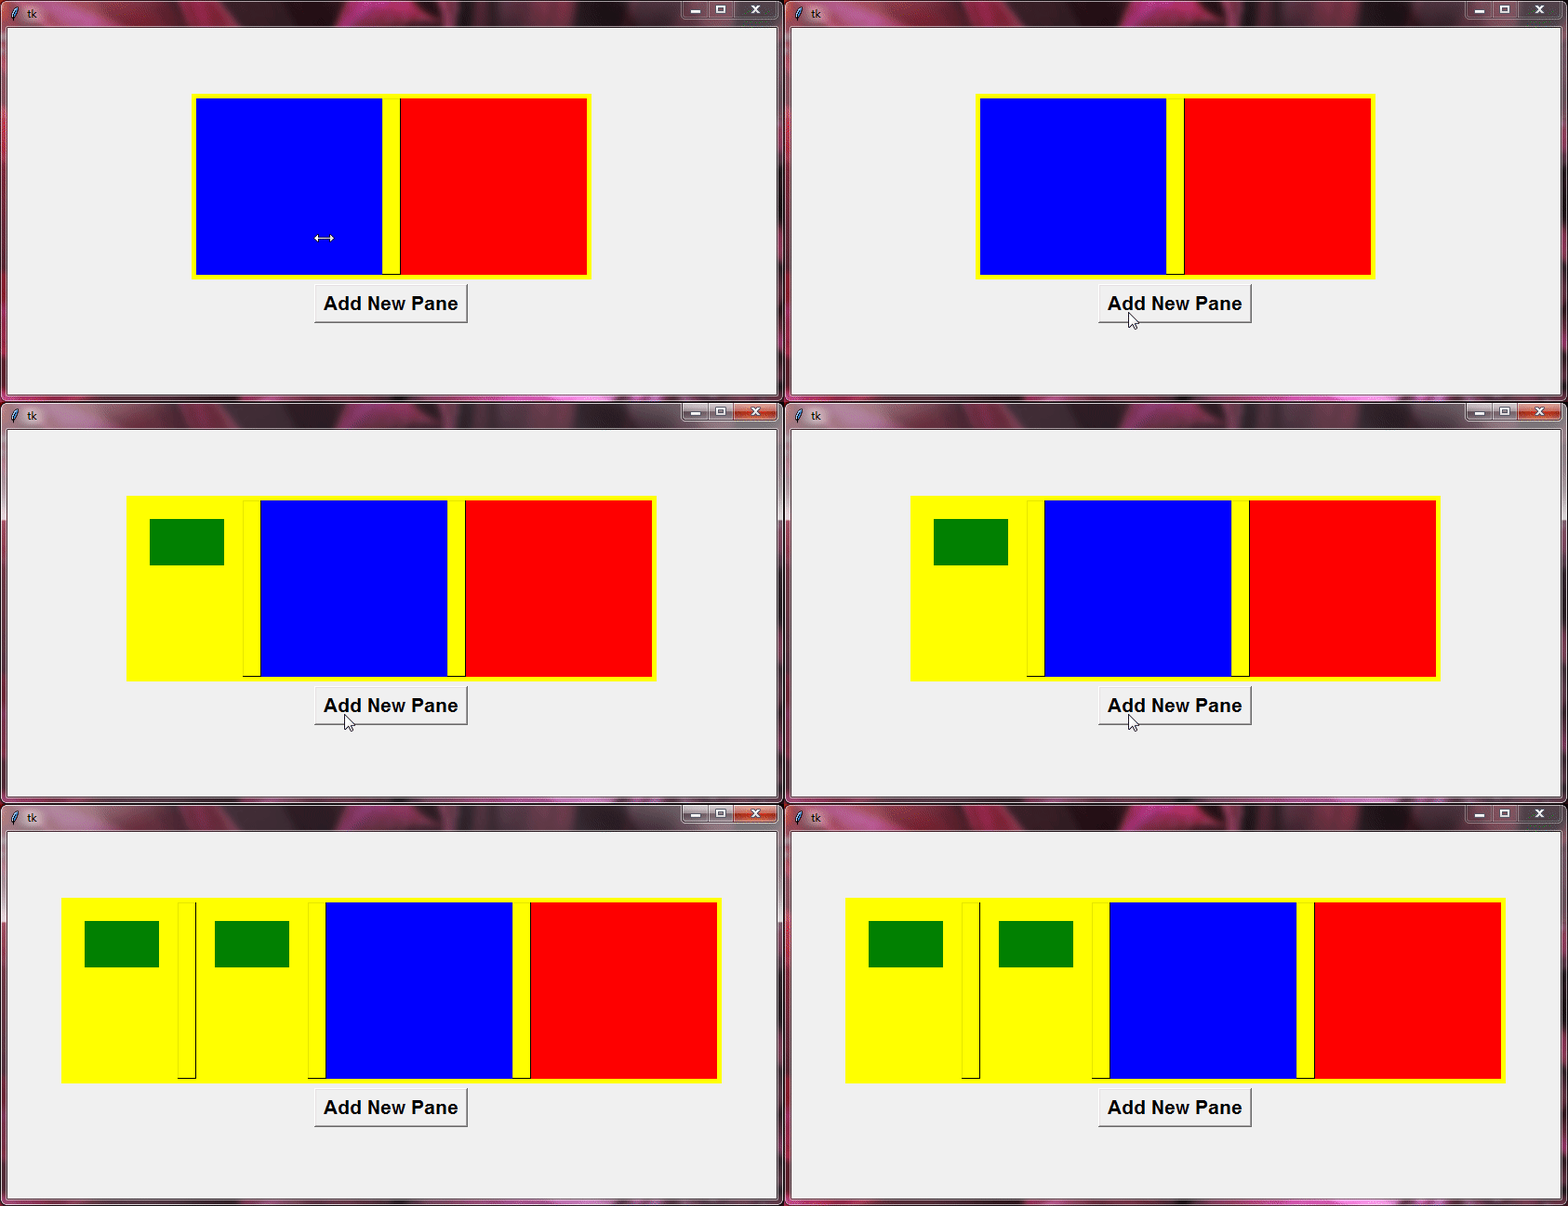
Adding panes to a Tkinter PanedWindow is straightforward using the add()
Example:
from tkinter import *

root=Tk()
root.grid_anchor(anchor='center')

def add_pane():
    frame3=Frame(panedwin, width=200, background='green')
    panedwin.add(frame3, before=frame1, width=80, minsize=50, padx=20, pady=20,height=50, sticky='n')

panedwin=PanedWindow(root, height=200, background='yellow', proxybackground='orange', sashwidth=20, sashrelief="raised", bd=5)
panedwin.grid()

frame1=Frame(panedwin, width=200, background='blue')
frame2=Frame(panedwin, width=200, background='red')

panedwin.add(frame1)
panedwin.add(frame2)

btn=Button(root, text='Add New Pane', command=add_pane, font='arial 16 bold')
btn.grid(pady=5)

root.mainloop()
Output:
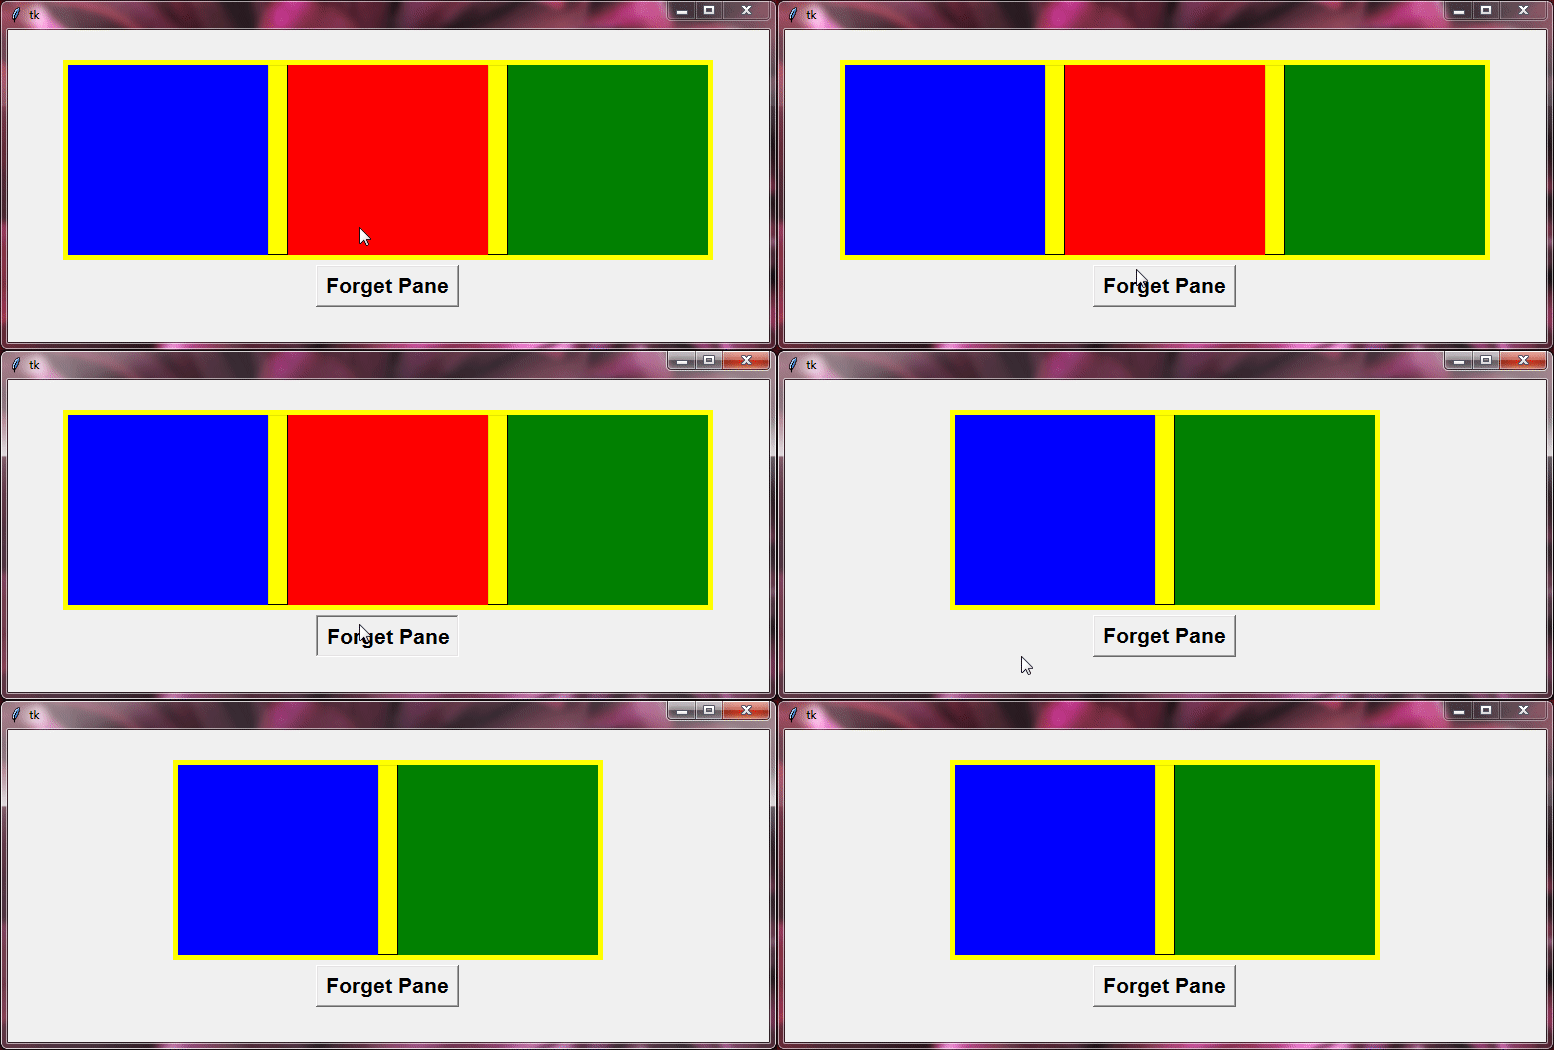
Removing Panes from PanedWindow with forget()
In Tkinter’s PanedWindow, you can easily take out panes using the forget()
To do this, you simply need to pass the widget you wish to remove from the PanedWindow.
When you use forget()
Example:
from tkinter import *

root=Tk()
root.grid_anchor(anchor='center')

# this function showing the use of forget method of panedwindow widget
def forget_pane():
    panedwin.forget(frame2)

panedwin=PanedWindow(root, height=200, background='yellow', proxybackground='orange', sashwidth=20, sashrelief="raised", bd=5)
panedwin.grid()

frame1=Frame(panedwin, width=200, background='blue')
frame2=Frame(panedwin, width=200, background='red')
frame3=Frame(panedwin, width=200, background='green')

panedwin.add(frame1)
panedwin.add(frame2)
panedwin.add(frame3)

btn=Button(root, text='Forget Pane', command=forget_pane, font='arial 16 bold')
btn.grid(pady=5)

root.mainloop()
Output:
How to Get a List of Child Panes
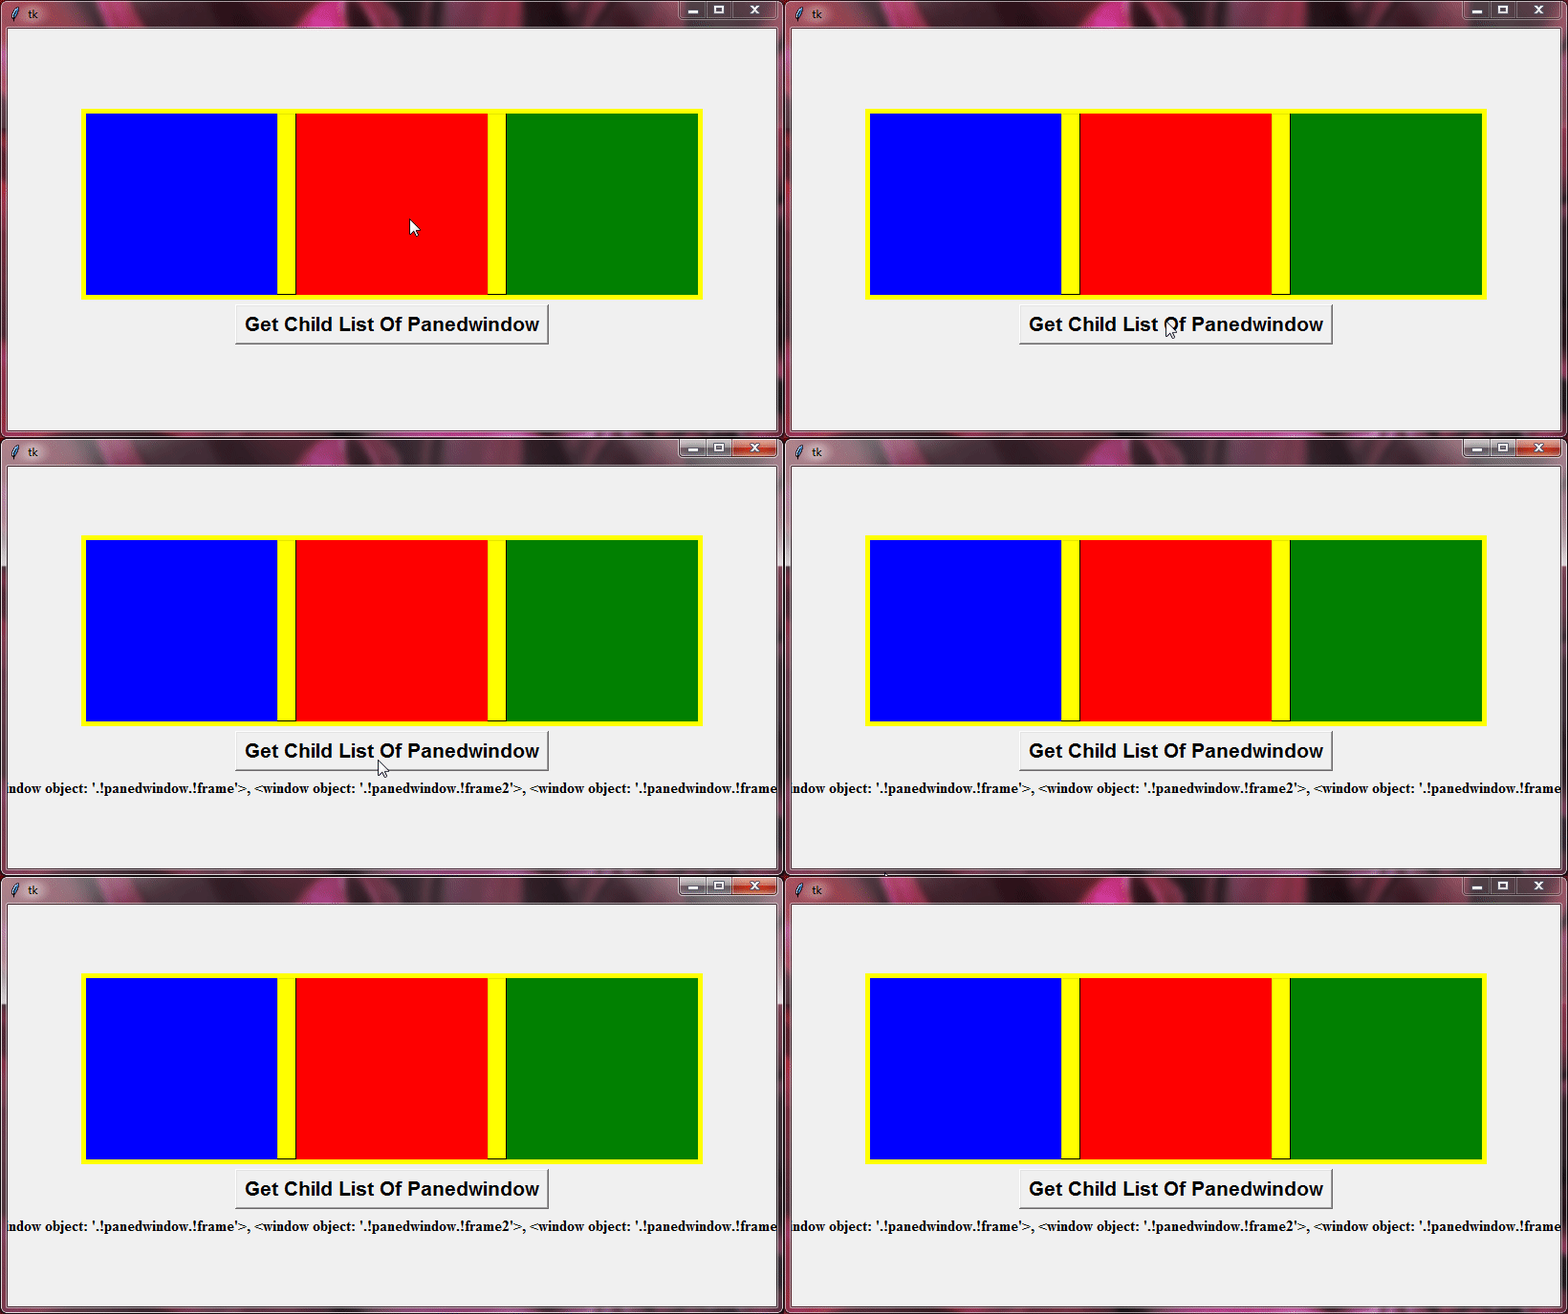
If you want to find out the list of panes inside your PanedWindow, you can use the panes() method.
Example:
from tkinter import *

root=Tk()
root.grid_anchor(anchor='center')

# this function showing the use of panes method of panedwindow widget
def get_child_list():
    childlist=panedwin.panes()
    lab=Label(root, text=f'{childlist}', font='times 12 bold')
    lab.grid()

panedwin=PanedWindow(root, height=200, background='yellow', proxybackground='orange', sashwidth=20, sashrelief="raised", bd=5)
panedwin.grid()

frame1=Frame(panedwin, width=200, background='blue')
frame2=Frame(panedwin, width=200, background='red')
frame3=Frame(panedwin, width=200, background='green')

panedwin.add(frame1)
panedwin.add(frame2)
panedwin.add(frame3)

btn=Button(root, text='Get Child List Of Panedwindow', command=get_child_list, font='arial 16 bold')
btn.grid(pady=5)

root.mainloop()
Output:
Customizing Panes with paneconfigure()
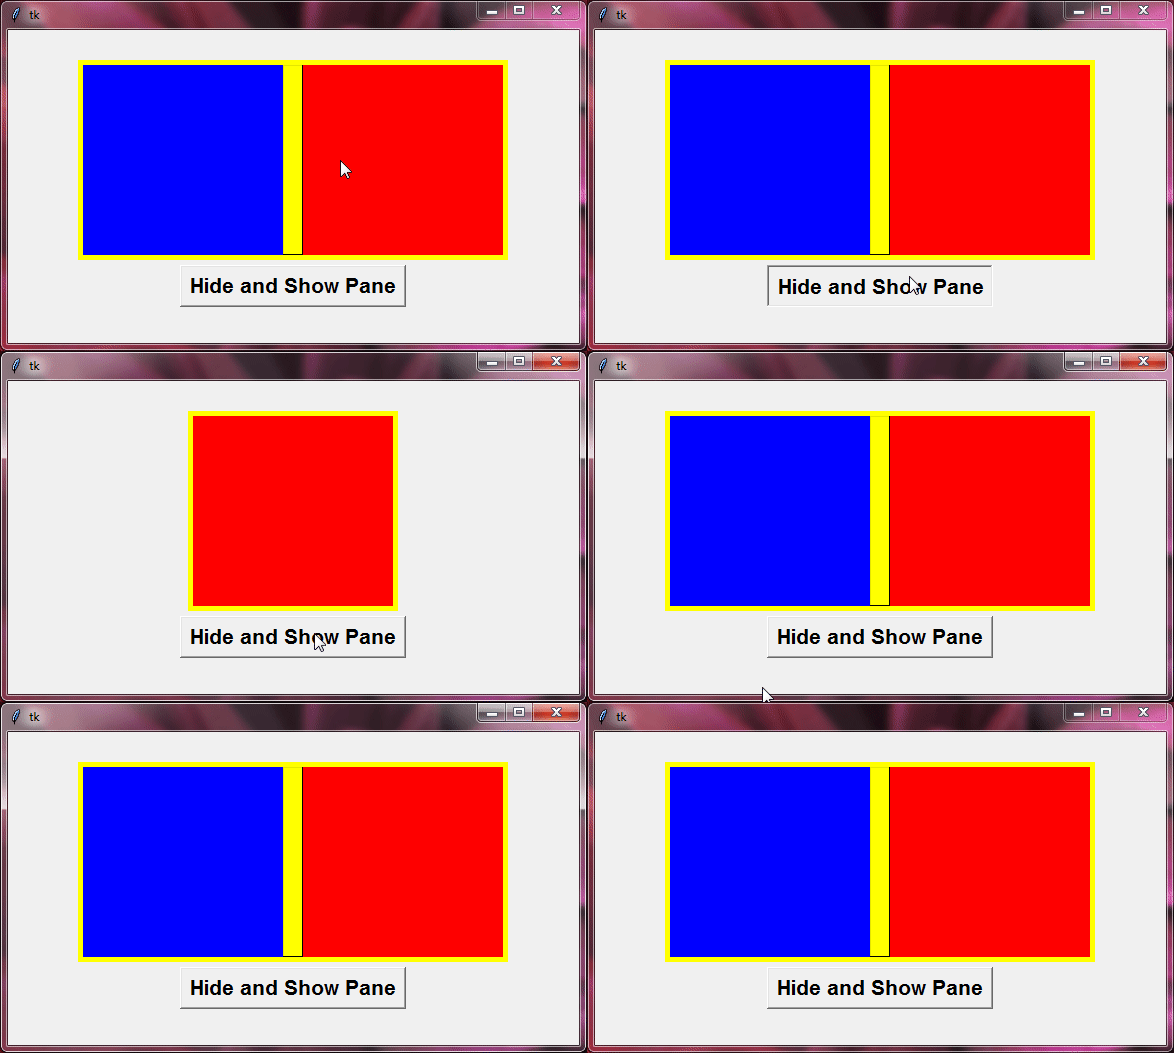
Now, let’s talk about tweaking how each section looks and behaves within a Tkinter PanedWindow. We’ll use the paneconfigure() method to do this.
With paneconfigure(), we can change specific things about each section, or “pane”, inside the PanedWindow. We just tell it which pane we want to work on and give it a list of changes we want to make, like adjusting its size or adding a border.
paneconfigure(pane, option=value, option=value, ...)
Let’s explore the available options:
after and before | Use after to add a new pane after a specific pane, and before to add a new pane before a specific one. |
height and width | Set height for vertical PanedWindows and width for horizontal ones to define the pane dimensions. |
hide | To hide a pane, set hide=True. |
minsize | Use minsize to set the minimum pane size. |
padx and pady | These options add extra space around the content inside the pane. |
sticky | The sticky option aligns content within a pane. Values like ‘n’, ‘s’, ‘e’, and ‘w’ represent the top, bottom, right, and left alignments. Combine them to achieve different alignments, like ‘nw’. |
With the panecget() method, we can retrieve the current configuration of any pane in the PanedWindow.
Example:
from tkinter import *

root=Tk()
root.grid_anchor(anchor='center')

# this function showing the use of panecget and paneconfigure method of panedwindow widget
def hide_and_show_pane():
    if(panedwin.panecget(frame1,'hide') == FALSE):
        panedwin.paneconfigure(frame1, hide=TRUE)
    elif(panedwin.panecget(frame1,'hide') == TRUE):
        panedwin.paneconfigure(frame1, hide=FALSE)


panedwin=PanedWindow(root, height=200, background='yellow', proxybackground='orange', sashwidth=20, sashrelief="raised", bd=5)
panedwin.grid()

frame1=Frame(panedwin, width=200, background='blue')
frame2=Frame(panedwin, width=200, background='red')

panedwin.add(frame1)
panedwin.add(frame2)

btn=Button(root, text='Hide and Show Pane', command=hide_and_show_pane, font='arial 16 bold')
btn.grid(pady=5)

root.mainloop()
Output:
Moving and Checking Sashes
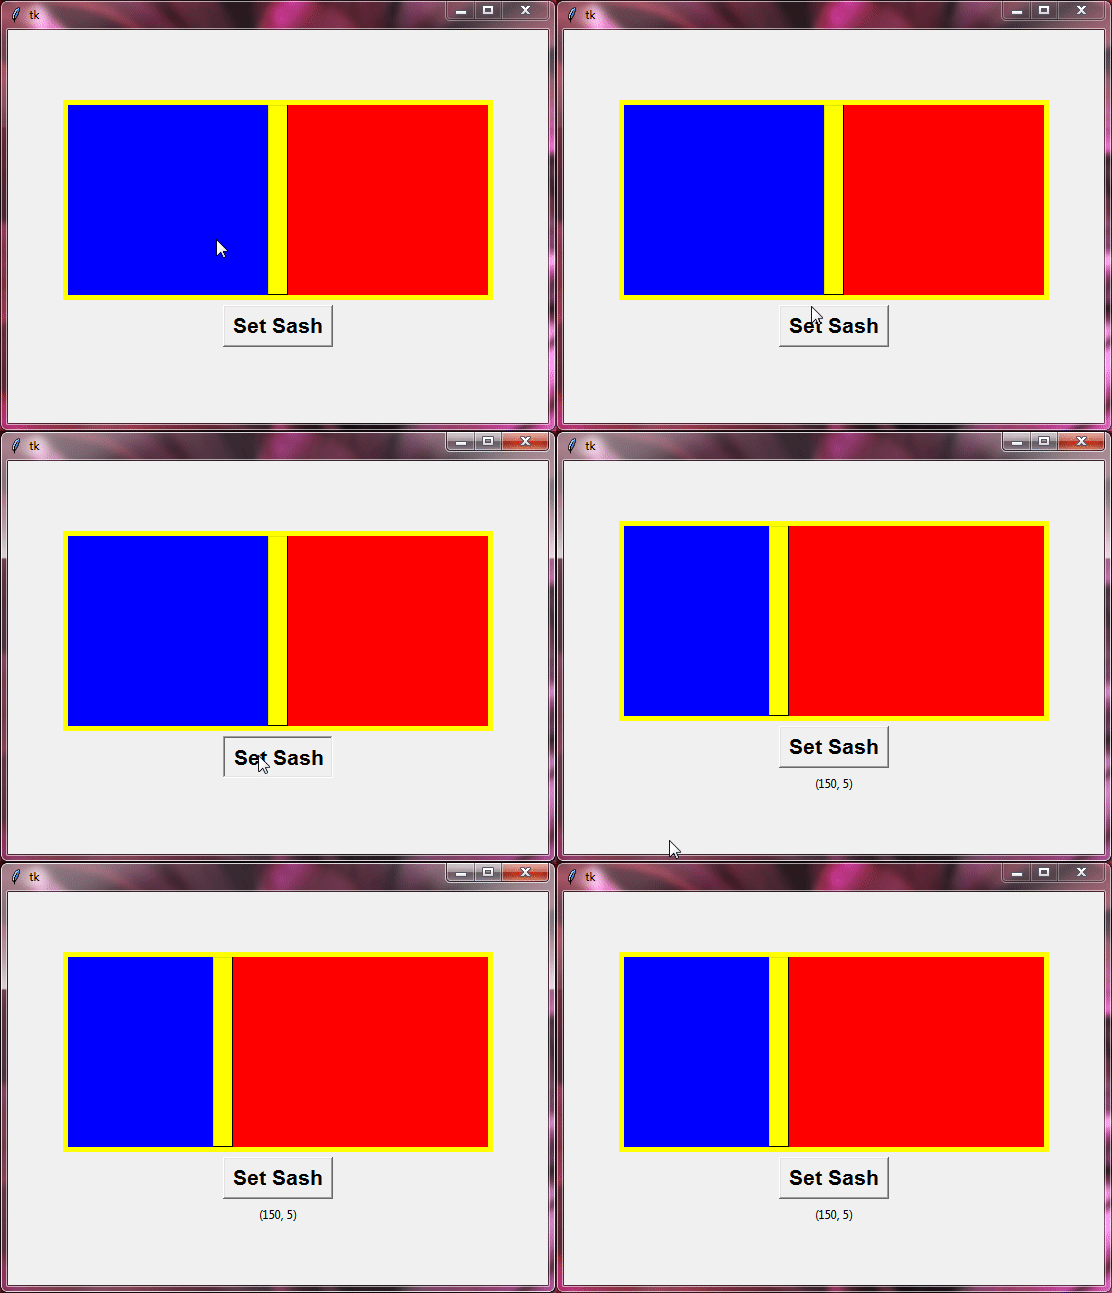
The Tkinter PanedWindow also provides some methods for dealing with sashes:
sash_place(index, x, y)
With sash_place(), we can move a sash around in the PanedWindow. We just tell it which sash we want to move (like the first one, second one, and so on with 0, 1, 2, etc.), and where we want it to go by giving it new x and y coordinates.
sash_coordinates(index)
This method, sash_coordinates(), tells us where a sash currently sits. We pick a sash by giving its index, and it gives us back the exact x and y coordinates where that sash is hanging out right now.
Example:
from tkinter import *

root=Tk()
root.grid_anchor(anchor='center')

# this function showing the use of sash_place and sash_coord method of panedwindow widget
def set_sash():
    panedwin.sash_place(0,x=150,y=0)
    sashcoord=panedwin.sash_coord(0)
    lab=Label(root,text=f'{sashcoord}')
    lab.grid()

panedwin=PanedWindow(root, height=200, background='yellow', proxybackground='orange', sashwidth=20, sashrelief="raised", bd=5)
panedwin.grid()

frame1=Frame(panedwin, width=200, background='blue')
frame2=Frame(panedwin, width=200, background='red')

panedwin.add(frame1)
panedwin.add(frame2)

btn2=Button(root, text='Set Sash', command=set_sash, font='arial 16 bold')
btn2.grid(pady=5)

root.mainloop()
Output:
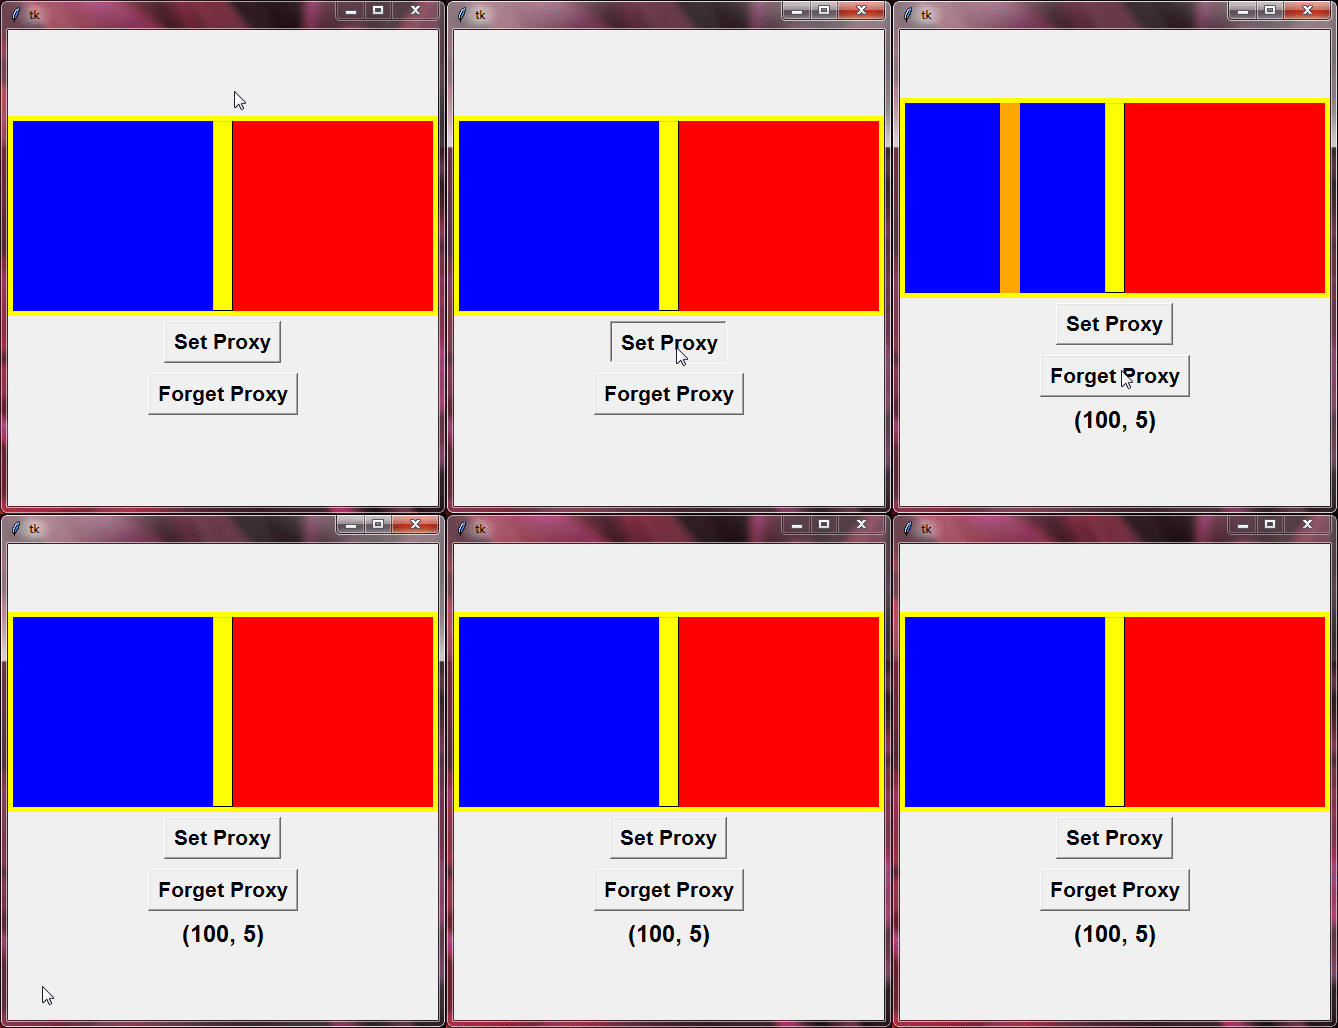
Proxy Methods for tkinter PanedWindow
Now we are going to talk about the Proxy Methods. These methods help us work with the proxy sash in a Tkinter PanedWindow.
proxy_place()
With the proxy_place() method, we can decide exactly where on the screen we want the proxy sash to appear by specifying its x and y coordinates.
proxy_coordinates()
If you want to know where the proxy sash is currently located. The proxy_coordinates() method gives us the x and y coordinates of the proxy sash.
proxy_forget()
Lastly, let’s say we want to hide the proxy sash. The proxy_forget() method does just that.
Example:
from tkinter import *

root=Tk()
root.grid_anchor(anchor='center')

# this function showing the use of proxy_place and proxy_coord method of panedwindow widget
def set_proxy():
    panedwin.proxy_place(x=100,y=0)
    proxycoord=panedwin.proxy_coord()
    lab=Label(root, text=f'{proxycoord}', font='arial 18 bold')
    lab.grid()

panedwin=PanedWindow(root, height=200, background='yellow', proxybackground='orange', sashwidth=20, sashrelief="raised", bd=5)
panedwin.grid()

frame1=Frame(panedwin, width=200, background='blue')
frame2=Frame(panedwin, width=200, background='red')

panedwin.add(frame1)
panedwin.add(frame2)

btn1=Button(root, text='Set Proxy', command=set_proxy, font='arial 16 bold')
btn1.grid(pady=5)

btn2=Button(root, text='Forget Proxy', command=lambda : panedwin.proxy_forget(), font='arial 16 bold')
btn2.grid(pady=5)

root.mainloop()
Output:
Binding Events with tkinter PanedWindow
In Tkinter, you can link actions or functions to events that happen in your PanedWindow. This means when a user does something, like clicking or resizing, your program can respond in specific ways.
Let me show you a simple example:
from tkinter import *

def on_drag_sash(event):
    # Your magical code here
    pane1.config(bg="red", fg="white")
    pane2.config(bg="blue", fg="white")

root = Tk()
root.title("Magical PanedWindow")
root.geometry("400x300")

paned_window = PanedWindow(root, orient=HORIZONTAL)
paned_window.pack(expand=True, fill='both')

pane1 = Label(paned_window, text="Pane 1", bg="lightblue")
pane2 = Label(paned_window, text="Pane 2", bg="lightgreen")

paned_window.add(pane1)
paned_window.add(pane2)

# Bind the event to the PanedWindow
paned_window.bind("<B1-Motion>", on_drag_sash)

root.mainloop()
Output:
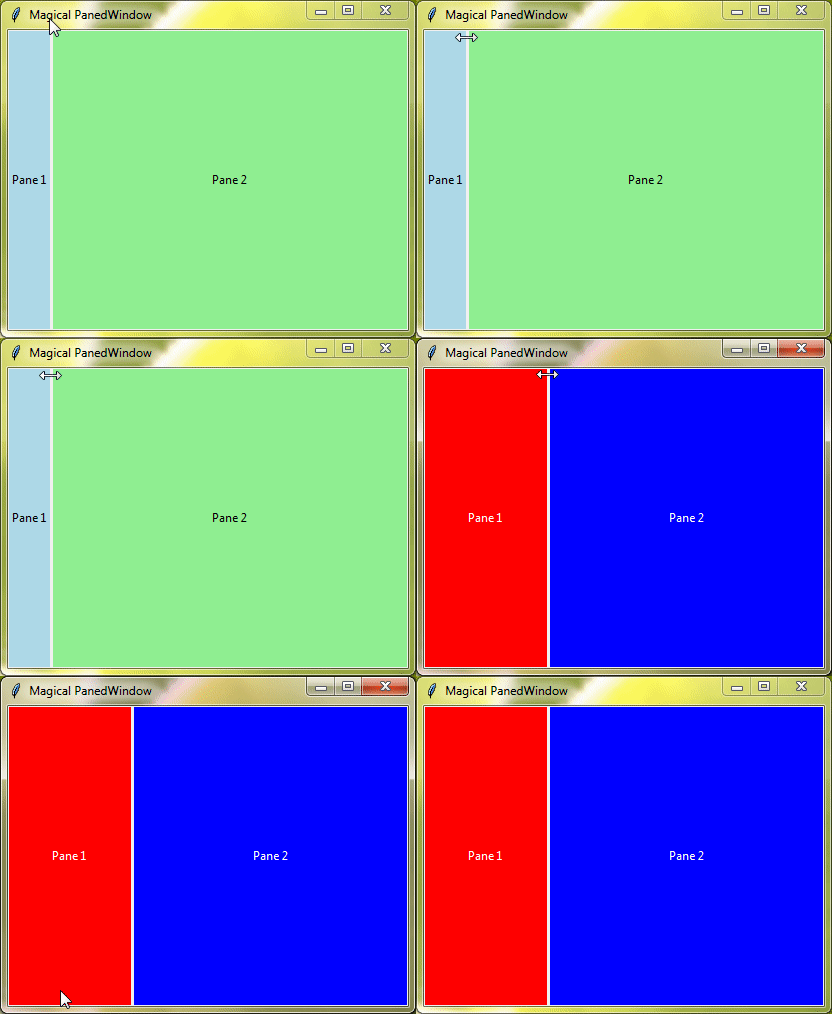
In this example, whenever you click and drag the divider to resize the panes, the on_drag_sash() function kicks in. As a result, the colors of both panes will change.
Conclusion
You’ve reached the end of this tutorial! In this guide, you’ve learned the basics of PanedWindow in Tkinter, how to customize it, use its methods, and even bind events to it. With this knowledge, you’re ready to create more dynamic and interactive GUI layouts in your Python programs.


Thank you for making this detailed page of examples & with animated previews, we are spoiled! I have been fiddling around with tkinter for a bit and it’s like pulling teeth this really helps showing what the code is doing.
Excellent examples to clarify usage. I have the kindle version of the book, “Modern Tkinter for Busy Python Developers”, but it glazes over the PanedWindow. Thank you for taking the time to create this resource.