Tkinter Grid Manager Tutorial
Among Tkinter’s geometry managers, the grid() manager stands out for its ability to create structured and organized layouts using rows and columns.
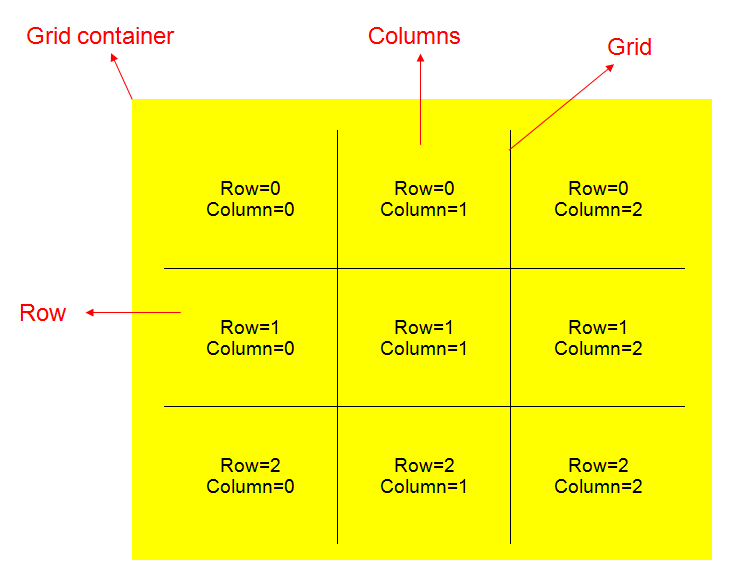
The grid() geometry manager in Tkinter allows you to arrange widgets in a grid-like structure within a window. Unlike the pack() manager, which stacks widgets in a single direction, the grid() manager provides greater control over widget placement by dividing the window into rows and columns.
Understand these key concepts of Grid Geometry Manager.
Rows and Columns: The grid manager organizes widgets in rows and columns. You can think of rows as horizontal lines and columns as vertical lines on the grid.
Grid Coordinates: Each cell in the grid is identified by its row and column index. For example, (0, 0) represents the top-left cell, (0, 1) represents the cell to the right of it, and so on.
Widget Placement: When placing a widget using the grid manager, you specify its row and column coordinates. This determines where the widget will appear within the Tkinter window.
Spanning: Widgets can span multiple rows or columns, allowing you to create more complex layouts. For example, a widget with rowspan=2 will occupy two rows vertically.
Now that we’ve learned the basics, let’s dig in and see how we can use the grid manager in our projects.
Simple Example using Grid Manager
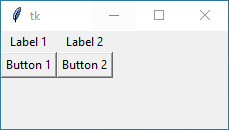
In this example, we’re creating a simple Tkinter window with four widgets: two labels and two buttons. We’ll use the grid manager to arrange these widgets in a 2×2 grid layout.
Example:
import tkinter as tk

# Create a Tkinter window
window = tk.Tk()

# Create widgets
label1 = tk.Label(window, text="Label 1")
label2 = tk.Label(window, text="Label 2")
button1 = tk.Button(window, text="Button 1")
button2 = tk.Button(window, text="Button 2")

# Arrange widgets using the grid manager
label1.grid(row=0, column=0)  # Place label1 in row 0, column 0
label2.grid(row=0, column=1)  # Place label2 in row 0, column 1
button1.grid(row=1, column=0)  # Place button1 in row 1, column 0
button2.grid(row=1, column=1)  # Place button2 in row 1, column 1

# Run the Tkinter event loop
window.mainloop()
Output:
Grid Geometry Manager Options
Now, let’s explore the configuration options available with Tkinter’s Grid Geometry Manager. These options allow us to fine-tune the placement and appearance of our widgets within the grid.
row and column
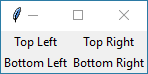
Row and column options specify the position of a widget within the grid layout. For example, widget.grid(row=1, column=2) places the widget in the second row and third column of the grid.
Let’s create a Tkinter window with a unique layout using rows and columns!
Example:
import tkinter as tk

# Create a Tkinter window
window = tk.Tk()

# Create widgets
label1 = tk.Label(window, text="Top Left")
label2 = tk.Label(window, text="Top Right")
label3 = tk.Label(window, text="Bottom Left")
label4 = tk.Label(window, text="Bottom Right")

# Arrange widgets using the grid manager
label1.grid(row=0, column=0)
label2.grid(row=0, column=1)
label3.grid(row=1, column=0)
label4.grid(row=1, column=1)

# Run the Tkinter event loop
window.mainloop()
Output:
rowspan and columnspan
The rowspan and columnspan options let you make a widget stretch across multiple rows or columns in the grid.
For instance, widget.grid(row=0, column=0, columnspan=2) makes the widget span across two columns, starting from the first column.
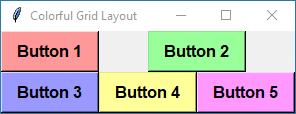
Ok now, let’s put rowspan and columnspan to the test with a fun little example.
Example:
import tkinter as tk

# Create a Tkinter window
window = tk.Tk()
window.title("Colorful Grid Layout")  # Set window title

# Define colors for buttons
button_colors = ["#ff9999", "#99ff99", "#9999ff", "#ffff99", "#ff99ff"]

# Create buttons with different colors
buttons = []
for i, color in enumerate(button_colors):
    # Create button with specified color, text, font, and padding
    button = tk.Button(window, text=f"Button {i+1}", bg=color, fg="black", padx=10, pady=5, font=("Arial", 12, "bold"))
    buttons.append(button)

# Arrange buttons using the grid manager
buttons[0].grid(row=0, column=0)  # Place button 1 in row 0, column 0
buttons[1].grid(row=0, column=1, columnspan=2)  # Place button 2 spanning columns 1 and 2 in row 0
buttons[2].grid(row=1, column=0, rowspan=2)  # Place button 3 spanning rows 1 and 2 in column 0
buttons[3].grid(row=1, column=1)  # Place button 4 in row 1, column 1
buttons[4].grid(row=1, column=2)  # Place button 5 in row 1, column 2

# Run the Tkinter event loop
window.mainloop()
Output:
padx and pady
If you want a bit of space around your widget, you can add it with padx and pady. They create some empty space horizontally and vertically.
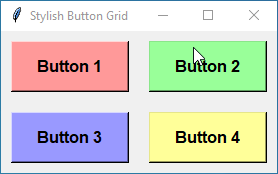
Let’s create a simple example that shows the use of padx and pady.
Example:
import tkinter as tk

# Create a Tkinter window
window = tk.Tk()
window.title("Stylish Button Grid")

# Define colors for buttons
button_colors = ["#ff9999", "#99ff99", "#9999ff", "#ffff99"]

# Create buttons with different colors and text
buttons = []
for i, color in enumerate(button_colors):
    button_text = f"Button {i+1}"
    button = tk.Button(window, text=button_text, bg=color, fg="black", padx=20, pady=10, font=("Arial", 12, "bold"))
    buttons.append(button)

# Arrange buttons using the grid manager with padx and pady
for i, button in enumerate(buttons):
    button.grid(row=i // 2, column=i % 2, padx=10, pady=10)

# Run the Tkinter event loop
window.mainloop()
Output:
ipadx and ipady
Sometimes, you want to add some extra space inside a widget. The ipadx and ipady options allow you to add padding inside the widget, between its contents and its edges.
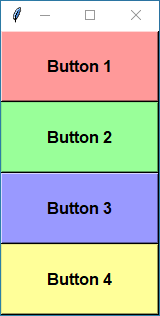
Now, we’ll create a Tkinter window with buttons styled like colorful tiles, and we’ll use ipadx and ipady to add some space inside each button, making them look even more elegant and modern.
Example:
import tkinter as tk

# Create a Tkinter window
window = tk.Tk()
window.title("Stylish Button Tiles")

# Define colors for buttons
button_colors = ["#ff9999", "#99ff99", "#9999ff", "#ffff99"]

# Create buttons with different colors and text
buttons = []
for i, color in enumerate(button_colors):
    button_text = f"Button {i+1}"
    button = tk.Button(window, text=button_text, bg=color, fg="black", padx=20, pady=10, font=("Arial", 12, "bold"))
    buttons.append(button)

# Arrange buttons using the grid manager with ipadx and ipady
for i, button in enumerate(buttons):
    button.grid(row=i, column=0, ipadx=20, ipady=10)

# Run the Tkinter event loop
window.mainloop()
Output:
sticky
The sticky is like glue for widgets. It controls how a widget sticks to the edges of its grid cell. You can make a widget stick to the north, south, east, or west sides, or even to all sides at once.
Acceptable values are – "n", "s", "e", "w", "nw", "ne", "sw", "se", "ns", "ew", "nsew".
Let’s create a simple example using the sticky option with different values to demonstrate its effect on widget placement and alignment.
Example:
import tkinter as tk

# Create a Tkinter window
window = tk.Tk()
window.title("Sticky Options Example")

# Create labels with different text and colors
label1 = tk.Label(window, text="Top Left", bg="lightblue", padx=10, pady=5, font=("Arial", 12))
label2 = tk.Label(window, text="Top Right", bg="lightgreen", padx=10, pady=5, font=("Arial", 12))
label3 = tk.Label(window, text="Bottom Left", bg="lightcoral", padx=10, pady=5, font=("Arial", 12))
label4 = tk.Label(window, text="Bottom Right", bg="lightyellow", padx=10, pady=5, font=("Arial", 12))

# Arrange labels using the grid manager with different sticky values
label1.grid(row=0, column=0, sticky="nw")  # Stick label1 to the northwest corner
label2.grid(row=0, column=1, sticky="ne")  # Stick label2 to the northeast corner
label3.grid(row=1, column=0, sticky="sw")  # Stick label3 to the southwest corner
label4.grid(row=1, column=1, sticky="se")  # Stick label4 to the southeast corner

# Run the Tkinter event loop
window.mainloop()
Output:

Design a Vibrant Layout with Tkinter Grid Geometry Manager
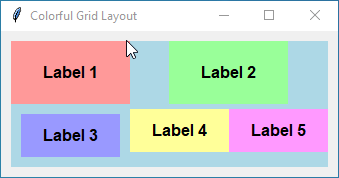
Let’s create a beautiful layout using the Tkinter grid geometry manager, incorporating all the grid options.
Example:
import tkinter as tk

# Create the Tkinter window
root = tk.Tk()
root.title("Colorful Grid Layout")

# Define colors for widgets
colors = ["#ff9999", "#99ff99", "#9999ff", "#ffff99", "#ff99ff"]

# Create a frame container with a blue background
container = tk.Frame(root, background='lightblue')
container.grid(padx=10, pady=10)

# Create and position widgets with different grid options
for i, color in enumerate(colors):
    # Create labels with text and background color
    label = tk.Label(container, text=f"Label {i+1}", bg=color, fg="black", padx=20, pady=10, font=("Arial", 12, "bold"))
    # Position labels with grid options
    if i == 0:
        label.grid(row=0, column=0, sticky="nsew")
    elif i == 1:
        label.grid(row=0, column=1, columnspan=2, ipadx=10, ipady=10)
    elif i == 2:
        label.grid(row=1, column=0, rowspan=2, padx=10, pady=10)
    elif i == 3:
        label.grid(row=1, column=1)
    elif i == 4:
        label.grid(row=1, column=2)
    elif i == 5:
        label.grid(row=0, column=3, rowspan=3, sticky="ns")
    elif i == 6:
        label.grid(row=0, column=4, rowspan=3, sticky="nswe")

# Run the Tkinter event loop
root.mainloop()
Output:
Grid Configuration in Tkinter
In Tkinter, making grid-based layouts gets even easier with the grid_configure(), grid_rowconfigure(), and grid_columnconfigure() methods. So, now let’s learn about these configuration methods.
grid_configure()
The grid_configure() method allows you to modify the grid options of a widget that has already been placed within the grid. This means you can tweak properties like row, column, columnspan, rowspan, padx, pady, ipadx, ipady, and sticky after the widget has been initially placed.
Let’s create an example to demonstrate the usage of grid_configure() in Tkinter:
Example:
import tkinter as tk

# Function to update label configuration
def update_label_config():
    label.grid_configure(row=1, column=1, padx=10, pady=10, ipadx=5, ipady=5, sticky="nsew")

# Create the Tkinter window
root = tk.Tk()
root.title("Using grid_configure()")

# Create a label widget and place it in the grid
label = tk.Label(root, text="Original Label", bg="lightblue", padx=20, pady=10)
label.grid(row=0, column=0)

# Create a button to update label configuration
update_button = tk.Button(root, text="Update Label", command=update_label_config)
update_button.grid(row=1, column=0)

# Run the Tkinter event loop
root.mainloop()
Output:
grid_rowconfigure()
The grid_rowconfigure() method allows you to set specific rules for each row in your Tkinter grid layout. This helps you control things like row size, spacing, and how they adjust when you resize the window.
With grid_rowconfigure(), you can use these parameters.
weight | With weight, you can tell Tkinter how much extra space each row should get when the window is resized. A higher weight means more space. For example, a row with weight 2 gets twice as much extra space as a row with weight 1. |
minsize | This option sets the minimum height for a row, ensuring that it doesn’t shrink beyond a specified size. You specify the minimum size in pixels. |
pad | The pad option adds padding (extra space) above and below a row. |
Let’s Get Practical:
Example:
import tkinter as tk

# Create the Tkinter window
root = tk.Tk()
root.title("Customizing Rows")

# Create labels with different colors and text
label1 = tk.Label(root, text="Label 1", bg="lightblue", padx=20, pady=10)
label2 = tk.Label(root, text="Label 2", bg="lightgreen", padx=20, pady=10)
label3 = tk.Label(root, text="Label 3", bg="lightcoral", padx=20, pady=10)

# Create buttons with different colors and text
button1 = tk.Button(root, text="Button 1", bg="lightpink", padx=10, pady=5)
button2 = tk.Button(root, text="Button 2", bg="lightyellow", padx=10, pady=5)
button3 = tk.Button(root, text="Button 3", bg="lightcyan", padx=10, pady=5)

# Place labels and buttons in the grid
label1.grid(row=0, column=0, sticky="nsew")
label2.grid(row=1, column=0, sticky="nsew")
label3.grid(row=2, column=0, sticky="nsew")
button1.grid(row=0, column=1, sticky="nsew")
button2.grid(row=1, column=1, sticky="nsew")
button3.grid(row=2, column=1, sticky="nsew")

# Customize row 1 to stretch, have a minimum height, and add padding
root.grid_rowconfigure(1, weight=1, minsize=100, pad=20)

# Run the Tkinter event loop
root.mainloop()
Output:
grid_columnconfigure()
The grid_columnconfigure() is a method in Tkinter that allows you to configure the properties of columns within a grid layout. Similar to grid_rowconfigure(), it offers options such as weight, minsize, and pad to customize column properties.
Here is a simple example that shows the use of grid_columnconfigure():
Example:
import tkinter as tk

# Create the Tkinter window
root = tk.Tk()
root.title("Customizing Columns")

# Create buttons with different colors and text
button1 = tk.Button(root, text="Button 1", bg="lightblue", padx=20, pady=10)
button2 = tk.Button(root, text="Button 2", bg="lightgreen", padx=20, pady=10)
button3 = tk.Button(root, text="Button 3", bg="lightcoral", padx=20, pady=10)

# Create entry widgets for user input
entry1 = tk.Entry(root, bg="lightyellow", width=20)
entry2 = tk.Entry(root, bg="lightcyan", width=20)
entry3 = tk.Entry(root, bg="lightpink", width=20)

# Place buttons and entry widgets in the grid
button1.grid(row=0, column=0, sticky="nsew", padx=5, pady=5)
button2.grid(row=1, column=0, sticky="nsew", padx=5, pady=5)
button3.grid(row=2, column=0, sticky="nsew", padx=5, pady=5)
entry1.grid(row=0, column=1, sticky="nsew", padx=5, pady=5)
entry2.grid(row=1, column=1, sticky="nsew", padx=5, pady=5)
entry3.grid(row=2, column=1, sticky="nsew", padx=5, pady=5)

# Customize column 1 to stretch, have a minimum width, and add padding
root.grid_columnconfigure(1, weight=1, minsize=150, pad=20)

# Run the Tkinter event loop
root.mainloop()
Output:
Grid Geometry Manager Methods
The Grid Geometry Manager offers various methods to manipulate widgets within a grid layout dynamically. Let’s explore each method with a simple example.
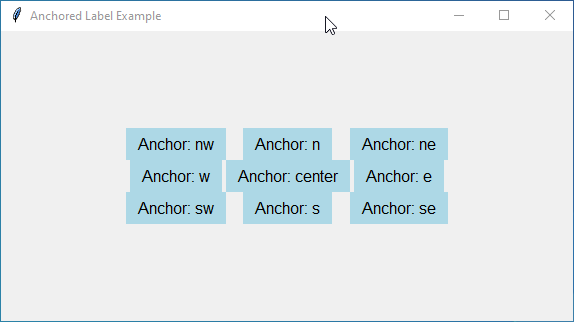
grid_anchor()
The grid_anchor() method lets you specify where your widget should be anchored within its allocated space in the grid cell.
Let’s create a simple example using the grid_anchor() method that illustrates how you can position the root window itself within its parent container.
Example:
import tkinter as tk

# Create the Tkinter window and anchor it to the center
root = tk.Tk()
root.grid_anchor("center")
root.title("Anchored Label Example")

# Define a list of anchor positions
anchor_positions = ["nw", "n", "ne", "w", "center", "e", "sw", "s", "se"]

# Create and position labels around the anchored root window
for i, anchor in enumerate(anchor_positions):
    label = tk.Label(root, text=f"Anchor: {anchor}", padx=10, pady=5, bg="lightblue", fg="black", font=("Arial", 12))
    label.grid(row=i // 3, column=i % 3)
    # Apply grid_anchor() to position labels
    label.grid_anchor(anchor)

# Run the Tkinter event loop
root.mainloop()
Output:
grid_forget()
The grid_forget() method removes a widget from the grid layout entirely, freeing up its grid cell for other widgets. If you want to display the widget again, you’ll need to reconfigure its placement within the grid using the grid() method.
Let’s create an example showcasing the use of grid_forget() method in Tkinter.
Example:
import tkinter as tk

def remove_widget():
    widget.grid_forget()
    remove_button.config(state=tk.DISABLED)
    add_button.config(state=tk.NORMAL)

def add_widget():
    widget.grid(row=1, column=0, padx=10, pady=10)
    remove_button.config(state=tk.NORMAL)
    add_button.config(state=tk.DISABLED)

# Create the Tkinter window
root = tk.Tk()
root.title("Grid Forget Example")

# Create a widget
widget = tk.Label(root, text="I'm a widget!", bg="lightgreen", padx=20, pady=10, font=("Arial", 12))

# Create buttons to remove and add the widget
remove_button = tk.Button(root, text="Remove Widget", command=remove_widget)
add_button = tk.Button(root, text="Add Widget", command=add_widget, state=tk.DISABLED)

# Position widgets using grid
widget.grid(row=1, column=0, padx=10, pady=10)
remove_button.grid(row=0, column=0, padx=10, pady=5)
add_button.grid(row=2, column=0, padx=10, pady=5)

# Run the Tkinter event loop
root.mainloop()
Output:
grid_info()
The grid_info() method returns a neat dictionary filled with the details about your widget’s placement in the grid.
Let’s create an example demonstrating the grid_info() method in Tkinter.
Example:
import tkinter as tk

def show_grid_info():
    # Clear any previous information
    info_label.config(text="")

    # Get grid info for each label and display it
    for label in labels:
        label_info = label.grid_info()
        info_label.config(text=info_label.cget("text") + f"{label.cget('text')} info: {label_info}\n")

# Create the Tkinter window
root = tk.Tk()
root.title("Grid Info Example")

# Create a frame container
container = tk.Frame(root, padx=10, pady=10)
container.grid()

# Create labels in a grid layout
labels = []
for i in range(3):
    for j in range(3):
        label_text = f"Label {i+1}-{j+1}"
        label = tk.Label(container, text=label_text, padx=10, pady=5, bg="lightblue")
        label.grid(row=i, column=j, padx=5, pady=5)
        labels.append(label)

# Button to show grid info
info_button = tk.Button(root, text="Show Grid Info", command=show_grid_info)
info_button.grid()

# Label to display grid info
info_label = tk.Label(root, text="", bg="lightyellow", padx=10, pady=10)
info_label.grid()

# Run the Tkinter event loop
root.mainloop()
Output:
grid_remove()
The grid_remove() method helps you to temporarily remove a widget from the grid layout while retaining its configuration settings and grid cell. You can easily bring it back later using the grid() method.
Here’s an example demonstrating the use of both grid_remove() and grid_forget() methods.
Example:
import tkinter as tk

def remove_label():
    label.grid_remove()
    remove_button.config(state=tk.DISABLED)
    add_button.config(state=tk.NORMAL)

def add_label():
    label.grid()
    remove_button.config(state=tk.NORMAL)
    add_button.config(state=tk.DISABLED)

def forget_label():
    label.grid_forget()
    forget_button.config(state=tk.DISABLED)
    recall_button.config(state=tk.NORMAL)

def recall_label():
    label.grid()
    forget_button.config(state=tk.NORMAL)
    recall_button.config(state=tk.DISABLED)

# Create the Tkinter window
root = tk.Tk()
root.title("Grid Management Example")

# Create a label widget
label = tk.Label(root, text="Hello, World!", bg="lightblue", padx=20, pady=10, font=("Arial", 12))

# Create buttons to remove and add the label
remove_button = tk.Button(root, text="Remove Label", command=remove_label)
add_button = tk.Button(root, text="Add Label", command=add_label, state=tk.DISABLED)

# Create buttons to forget and recall the label
forget_button = tk.Button(root, text="Forget Label", command=forget_label)
recall_button = tk.Button(root, text="Recall Label", command=recall_label, state=tk.DISABLED)

# Position widgets using grid
label.grid(row=0, column=0, padx=10, pady=10)
remove_button.grid(row=1, column=0, padx=10, pady=5)
add_button.grid(row=2, column=0, padx=10, pady=5)
forget_button.grid(row=3, column=0, padx=10, pady=5)
recall_button.grid(row=4, column=0, padx=10, pady=5)

# Run the Tkinter event loop
root.mainloop()
Output:
grid_size()
The grid_size() method returns a tuple containing the number of rows and columns in your grid, so you’ll always know how much space you’re working with.
Let’s create a simple example to demonstrate the grid_size() method in Tkinter.
Example:
import tkinter as tk

def print_grid_size():
    # Get the size of the grid
    size = root.grid_size()
    # Update the label with the grid size
    size_label.config(text=f"Number of rows: {size[1]}, Number of columns: {size[0]}")

# Create the Tkinter window
root = tk.Tk()
root.title("Grid Size Example")

# Create labels
label1 = tk.Label(root, text="Label 1")
label2 = tk.Label(root, text="Label 2")
label3 = tk.Label(root, text="Label 3")

# Create buttons
button1 = tk.Button(root, text="Button 1")
button2 = tk.Button(root, text="Button 2")
button3 = tk.Button(root, text="Button 3")

# Position widgets using the grid manager
label1.grid(row=0, column=0, padx=10, pady=5)
label2.grid(row=1, column=0, padx=10, pady=5)
label3.grid(row=2, column=0, padx=10, pady=5)

button1.grid(row=0, column=1, padx=10, pady=5)
button2.grid(row=1, column=1, padx=10, pady=5)
button3.grid(row=2, column=1, padx=10, pady=5)

# Create a label to display the grid size
size_label = tk.Label(root, text="")
size_label.grid(row=3, columnspan=2, pady=10)

# Create a button to update the label with the grid size
print_button = tk.Button(root, text="Print Grid Size", command=print_grid_size)
print_button.grid(row=4, columnspan=2, pady=10)

# Run the Tkinter event loop
root.mainloop()
Output:
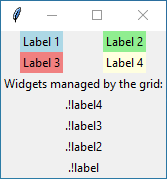
grid_slaves()
The grid_slaves() method gives you a list of all the widgets currently managed by the grid.
Let’s create a simple example to showcase the grid_slaves() method in action.
Example:
import tkinter as tk

# Create the Tkinter window
root = tk.Tk()
root.title("Grid Slaves Example")

# Create widgets and arrange them in a grid layout
label1 = tk.Label(root, text="Label 1", bg="lightblue")
label2 = tk.Label(root, text="Label 2", bg="lightgreen")
label3 = tk.Label(root, text="Label 3", bg="lightcoral")
label4 = tk.Label(root, text="Label 4", bg="lightyellow")

label1.grid(row=0, column=0)
label2.grid(row=0, column=1)
label3.grid(row=1, column=0)
label4.grid(row=1, column=1)

# Use grid_slaves() to obtain a list of all widgets managed by the grid
slaves = root.grid_slaves()

# Create a label to display the list of slaves
slaves_label = tk.Label(root, text="Widgets managed by the grid:")
slaves_label.grid(row=2, column=0, columnspan=2)

# Create labels to display each widget's information
for i, slave in enumerate(slaves):
    slave_label = tk.Label(root, text=slave)
    slave_label.grid(row=i+3, column=0, columnspan=2)

# Run the Tkinter event loop
root.mainloop()
Output:
Understanding Grid Propagation
By default, Tkinter widgets can cause their parent container (usually a frame or window) to resize based on their dimensions. The grid_propagate() method gives you control over how widgets influence the size of their parent containers in grid layouts.
For example, When grid_propagate(False) is called on a container widget, it tells Tkinter not to adjust the size of the container based on the size of its child widgets. This means that even if child widgets are added or removed, the size of the container remains fixed, as determined by the programmer.
Conversely, calling grid_propagate(True) lets Tkinter know that it’s okay for the container to resize itself based on its child widgets. This is the default behavior.
Example:
import tkinter as tk

# Create the Tkinter window
root = tk.Tk()
root.title("Mastering Grid Propagation")

# Create a frame container with grid propagation ON
frame_on = tk.Frame(root, bg="lightblue", width=250, height=100)
frame_on.grid(row=0, column=0, padx=10, pady=10)

# Add a label to the container with propagation ON
label_on = tk.Label(frame_on, text="Resizable Frame (Propagation ON)", bg="lightgreen")
label_on.grid()

# Create a frame container with grid propagation OFF
frame_off = tk.Frame(root, bg="lightblue", width=250, height=100)
frame_off.grid(row=0, column=1, padx=10, pady=10)

# Turn off grid propagation for the frame
frame_off.grid_propagate(False)

# Add a label to the container with propagation OFF
label_off = tk.Label(frame_off, text="Non-resizable Frame (Propagation OFF)", bg="lightcoral")
label_off.grid()

# Run the Tkinter event loop
root.mainloop()
Output:

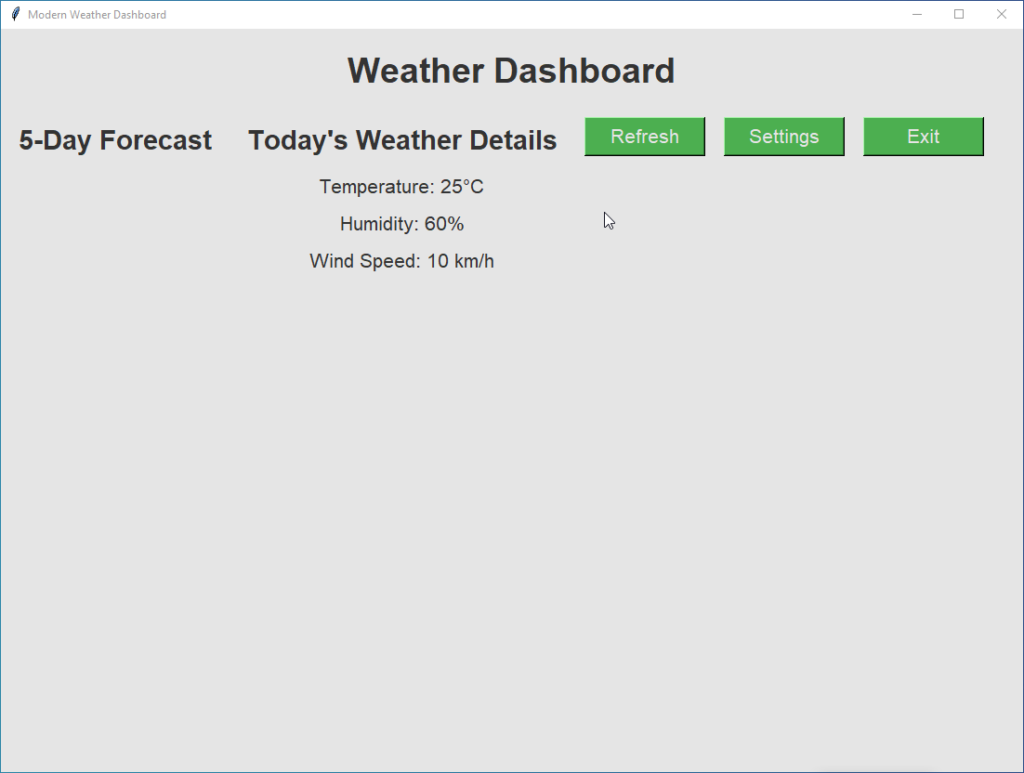
Real-World Example with Tkinter Grid Geometry Manager
Imagine you’re building a weather application, and you want to create a dashboard that displays various weather-related information in a visually appealing layout. You’ll need to design a grid-based interface that neatly organizes widgets such as labels, icons, and buttons to provide users with a seamless experience.
Example:
import tkinter as tk

root = tk.Tk()
root.title("Modern Weather Dashboard")
root.geometry("1100x800")

background_color = "#E5E5E5"
widget_color = "#FFFFFF"
accent_color = "#4CAF50"

header_frame = tk.Frame(root, bg=background_color)
header_frame.grid(row=0, column=0, columnspan=3, sticky="ew")

forecast_frame = tk.Frame(root, bg=background_color)
forecast_frame.grid(row=1, column=0, rowspan=2, sticky="nsew")

details_frame = tk.Frame(root, bg=background_color)
details_frame.grid(row=1, column=1, sticky="nsew")

controls_frame = tk.Frame(root, bg=background_color)
controls_frame.grid(row=1, column=2, sticky="nsew")

header_label = tk.Label(header_frame, text="Weather Dashboard", font=("Arial", 28, "bold"), bg=background_color, fg="#333333")
header_label.pack(pady=20)

forecast_label = tk.Label(forecast_frame, text="5-Day Forecast", font=("Arial", 22, "bold"), bg=background_color, fg="#333333")
forecast_label.pack(pady=10)

details_label = tk.Label(details_frame, text="Today's Weather Details", font=("Arial", 22, "bold"), bg=background_color, fg="#333333")
details_label.pack(pady=10)

refresh_button = tk.Button(controls_frame, text="Refresh", font=("Arial", 16), bg=accent_color, fg=background_color, width=10)
refresh_button.grid(row=0, column=0, padx=10, pady=5)

settings_button = tk.Button(controls_frame, text="Settings", font=("Arial", 16), bg=accent_color, fg=background_color, width=10)
settings_button.grid(row=0, column=1, padx=10, pady=5)

exit_button = tk.Button(controls_frame, text="Exit", font=("Arial", 16), bg=accent_color, fg=background_color, width=10)
exit_button.grid(row=0, column=2, padx=10, pady=5)

# Additional Widgets
temperature_label = tk.Label(details_frame, text="Temperature: 25°C", font=("Arial", 16), bg=background_color, fg="#333333")
temperature_label.pack(pady=5)

humidity_label = tk.Label(details_frame, text="Humidity: 60%", font=("Arial", 16), bg=background_color, fg="#333333")
humidity_label.pack(pady=5)

wind_label = tk.Label(details_frame, text="Wind Speed: 10 km/h", font=("Arial", 16), bg=background_color, fg="#333333")
wind_label.pack(pady=5)

# Configure grid layout to resize dynamically
for i in range(3):
    root.columnconfigure(i, weight=1)
root.rowconfigure(1, weight=1)

root.mainloop()
Output: