Tkinter Frame
In Tkinter, a Frame is a fundamental widget that serves as a container for other widgets, allowing you to group and arrange them logically. You can also design complex layouts by nesting frames within frames.
Creating Your First Tkinter Frame
To create a Tkinter Frame, you need to import the Tkinter module and then instantiate a Frame object. Here’s a simple example to help you get started:
Example:
import tkinter as tk

# Creating the main window
root = tk.Tk()

# Creating a frame
my_frame = tk.Frame(root)

# Displaying the frame
my_frame.pack()

# Adding a button to the frame
my_button = tk.Button(my_frame, text="Click Me!")

# Adding a label to the frame
my_label = tk.Label(my_frame, text="Hello, Tkinter!")

# Packing widgets to make them visible
my_button.pack()
my_label.pack()

root.mainloop()
Output:

Customizing Tkinter Frames
Understanding and utilizing the key customization options for Frames can enhance the visual appeal. Let’s explore two of the most commonly used options for customizing Frames: background color (bg or background) and padding (padx and pady).
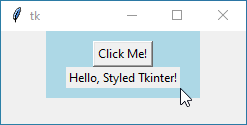
The background color option allows you to specify the color of the Frame’s background. By default, the background color is typically the same as the parent widget (usually the main application window).
And padding refers to the space around the contents of the Frame. By adjusting the padx (horizontal padding) and pady (vertical padding) options, you can control the amount of space between the Frame’s contents and its borders.
Here’s a simple example that shows you the effect of these options.
Example:
import tkinter as tk

# Creating the main window
root = tk.Tk()

# Creating a styled frame
styled_frame = tk.Frame(root, bg="lightblue", padx=20, pady=10)

# Adding a button to the styled frame
styled_button = tk.Button(styled_frame, text="Click Me!")

# Adding a label to the styled frame
styled_label = tk.Label(styled_frame, text="Hello, Styled Tkinter!")

# Packing widgets to make them visible
styled_button.pack()
styled_label.pack()

# Displaying the styled frame
styled_frame.pack()

root.mainloop()
Output:
Additional standard options available for the Frame widget include:
borderwidthcursorhighlightbackgroundhighlightcolorhighlightthicknesspadxpadyrelief
For further details on these options, please refer to the Tkinter Standard Option.
Exploring Custom Designs for Tkinter Frames
You can create frames that reflect various themes and styles by leveraging customization options. Here are some creative designs to inspire your Tkinter projects:
Rainbow Frame
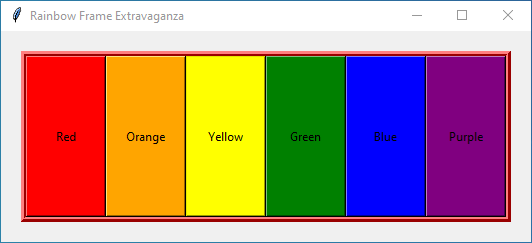
Experiment with different color combinations to achieve a visually stunning display.
Example:
import tkinter as tk

# Creating the main window
root = tk.Tk()

# Setting the title
root.title("Rainbow Frame Extravaganza")

# Creating a rainbow frame
rainbow_frame = tk.Frame(root, bg="red", bd=5, relief=tk.RIDGE)

# Adding colorful buttons
red_button = tk.Button(rainbow_frame, text="Red", bg="Red", width=10, height=10)
orange_button = tk.Button(rainbow_frame, text="Orange", bg="Orange", width=10, height=10)
yellow_button = tk.Button(rainbow_frame, text="Yellow", bg="Yellow", width=10, height=10)
green_button = tk.Button(rainbow_frame, text="Green", bg="Green", width=10, height=10)
blue_button = tk.Button(rainbow_frame, text="Blue", bg="Blue", width=10, height=10)
purple_button = tk.Button(rainbow_frame, text="Purple", bg="Purple", width=10, height=10)

# Packing buttons for a vibrant display
red_button.pack(side=tk.LEFT)
orange_button.pack(side=tk.LEFT)
yellow_button.pack(side=tk.LEFT)
green_button.pack(side=tk.LEFT)
blue_button.pack(side=tk.LEFT)
purple_button.pack(side=tk.LEFT)

# Displaying the rainbow frame
rainbow_frame.pack(padx=20, pady=20)

# Running the colorful GUI
root.mainloop()
Output:
Party Frame
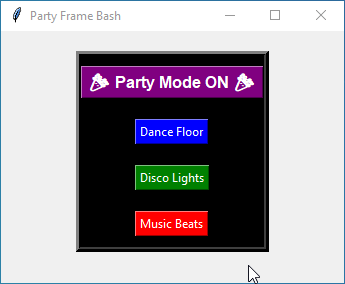
This frame is your virtual party space with buttons that light up and bring the party vibes to your screen.
Example:
import tkinter as tk

# Creating the main window
root = tk.Tk()

# Setting the title
root.title("Party Frame Bash")

# Creating a party frame
party_frame = tk.Frame(root, bg="black", bd=5, relief=tk.RAISED)

# Adding dynamic party buttons
party_button_1 = tk.Button(party_frame, text="🎉 Party Mode ON 🎉", bg="purple", fg="white", font=("Helvetica", 12, "bold"))
party_button_2 = tk.Button(party_frame, text="Dance Floor", bg="blue", fg="white")
party_button_3 = tk.Button(party_frame, text="Disco Lights", bg="green", fg="white")
party_button_4 = tk.Button(party_frame, text="Music Beats", bg="red", fg="white")

# Packing buttons to set the party mood
party_button_1.pack(pady=10)
party_button_2.pack(pady=10)
party_button_3.pack(pady=10)
party_button_4.pack(pady=10)

# Displaying the party frame
party_frame.pack(padx=20, pady=20)

# Running the lively GUI party
root.mainloop()
Output:
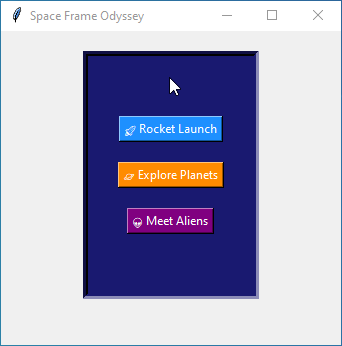
Space Frame
A frame that has deep, dark hues like midnight blue or cosmic purple to represent outer space and buttons representing celestial elements.
Example:
import tkinter as tk

# Creating the main window
root = tk.Tk()

# Setting the title
root.title("Space Frame Odyssey")

# Creating a space frame
space_frame = tk.Frame(root, bg="midnight blue", bd=5, relief=tk.SUNKEN, padx=30, pady=50)

# Adding space-themed buttons
rocket_button = tk.Button(space_frame, text="🚀 Rocket Launch", bg="dodger blue", fg="white")
planet_button = tk.Button(space_frame, text="🪐 Explore Planets", bg="dark orange", fg="white")
alien_button = tk.Button(space_frame, text="👽 Meet Aliens", bg="purple", fg="white")

# Packing buttons for a cosmic adventure
rocket_button.pack(pady=10)
planet_button.pack(pady=10)
alien_button.pack(pady=10)

# Displaying the space frame
space_frame.pack(padx=20, pady=20)

# Running the cosmic GUI experience
root.mainloop()
Output:
