Tkinter Colorchooser
Welcome to our Tkinter colorchooser tutorial! Here, we’ll explore how to use the colorchooser in Tkinter and why it’s handy for making your app look great. Let’s jump in and see how choosing colors dynamically can level up your Tkinter projects!
Imagine you’re making a program with colorful buttons or backgrounds. You want the colors to match and look nice together, right? However, figuring out the perfect color codes can be tricky and time-consuming. That’s where the Tkinter colorchooser comes in handy!
The colorchooser in Tkinter gives you a simple way to pick colors right within your app. Instead of guessing color codes, you can let users choose any color they like. It’s like having a paint palette for your app!
Creating a Simple Colorchooser
Alright, get ready to add some color to your Tkinter world! In this tutorial, we’ll guide you through creating a simple colorchooser using a neat piece of code.
Imagine you’re building a virtual art gallery where users can choose the background color. Let’s make it happen:
Step 1 :
First, let’s set up our Tkinter window and import the necessary modules.
from tkinter import *
from tkinter import colorchooser

root = Tk()
Step 2 :
Next, we’ll define a function called changecolor()
def changecolor():
    choosecolor = colorchooser.askcolor(
        title="Choose Background Color",
        initialcolor="#F0E68C",  # Initial color (a warm khaki shade)
        parent=root
    )

    colortuplelabel = Label(root, text=f'Selected Color: {choosecolor[1]}')
    colortuplelabel.pack()

    gallery_frame.configure(background=choosecolor[1])
In the changecolor()colorchooser.askcolor()
Now, let’s break down the customization options of colorchooser.askcolor():
title : This option lets you personalize your colorchooser by giving it a title. It’s like naming your color palette – for example, “Pick Your Favorite Color!”
initialcolor : Here, you can set the default color that appears when the colorchooser opens.
parent : Use this option to connect your colorchooser to a specific window. This comes in handy if you have multiple windows and want the colorchooser to appear in a particular one.
Step 3 :
Now, let’s create the art gallery frame with an initial background color of yellow.
# Creating the art gallery frame
gallery_frame = Frame(root, height=500, width=800, background='#F0E68C')
gallery_frame.pack()
Step 4 :
Add a button labeled “Choose Background Color” with a nice font and a light blue background. When clicked, it triggers the changecolor()
# Button to choose background color
btn_choose_color = Button(root, text='Choose Background Color', command=changecolor, font="Arial 16 bold", bg='#87CEEB')
btn_choose_color.pack(pady=20)
Step 5 :
Lastly, keep your Tkinter window running.
root.mainloop()
And there you go! You’re all set to bring some color to your Tkinter art gallery.
Complete Code :
from tkinter import *
from tkinter import colorchooser

root = Tk()

def changecolor():
    choosecolor = colorchooser.askcolor(
        title="Choose Background Color",
        initialcolor="#F0E68C",  # Initial color (a warm khaki shade)
        parent=root
    )

    colortuplelabel = Label(root, text=f'Selected Color: {choosecolor[1]}')
    colortuplelabel.pack()

    gallery_frame.configure(background=choosecolor[1])

# Creating the art gallery frame
gallery_frame = Frame(root, height=500, width=800, background='#F0E68C')
gallery_frame.pack()

# Button to choose background color
btn_choose_color = Button(root, text='Choose Background Color', command=changecolor, font="Arial 16 bold", bg='#87CEEB')
btn_choose_color.pack(pady=20)

root.mainloop()
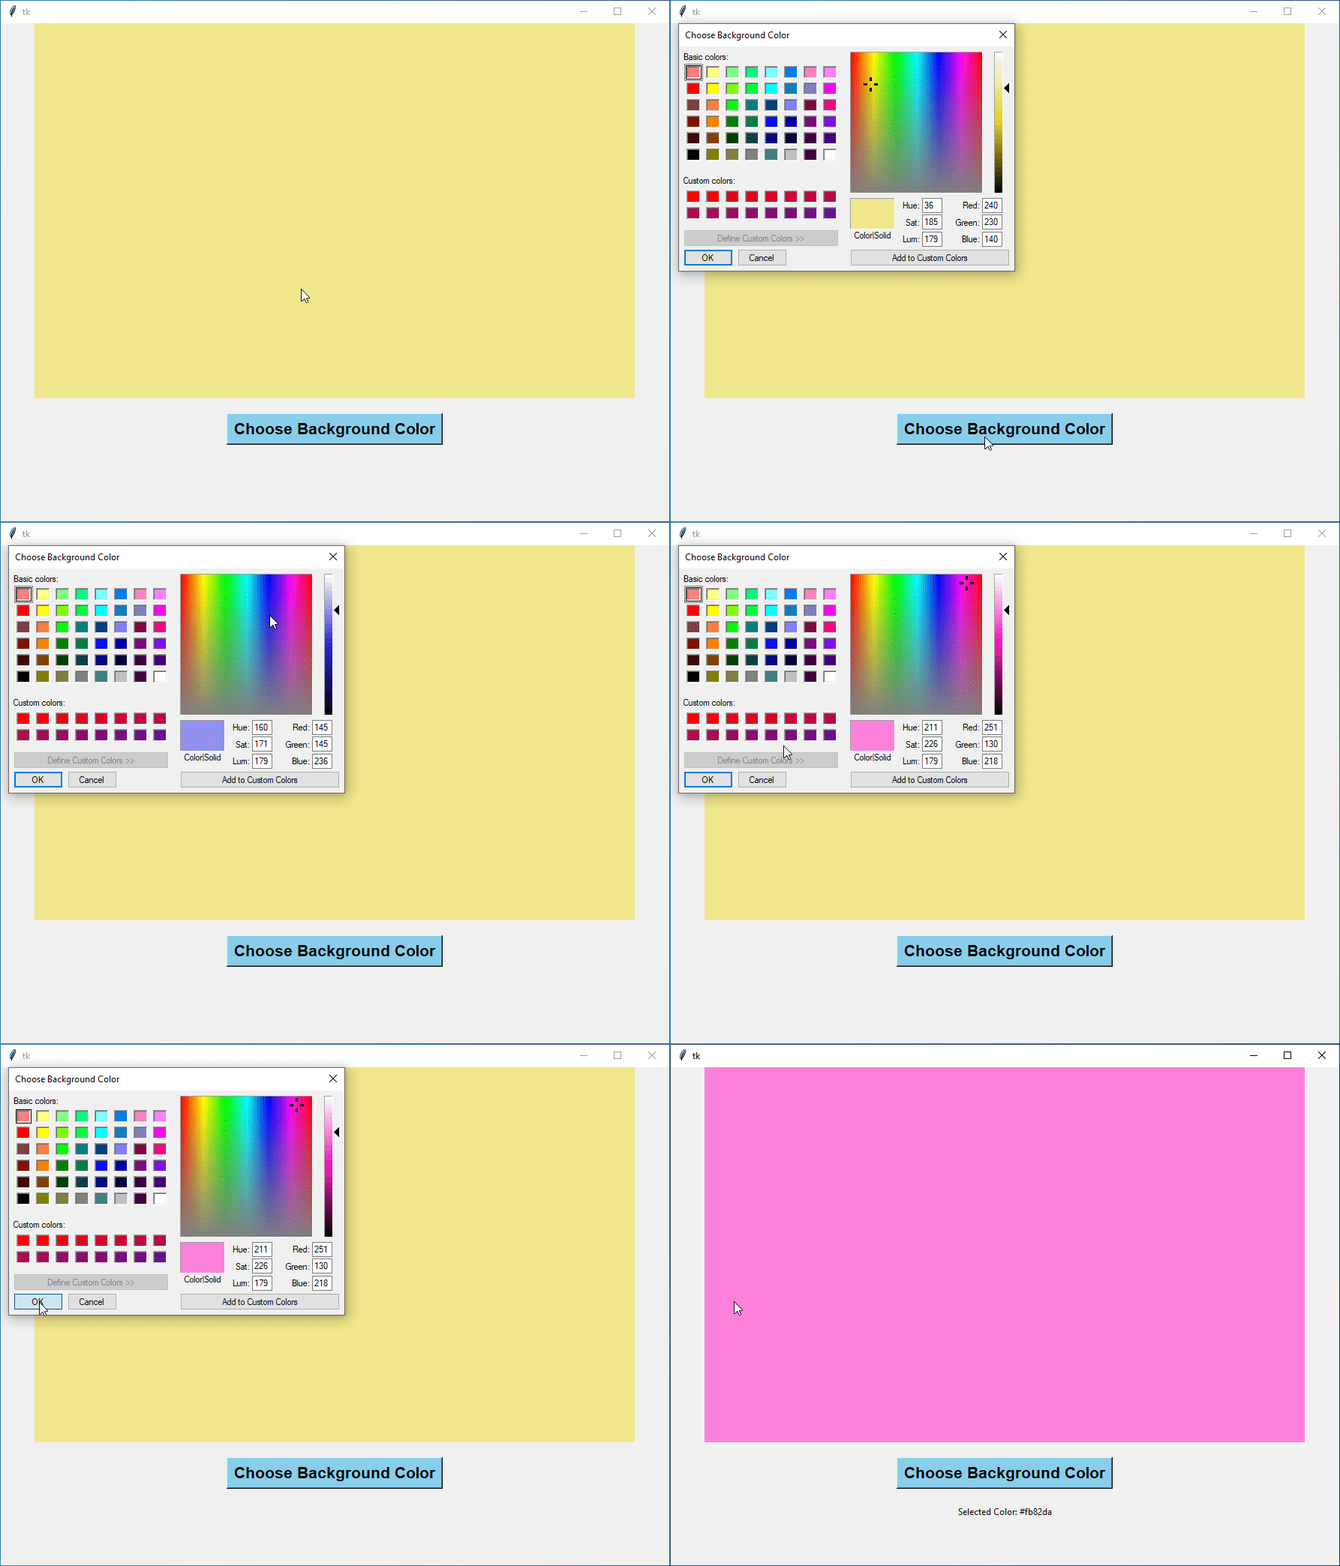
In this example, we’ve created an art gallery frame with an initial background color. Users can simply click the button, choose their favorite background color, and watch as the gallery’s atmosphere changes instantly.
Output :
Real World Examples Using Tkinter Colorchooser
Now, let’s explore how we can use Tkinter’s Colorchooser in a practical application!
Simple Post-it Notes App
Ever wanted to create your own virtual Post-it notes app where you can pick colors for your notes? Let’s jump into the code and make it happen:
import tkinter as tk
from tkinter import colorchooser, simpledialog

class ColorfulNotesApp:
    def __init__(self, root):
        self.root = root
        self.root.title("Colorful Notes App")

        # Dictionary to store notes and their corresponding colors
        self.notes_data = {}

        # Button to add a new note
        btn_add_note = tk.Button(root, text="Add Note", command=self.add_note)
        btn_add_note.pack(pady=10)

    def add_note(self):
        # Get text for the note
        note_text = simpledialog.askstring("Input", "Enter your note:")

        if note_text:
            # Ask user to choose a color
            color = colorchooser.askcolor(title="Choose a Color")[1]

            # Create a label with the note text and set its background color
            note_label = tk.Label(self.root, text=note_text, bg=color)
            note_label.pack(pady=5)

            # Store the note and its color in the dictionary
            self.notes_data[note_text] = color

            # Bind a right-click event to delete the note
            note_label.bind("<Button-3>", lambda event, note_label=note_label: self.delete_note(event, note_label))

    def delete_note(self, event, note_label):
        # Remove the note from the dictionary and destroy the label
        note_text = note_label.cget("text")
        del self.notes_data[note_text]
        note_label.destroy()

# Create the main window
root = tk.Tk()
app = ColorfulNotesApp(root)

# Run the Tkinter event loop
root.mainloop()
Output:
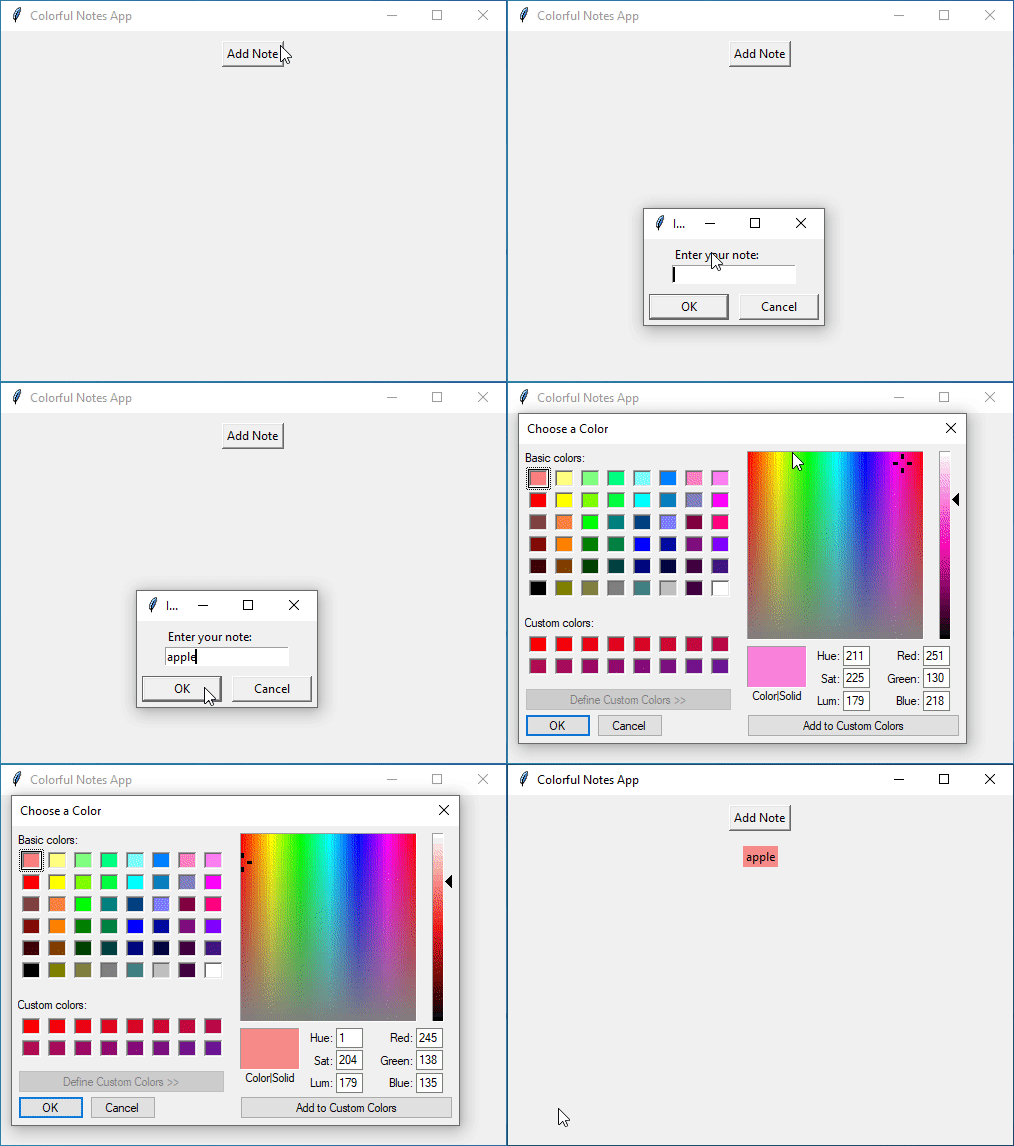
Here’s what’s happening:
- Users can click “Add Note” to input text for a new note.
- Upon adding a note, the Colorchooser pops up for them to choose a background color.
- Each note is displayed as a label with the chosen color.
- If users right-click on a note, it gets deleted.
This app not only shows off the Colorchooser feature but also makes it handy. Users can use colorful notes to organize their stuff, making it both useful and nice to look at!
Creating a Colorful Diary App
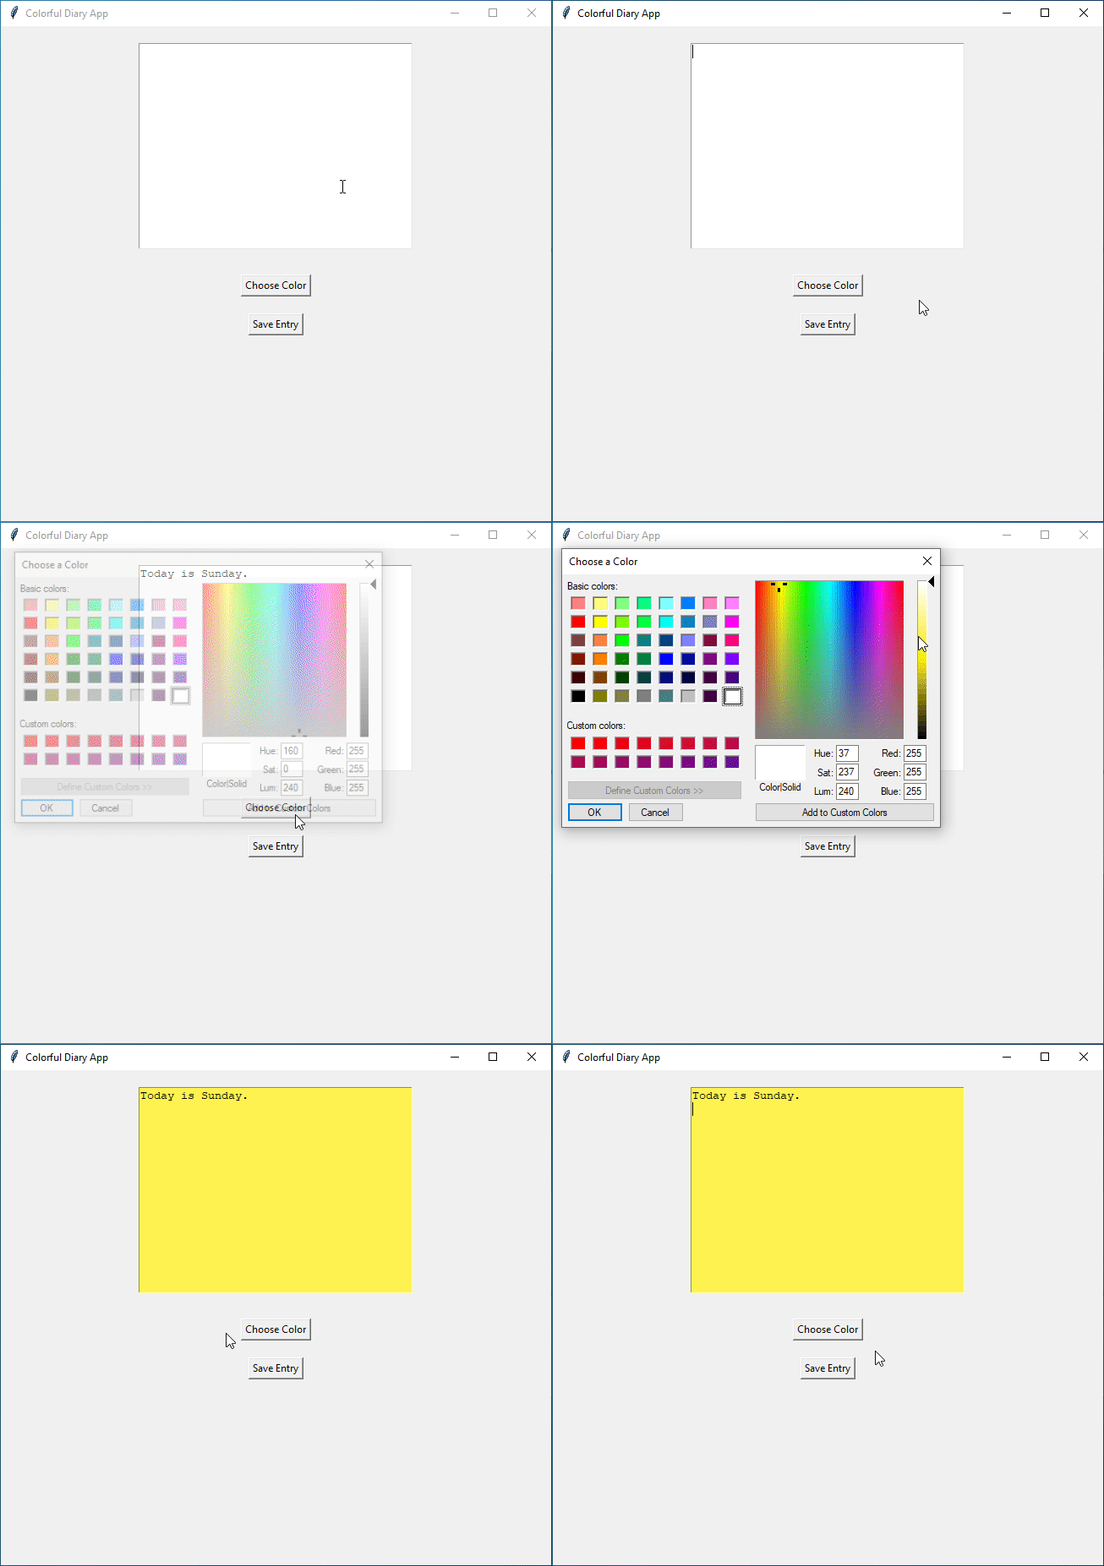
Let’s make a special diary app where users can pick their color theme. Picture each diary entry wrapped in colors that reflect their feelings. Here’s how we’ll make it:
import tkinter as tk
from tkinter import colorchooser, messagebox

# Create the main window
diary_window = tk.Tk()
diary_window.title("Colorful Diary App")
diary_window.geometry("400x400")

# Time to provide a space for users to pour their hearts out.
diary_entry = tk.Text(diary_window, wrap="word", width=40, height=15)
diary_entry.pack(pady=20)

# Here's where the magic happens. Users can choose their theme color!
def choose_color():
    color = colorchooser.askcolor(title="Choose a Color")[1]
    diary_entry.config(bg=color)

# Let's add a button for users to pick their favorite color.
color_button = tk.Button(diary_window, text="Choose Color", command=choose_color)
color_button.pack(pady=10)

# Include a button to save their heartfelt entries.
def save_entry():
    entry_text = diary_entry.get("1.0", "end-1c")
    if not entry_text:
        messagebox.showinfo("Oops!", "Your diary entry is empty. Pour your heart out first!")
    else:
        messagebox.showinfo("Saved!", "Your feelings are safely stored.")

save_button = tk.Button(diary_window, text="Save Entry", command=save_entry)
save_button.pack(pady=10)

# Wrap it all up with the Tkinter event loop
diary_window.mainloop()
Now, users can open the app, pick a color that reflects their emotions, and express themselves through a beautifully themed diary entry. The chosen color becomes a visual expression of their feelings at that particular moment.
Output:
