Tkinter Checkbuttons
A Tkinter Checkbutton is a small box on a graphical user interface (GUI) that can be checked or unchecked. It’s like those little boxes you see next to options on forms or settings menus.
You might need a Tkinter Checkbutton when you want to give users choices in your program. For example, if you’re making a to-do list app, you might use a Checkbutton next to each task so users can mark them as done or not done.
In this tutorial, we’ll explore how to create and use Tkinter Checkbuttons, customize their appearance, add images to them, and even create Checkbuttons without checkmarks.
Create Your First Checkbutton
Let’s start our journey by creating your very first Checkbutton.
Example:
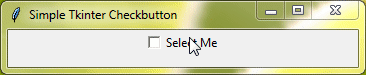
import tkinter as tk

root = tk.Tk()
root.title("Simple Tkinter Checkbutton")

check_var = tk.IntVar()
checkbutton = tk.Checkbutton(root, text="Select Me", variable=check_var)
checkbutton.pack()

root.mainloop()
In this code, we’ve set up Tkinter, created a window, and added a Checkbutton with the label "Select Me". The check_var
Output:
Customizing Checkbuttons
Here are some key options you can use to customize Checkbuttons:
You can adjust the height and width of a Checkbutton to make it fit better in your layout. This allows you to control how big or small the Checkbutton appears on your GUI.
The command option lets you specify a function to be called whenever the Checkbutton is clicked. This means you can make the Checkbutton perform certain actions when it’s toggled on or off.
With the onvalue and offvalue options, you can set custom values to represent the state of the Checkbutton. For example, you could set “1” as the onvalue and “0” as the offvalue, or use any other values that make sense for your application.
The variable option allows you to connect the Checkbutton to a variable in Tkinter. This variable keeps track of whether the Checkbutton is checked or not, making it easy to control its state in your code
Example:
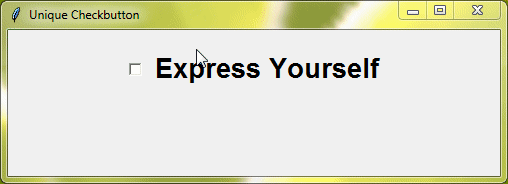
Now, let’s combine these options and make a Checkbutton that does it all: changes size, has special values for when it’s on or off, and even runs a function when you click it!
import tkinter as tk

def toggle():
    if check_var.get() == "On":
        label.config(text="Selected!", font="arial 20 bold")
    else:
        label.config(text="Unselected", font="arial 20 bold")

root = tk.Tk()
root.title("Unique Checkbutton")

check_var = tk.StringVar()
check_var.set("Off")

checkbutton = tk.Checkbutton(root, text="Express Yourself", variable=check_var, onvalue="On", offvalue="Off", width=20, height=2, command=toggle, font="arial 20 bold")
checkbutton.pack()

label = tk.Label(root, text="")
label.pack()

root.mainloop()
Output:
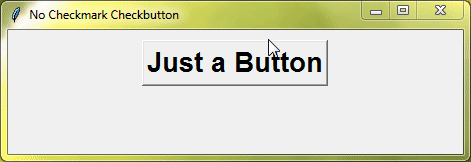
Checkbuttons Without Checkmarks
By default, Tkinter’s Checkbuttons include a small checkmark or box, known as the indicator. However, if you desire a cleaner, button-like appearance, you can achieve this by setting the indicatoron option to 0 (zero). And you’ll get a smooth-looking Checkbutton with no checkmarks in sight.
Example:
Here’s how you can create a Checkbutton without the indicator:
import tkinter as tk

root = tk.Tk()
root.title("No Checkmark Checkbutton")

checkbutton = tk.Checkbutton(root, text="Just a Button", indicatoron=0, font="arial 20 bold")
checkbutton.pack()

root.mainloop()
Output:
Enhancing Checkbutton Style
Besides removing the indicator, you can further style your Checkbutton to match your application’s design with the options below.
offrelief : This decides how the Checkbutton appears when it’s not selected (unchecked). You can choose different styles like “raised”, “sunken”, “ridge”, or “flat” to give it the right look.
overrelief : When your mouse hovers over the Checkbutton, this controls how it looks. It’s a nice way to show users that they can interact with the button.
selectcolor : This lets you pick a color for the Checkbutton when it’s selected (checked).
Example:
Here’s an example that combines these options:
import tkinter as tk

root = tk.Tk()
root.title("Checkbutton Style")

checkbutton = tk.Checkbutton(root, text="Fancy Style", indicatoron=0, offrelief="raised", overrelief="ridge", selectcolor="yellow", font="arial 20 bold")
checkbutton.pack()

root.mainloop()
Output:
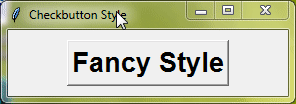
In this example, the Checkbutton has been styled to appear raised when unchecked, have a “ridge” relief when the mouse hovers over it, and turn yellow when selected.
Additional commonly used options:
activebackgroundactiveforegroundanchorbackgroundbitmapborderwidthcompoundcursordisabledforegroundfontforegroundimagejustifypadxpadyrelieftakefocustexttextvariableunderlinewraplength
For a deeper dive into these options, refer to the Tkinter Standard Options.
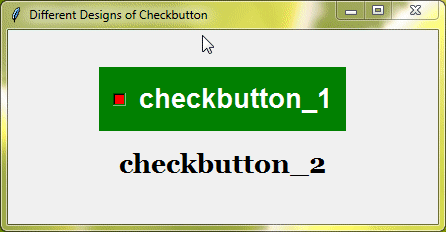
Example:
from tkinter import *

root = Tk()
root.title("Different Designs of Checkbutton")

checkbutton_1 = Checkbutton(root, text="checkbutton_1", selectcolor="red", font="arial 20 bold", background="green", foreground="white", padx=10, pady=10)
checkbutton_1.grid(row=0, column=0,padx=5, pady=5)

checkbutton_2 = Checkbutton(root, text="checkbutton_2", indicatoron=0, offrelief="flat", overrelief="raised", activebackground="red", activeforeground="white", selectcolor="yellow", font="georgia 20 bold")
checkbutton_2.grid(row=1, column=0,padx=5, pady=5)

root.mainloop()
Output:
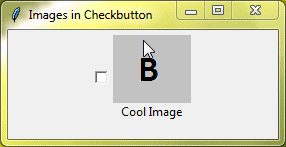
Including Pictures in Checkbuttons
Ok now, imagine you’ve got a Checkbutton, but instead of the usual checkmark, you’d like to use an image to show whether it’s checked or not. Well, you can easily do that by using the image and selectimage options.
Here’s how you can use these options:
image : This option lets you set an image to be displayed when the Checkbutton is unchecked. You can choose any image you like, such as a picture of a box or an empty circle, to represent the unchecked state.
selectimage : When the Checkbutton is checked, this option allows you to specify a different image to be displayed. This image could be a checkmark icon or any other image that indicates the checked state.
Example:
import tkinter as tk
from tkinter import PhotoImage

root = tk.Tk()
root.title("Images in Checkbutton")

# Load images
checked_image = PhotoImage(file="bold.png")
unchecked_image = PhotoImage(file="notbold.png")

check_var = tk.IntVar()
checkbutton = tk.Checkbutton(root, text="Cool Image", variable=check_var, image=unchecked_image, selectimage=checked_image, compound="top")
checkbutton.pack()

root.mainloop()
Output:
Checkbuttons in Toolbars
Checkbuttons in toolbars are like mini toggles that let you activate or deactivate tools instantly. They’re perfect for situations where you need quick access to frequently used features.
For example, if you’re working on a graphics program, you could have a Checkbutton in your toolbar for the “Brush” tool. Clicking it once activates the brush, while clicking it again deactivates it, all without having to dig through menus.
Checkbutton With Indicator in a Toolbar
In this example, we’ll create a toolbar with Checkbuttons, each representing a different feature. These Checkbuttons will display checkmarks to indicate their status.
Example:
import tkinter as tk

root = tk.Tk()
root.title("Toolbar Checkbutton")

checkbutton1 = tk.Checkbutton(root, text="Toggle Feature 1")
checkbutton1.pack(side=tk.LEFT)

checkbutton2 = tk.Checkbutton(root, text="Toggle Feature 2")
checkbutton2.pack(side=tk.LEFT)

checkbutton3 = tk.Checkbutton(root, text="Toggle Feature 3")
checkbutton3.pack(side=tk.LEFT)

root.mainloop()
Output:

Checkbuttons with Images in a Toolbar
Now, we’ll create a toolbar with Checkbuttons, each featuring images instead of checkmarks. Additionally, we’ll remove the indicators to give the toolbar a cleaner look.
Example:
import tkinter as tk
from tkinter import PhotoImage

root = tk.Tk()
root.title("Images in Checkbutton")

# Load images
checked_image = PhotoImage(file="bold.png")
unchecked_image = PhotoImage(file="notbold.png")

checkbutton_1 = tk.Checkbutton(root, indicatoron=0, overrelief="sunken", image=unchecked_image, selectimage=checked_image, selectcolor="yellow", background="grey")
checkbutton_1.grid(row=0, column=0, ipadx=10, ipady=10, pady=5)

checkbutton_2 = tk.Checkbutton(root, indicatoron=0, overrelief="sunken", image=unchecked_image, selectimage=checked_image, selectcolor="red", background="grey")
checkbutton_2.grid(row=0, column=1, ipadx=10, ipady=10, pady=5)

checkbutton_3 = tk.Checkbutton(root, indicatoron=0, overrelief="sunken", image=unchecked_image, selectimage=checked_image, selectcolor="green", background="grey")
checkbutton_3.grid(row=0, column=2, ipadx=10, ipady=10, pady=5)

checkbutton_4 = tk.Checkbutton(root, indicatoron=0, overrelief="sunken", image=unchecked_image, selectimage=checked_image, selectcolor="blue", background="grey")
checkbutton_4.grid(row=0, column=3, ipadx=10, ipady=10, pady=5)

root.mainloop()
Output:

Exploring Tkinter Checkbutton Methods
Now, let’s explore the various methods available for manipulating Tkinter Checkbuttons:
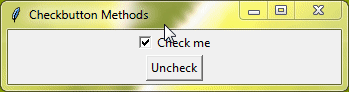
deselect() : This method clears the Checkbutton, marking it as unchecked. It’s handy when you want to reset the state of the Checkbutton.
Example:
import tkinter as tk

root = tk.Tk()
root.title("Checkbutton Methods")

check_var = tk.IntVar()
checkbutton = tk.Checkbutton(root, text="Check me", variable=check_var)
checkbutton.pack()

def uncheck():
    checkbutton.deselect()

button = tk.Button(root, text="Uncheck", command=uncheck)
button.pack()

root.mainloop()
Output:
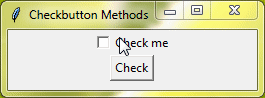
select() : On the other hand, select() marks the Checkbutton as checked. You can use this method to programmatically set the Checkbutton to its checked state.
Example:
import tkinter as tk

root = tk.Tk()
root.title("Checkbutton Methods")

check_var = tk.IntVar()
checkbutton = tk.Checkbutton(root, text="Check me", variable=check_var)
checkbutton.pack()

def check():
    checkbutton.select()

button = tk.Button(root, text="Check", command=check)
button.pack()

root.mainloop()
Output:
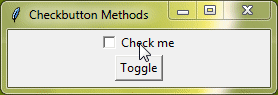
toggle() : The toggle() method switches the state of the Checkbutton. So, if it’s currently checked, it will become unchecked, and vice versa. This is useful when you want to toggle the state of the Checkbutton based on user interaction or certain conditions in your code.
Example:
import tkinter as tk

root = tk.Tk()
root.title("Checkbutton Methods")

check_var = tk.IntVar()
checkbutton = tk.Checkbutton(root, text="Check me", variable=check_var)
checkbutton.pack()

def toggle_state():
    checkbutton.toggle()

button = tk.Button(root, text="Toggle", command=toggle_state)
button.pack()

root.mainloop()
Output:
Binding Events with Checkbuttons
Event binding is the process of associating a function or action with a specific event. In the case of Checkbuttons, you can bind events to actions like clicking, hovering, or toggling the button.
Example:
import tkinter as tk

def on_checked():
    label.config(text="Checked")

def on_unchecked():
    label.config(text="Unchecked")

root = tk.Tk()
root.title("Binding Events with Checkbutton")

check_var = tk.IntVar()
checkbutton = tk.Checkbutton(root, text="Check me", variable=check_var)
checkbutton.pack()

label = tk.Label(root, text="")
label.pack()

# Bind events
checkbutton.bind("<Button-1>", lambda e: on_checked())
checkbutton.bind("<ButtonRelease-1>", lambda e: on_unchecked())

root.mainloop()
With event bindings, your Checkbutton knows when you click and release the mouse button.
Output:

Conclusion
In conclusion, you’ve learned a lot about Tkinter Checkbuttons. You now know how to make them, customize their appearance, add images, and make them respond to user actions. We also touched on how handy they can be for toolbars.
With this knowledge, you’re ready to make your Python GUI applications more interactive and user-friendly. Whether you’re building something simple or complex, Tkinter Checkbuttons are a useful tool to have in your toolbox.