Tkinter Pack Geometry Manager
When it comes to designing graphical user interfaces (GUIs) in Tkinter, one of the key challenges is effectively arranging and positioning widgets within the application window.
Geometry Managers in Tkinter help you arrange and organize widgets (like buttons, labels, and entry fields) within your application window. They make sure everything looks neat, even if you resize the window or add more widgets later on.

In Tkinter, there are three main Geometry Managers: Pack, Grid, and Place. Each manager has its unique way of organizing widgets within a container, giving you the flexibility to choose the one that best suits your needs.
Differences between Pack, Grid, and Place managers
| Manager | Description | Strengths | Weaknesses |
|---|---|---|---|
| Pack Manager | Packs widgets into a container one after another, either horizontally or vertically. | Simple to use | Limited control over precise positioning |
| Grid Manager | Organizes widgets in rows and columns, allowing for precise control over their placement. | Precise layout control | Can be complex for simple layouts |
| Place Manager | Positions widgets using exact coordinates within a container, offering the most flexibility. | Complete control over positioning | Cumbersome for dynamic layouts |
Deciding which geometry manager to use depends on your project and personal preference. If you’re just starting, pack() is a good option. As you get more comfortable, you might want to try out grid() or place() for more advanced layouts.
Now that we understand the basics of Geometry Managers, let’s explore our first one: the Pack Geometry Manager.
Understanding Pack Geometry Manager
When you pack widgets using the Pack Geometry Manager, Tkinter automatically arranges them one after another, like stacking blocks. By default, widgets are packed vertically from the top of the container. However, you can also pack them horizontally or change the packing order using options provided by the Pack Manager.
To pack a widget using the Pack Geometry Manager, you simply call the pack() method on the widget object. For example, to pack a button widget named my_button into a container:
my_button.pack()
Now, let’s create a simple example that shows how to use the Pack Geometry Manager to pack multiple widgets into a window.
Example:
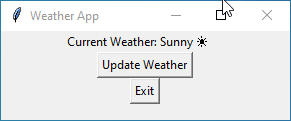
Imagine we’re creating a basic weather application with Tkinter. We want to display the current weather conditions along with some buttons to update the weather and exit the application.
import tkinter as tk

# Create the main window
root = tk.Tk()
root.title("Weather App")  # Set title for the window

# Create and pack widgets
label_weather = tk.Label(root, text="Current Weather: Sunny ☀️")  # Create a label widget
label_weather.pack()  # Pack the label widget into the window

button_update = tk.Button(root, text="Update Weather")  # Create an update button widget
button_update.pack()  # Pack the update button into the window

button_exit = tk.Button(root, text="Exit")  # Create an exit button widget
button_exit.pack()  # Pack the exit button into the window

# Run the application
root.mainloop()  # Start the event loop to display the window and handle user interactions
Output:
Pack Configuration Options in Tkinter
The Pack Configuration options allow you to control how widgets are packed within a container.
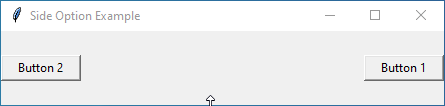
side
The side option decides which side of the container your widget sticks to. You can choose from 'top', 'bottom', 'left', or 'right'.
Let’s create a simple example to demonstrate the side option in action. We’ll pack two buttons onto a window, each positioned on a different side.
Example:
import tkinter as tk

# Create the main window
root = tk.Tk()
root.title("Side Option Example")

# Create buttons
button1 = tk.Button(root, text="Button 1", width=10)
button2 = tk.Button(root, text="Button 2", width=10)

# Pack buttons with different sides
button1.pack(side="right")  # Button 1 at the right
button2.pack(side="left")  # Button 2 on the left

# Run the application
root.mainloop()
Output:
expand
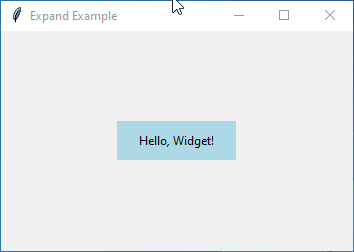
The expand option specifies whether the widget should expand to fill any extra space in the container.
Setting it to True enables the widget to expand, while False (default) restricts expansion.
Let’s create a simple example to demonstrate how the expand option works with the Pack geometry manager in Tkinter:
Example:
import tkinter as tk

# Create the main window
root = tk.Tk()
root.title("Expand Example")

# Create a label widget
label = tk.Label(root, text="Hello, Widget!", bg="lightblue", padx=20, pady=10)
label.pack(expand=True)

# Run the application
root.mainloop()
Output:
fill
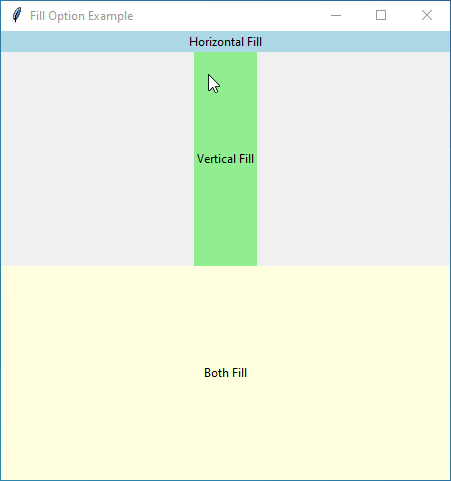
The fill option controls how the widget fills the available space within the container.
You can set it to 'none' (default), 'x', 'y', or 'both'.
'none': The widget does not stretch to fill any extra space.'x': The widget expands horizontally to fill any extra horizontal space.'y': The widget expands vertically to fill any extra vertical space.'both': The widget expands both horizontally and vertically to fill any extra space in both directions.
Here is a simple example to demonstrate the fill option in Tkinter:
Example:
import tkinter as tk

# Create the main window
root = tk.Tk()
root.title("Fill Option Example")

# Create widgets
label_horizontal = tk.Label(root, text="Horizontal Fill", bg="lightblue")
label_vertical = tk.Label(root, text="Vertical Fill", bg="lightgreen")
label_both = tk.Label(root, text="Both Fill", bg="lightyellow")

# Pack widgets with different fill options
label_horizontal.pack(fill="x")  # Horizontal fill
label_vertical.pack(fill="y", expand=True)    # Vertical fill
label_both.pack(fill="both", expand=True)     # Both horizontal and vertical fill

# Run the application
root.mainloop()
Output:
anchor
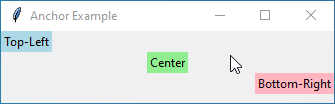
The anchor option lets you stick your widget to a specific spot within the container.
It accepts values such as 'n', 's', 'e', 'w', 'ne', 'nw', 'se', 'sw', or 'center'.
Let’s demonstrate the anchor option with a simple example in Tkinter:
Example:
import tkinter as tk

# Create the main window
root = tk.Tk()
root.title("Anchor Example")

# Create and pack widgets with different anchor options
label1 = tk.Label(root, text="Top-Left", bg="lightblue")
label1.pack(anchor='nw')

label2 = tk.Label(root, text="Center", bg="lightgreen")
label2.pack(anchor='center')

label3 = tk.Label(root, text="Bottom-Right", bg="lightpink")
label3.pack(anchor='se')

# Run the application
root.mainloop()
Output:
padx and pady
The padx and pady options add extra space around the widget, horizontally and vertically, respectively. You can specify the padding in pixels.
Let’s illustrate the padx and pady options with a simple example in Tkinter:
Example:
import tkinter as tk
# Create the main window
root = tk.Tk()
root.title("Padding Example")
# Create and pack widgets with padx and pady options
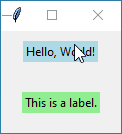
label1 = tk.Label(root, text="Hello, World!", bg="lightblue")
label1.pack(padx=20, pady=10)
label2 = tk.Label(root, text="This is a label.", bg="lightgreen")
label2.pack(padx=10, pady=20)
# Run the application
root.mainloop()Output:
ipadx and ipady
The ipadx and ipady options add internal padding to the widget, increasing its size without affecting the surrounding space.
Let’s see an example showcasing the ipadx and ipady options in Tkinter:
Example:
import tkinter as tk
# Create the main window
root = tk.Tk()
root.title("Internal Padding Example")
# Create a label with internal padding
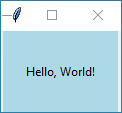
label = tk.Label(root, text="Hello, World!", bg="lightblue")
label.pack(ipadx=20, ipady=30)
# Run the application
root.mainloop()Output:
Pack Geometry Manager Methods
The Pack Geometry Manager offers some handy methods for manipulating and interacting with packed widgets dynamically.
pack_forget()
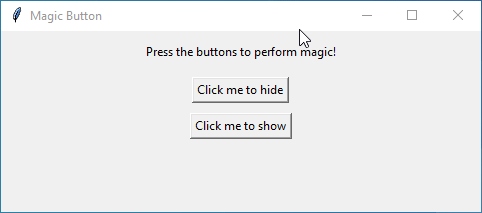
The pack_forget() method allows you to remove a widget from the packing order without destroying it. This means you can hide a widget temporarily and bring it back later if needed.
Let’s create a fun example to showcase the pack_forget() method in action:
Example:
import tkinter as tk

def hide_button():
    button.pack_forget()
    label_status.config(text="Button hidden! 🎩✨")

def show_button():
    button.pack()
    label_status.config(text="Button reappeared!")

# Create the main window
root = tk.Tk()
root.title("Magic Button")

# Create a label to display status
label_status = tk.Label(root, text="Press the buttons to perform magic!")
label_status.pack(pady=10)

# Create a button to hide
button = tk.Button(root, text="Click me to hide", command=hide_button)
button.pack(pady=5)

# Create a button to show
button_show = tk.Button(root, text="Click me to show", command=show_button)
button_show.pack(pady=5)

# Run the application
root.mainloop()
Output:
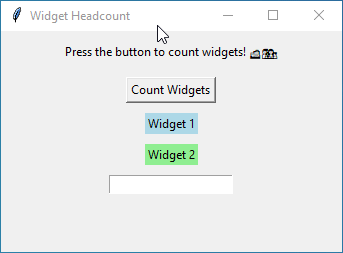
pack_slaves()
The pack_slaves() method returns a list of all widgets packed inside the container managed by the Pack Geometry Manager.
Let’s create an example to demonstrate the pack_slaves() method:
Example:
import tkinter as tk
def count_widgets():
# Get the list of all widgets packed inside the container
widgets = root.pack_slaves()
# Count the number of widgets
num_widgets = len(widgets)
# Update the status label
label_status.config(text=f"Number of widgets packed: {num_widgets}")
# Create the main window
root = tk.Tk()
root.title("Widget Headcount")
# Create a label to display status
label_status = tk.Label(root, text="Press the button to count widgets! 🚢👨👩👧👦")
label_status.pack(pady=10)
# Create a button to trigger the widget count
button_count = tk.Button(root, text="Count Widgets", command=count_widgets)
button_count.pack(pady=5)
# Create some widgets to pack inside the container
label1 = tk.Label(root, text="Widget 1", bg="lightblue")
label1.pack(pady=5)
label2 = tk.Label(root, text="Widget 2", bg="lightgreen")
label2.pack(pady=5)
entry = tk.Entry(root)
entry.pack(pady=5)
# Run the application
root.mainloop()Output:
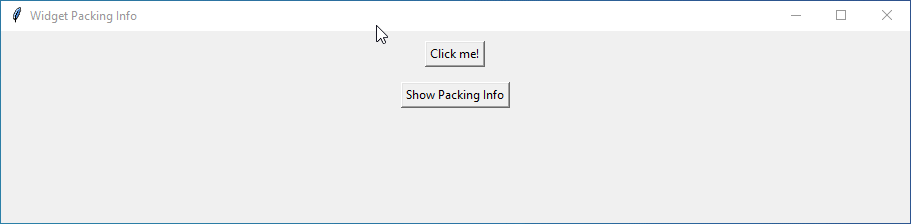
pack_info()
The pack_info() method provides information about how a widget is packed within its container. It returns a dictionary containing various packing options applied to the widget.
Let’s create an example to showcase the pack_info() method:
Example:
import tkinter as tk

def show_pack_info():
    # Get the packing information of the button widget
    pack_info = button.pack_info()

    # Display the packing information
    info_text = f"Pack Info:\n{pack_info}"
    label_info.config(text=info_text)

# Create the main window
root = tk.Tk()
root.title("Widget Packing Info")

# Create a button widget
button = tk.Button(root, text="Click me!")
button.pack(pady=10, padx=20)

# Create a button to display packing info
button_info = tk.Button(root, text="Show Packing Info", command=show_pack_info)
button_info.pack(pady=5)

# Create a label to display packing info
label_info = tk.Label(root, text="")
label_info.pack(pady=5)

# Run the application
root.mainloop()
Output:
pack_propagate()
The pack_propagate() method controls whether the size of the container is determined by its contents. By default, it’s set to True, meaning the container adjusts its size based on the size of the widgets packed inside it. Setting it to False prevents this automatic resizing.
Let’s create an example using two frames to demonstrate the pack_propagate() method:
import tkinter as tk

# Create the main window
root = tk.Tk()
root.title("Pack Propagate Example")

# Create Frame 1
frame1 = tk.Frame(root, bg="lightblue", width=200, height=200)
frame1.pack_propagate(True)  # Enable pack propagation
frame1.pack(side=tk.LEFT, padx=10, pady=10)

# Create widgets inside Frame 1
label1 = tk.Label(frame1, text="Frame 1", bg="lightblue")
label1.pack(padx=20, pady=20)

# Create Frame 2
frame2 = tk.Frame(root, bg="lightgreen", width=200, height=200)
frame2.pack_propagate(False)  # Disable pack propagation
frame2.pack(side=tk.RIGHT, padx=10, pady=10)

# Create widgets inside Frame 2
label2 = tk.Label(frame2, text="Frame 2", bg="lightgreen")
label2.pack(padx=20, pady=20)

# Run the application
root.mainloop()
Output:

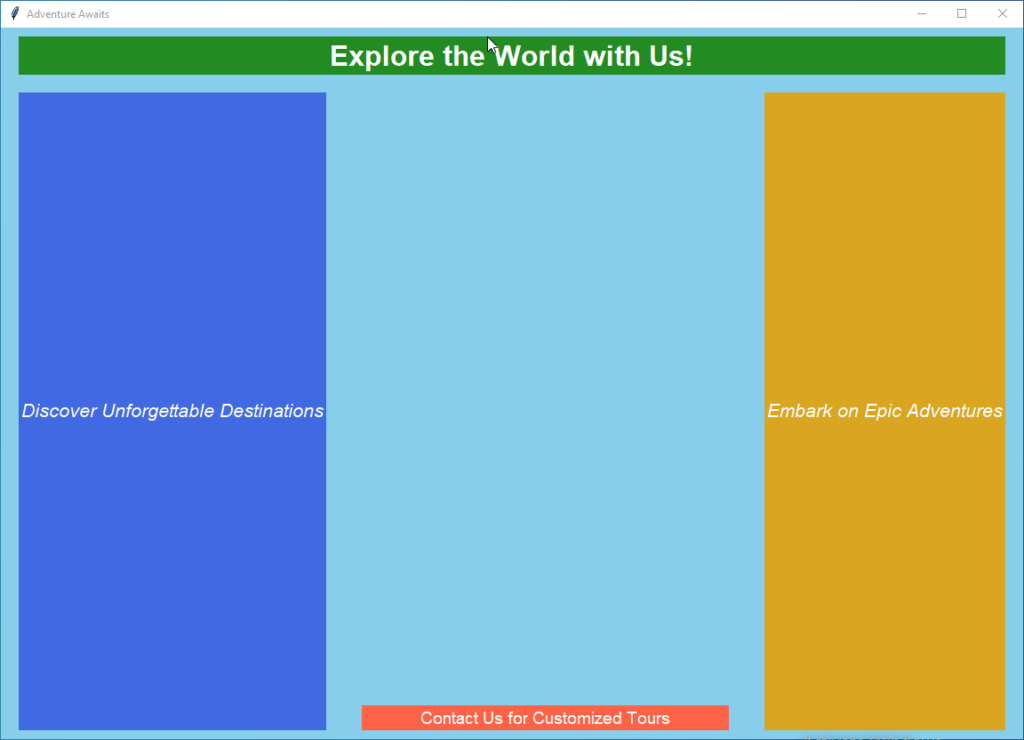
Real Life Example: Travel-Themed Website Landing Page
Let’s create a unique and creative example inspired by a travel-themed website landing page:
Example:
from tkinter import *

# Create the main window
root = Tk()
root.title("Adventure Awaits")
root.geometry("1150x800")

# Create a frame container for labels with expansion and fill for both x and y axes
frame1 = Frame(root, background='skyblue')
frame1.pack(expand=1, fill=BOTH)

# Create labels with different positions and options
label1 = Label(frame1, text='Explore the World with Us!', foreground='white', background='forestgreen', font=('Helvetica', 24, 'bold'))
label1.pack(side=TOP, fill=X, padx=20, pady=10)

label2 = Label(frame1, text='Discover Unforgettable Destinations', foreground='white', background='royalblue', font=('Helvetica', 16, 'italic'))
label2.pack(side=LEFT, fill=Y, padx=20, pady=10)

label3 = Label(frame1, text='Embark on Epic Adventures', foreground='white', background='goldenrod', font=('Helvetica', 16, 'italic'))
label3.pack(side=RIGHT, fill=Y, padx=20, pady=10)

label4 = Label(frame1, text='Contact Us for Customized Tours', foreground='white', background='tomato', font=('Helvetica', 14))
label4.pack(side=BOTTOM, fill=X, padx=20, pady=10)

# Run the application
root.mainloop()
Output: