Tkinter OptionMenu
The OptionMenu widget in Tkinter is a dropdown menu that lets users pick one item from a list of options.
Some Common Use Cases of Option Menu:
- Forms: In a sign-up form, you might use an
OptionMenuto let users select their country from a list. - Settings: In an app, you can use an
OptionMenufor users to choose a theme, language, or other preferences. - Data Filters: In a data analysis tool, you might use an
OptionMenuto let users filter data by category. - Dynamic Choices: In a multi-step form, the choices in an
OptionMenumight change based on what the user selected in a previous step.
Create a Simple OptionMenu in Tkinter
To create an OptionMenu in Tkinter, you need to follow a few simple steps. First, you have to define options for your option menu.
One of the most common ways to add options to an OptionMenu is by using a list or tuple. Both data structures work well, but lists are more commonly used due to their flexibility.
So, let’s create an OptionMenu where users can select a color from a list of color options.
Example:
import tkinter as tk

# Function to handle the selection of an option
def on_option_selected(choice):
    selected_label.config(text=f'Selected: {choice}')

root = tk.Tk()
root.title("Color Selection")

# Define the options for the OptionMenu using a list
color_options = ["Red", "Green", "Blue", "Yellow"]

# Create a StringVar to hold the selected option
selected_color = tk.StringVar(root)
selected_color.set(color_options[0])  # Set the default value

# Create the OptionMenu widget
color_menu = tk.OptionMenu(root, selected_color, *color_options, command=on_option_selected)
color_menu.pack(pady=20)

# Create a label to display the selected option
selected_label = tk.Label(root, text=f'Selected: {color_options[0]}')
selected_label.pack(pady=10)

root.mainloop()
Output:
Hiding the Indicator
The indicator (a small triangle or a line) is shown next to the selected option in the OptionMenu by default. However, you can remove it if you want a cleaner, more minimal look.
- Set
indicatoron=True(default) to show the indicator. - Set
indicatoron=Falseto hide the indicator.
Example:
import tkinter as tk
def update_label(selection):
selected_label.config(text=f'You chose: {selection}')
root = tk.Tk()
root.title("OptionMenu Without Indicator")
# Define options
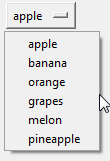
choices = ("Apple", "Banana", "Orange", "Grapes")
# StringVar to track the current choice
selected_choice = tk.StringVar(root)
selected_choice.set(choices[0]) # Set default option
# OptionMenu widget without the dropdown indicator
dropdown = tk.OptionMenu(root, selected_choice, *choices, command=update_label)
dropdown.config(indicatoron=False) # Hide the indicator
dropdown.pack(pady=10)
# Label to show the selected choice
selected_label = tk.Label(root, text=f'You chose: {choices[0]}')
selected_label.pack(pady=10)
root.mainloop()Output:
Changing the Direction of the OptionMenu
By default, the OptionMenu opens downward. However, if you’re placing the widget near the bottom or edge of a window, opening it in another direction—upwards, left, or right—might be better for your layout.
direction="below": Menu opens below the widget (default).direction="above": Menu opens above the widget.direction="left": Menu opens to the left of the widget.direction="right": Menu opens to the right of the widget.
Example:
import tkinter as tk

def update_label(selection):
    selected_label.config(text=f'Selected: {selection}')

root = tk.Tk()
root.title("OptionMenu Opening left")

# Options for the OptionMenu
fruits = ["Apple", "Banana", "Cherry", "Mango"]

# StringVar to store the selected option
selected_fruit = tk.StringVar(root)
selected_fruit.set(fruits[0])

# Create OptionMenu with direction set to 'left'
fruit_menu = tk.OptionMenu(root, selected_fruit, *fruits, command=update_label)
fruit_menu.config(direction="left")
fruit_menu.pack(pady=10)

# Label to display the selected option
selected_label = tk.Label(root, text=f'Selected: {fruits[0]}')
selected_label.pack(pady=10)

root.mainloop()
Output:
Example: OptionMenu with Different Styles
from tkinter import *

# Function to update the label with the selected option
def update_label(selected_value, label_widget):
    label_widget.config(text=f'Selected: {selected_value}')

# Create the main window
root = Tk()
root.title("Stylish OptionMenus")
root.config(bg="lightgrey")

# Common options for all OptionMenus
options = ["Apple", "Banana", "Orange", "Grapes", "Melon", "Pineapple"]

# Create a dynamic label function for each OptionMenu
def create_option_menu(row, option_values, default_value, menu_bg, label_bg, label_fg, label_font, command):
    # Create a StringVar to track selected option
    selected_var = StringVar(root)
    selected_var.set(default_value)

    # Create OptionMenu widget
    option_menu = OptionMenu(root, selected_var, *option_values, command=lambda val: command(val))
    option_menu.config(bg=menu_bg, fg="white", font="Arial 14 bold", width=12, height=2)
    option_menu.grid(row=row, column=0, padx=10, pady=10)

    # Create Label widget to display the selected option
    label = Label(root, text=f"Selected: {default_value}", bg=label_bg, fg=label_fg, font=label_font, padx=30, pady=10)
    label.grid(row=row, column=1, padx=10, pady=10)

    # Return the widgets for further updates
    return selected_var, option_menu, label

# First OptionMenu - Red/Yellow Theme
var1, option_menu1, label1 = create_option_menu(
    row=0,
    option_values=options,
    default_value=options[0],
    menu_bg="darkred",
    label_bg="yellow",
    label_fg="red",
    label_font="Arial 18 bold",
    command=lambda val: update_label(val, label1)
)

# Second OptionMenu - Green/LightGreen Theme
var2, option_menu2, label2 = create_option_menu(
    row=1,
    option_values=options,
    default_value=options[1],
    menu_bg="green",
    label_bg="lightgreen",
    label_fg="darkgreen",
    label_font="Arial 18 bold",
    command=lambda val: update_label(val, label2)
)

# Third OptionMenu - Orange/Black Theme
var3, option_menu3, label3 = create_option_menu(
    row=2,
    option_values=options,
    default_value=options[2],
    menu_bg="orange",
    label_bg="black",
    label_fg="orange",
    label_font="Arial 18 bold",
    command=lambda val: update_label(val, label3)
)

# Fourth OptionMenu - Blue/Purple Theme with Image
img = PhotoImage(file="cool.png")
var4, option_menu4, label4 = create_option_menu(
    row=3,
    option_values=options,
    default_value=options[3],
    menu_bg="blue",
    label_bg="skyblue",
    label_fg="purple",
    label_font="Arial 18 bold",
    command=lambda val: update_label(val, label4)
)
option_menu4.config(image=img, compound='left', width=250, height=150)

# Fifth OptionMenu - Pink/Silver Theme with Image on Top
img1 = PhotoImage(file="cool.png")
var5, option_menu5, label5 = create_option_menu(
    row=4,
    option_values=options,
    default_value=options[4],
    menu_bg="pink",
    label_bg="pink",
    label_fg="silver",
    label_font="Arial 18 bold",
    command=lambda val: update_label(val, label5)
)
option_menu5.config(image=img1, compound='top', indicatoron=False, width=200, height=250)

root.mainloop()
Output:
ttk.OptionMenu: Enhancing Dropdown Menus
So, you have learned the basics of tk.OptionMenu, now it’s time to explore ttk.OptionMenu. This is a more advanced version that improves how dropdown menus look and work in your Tkinter applications. Like all the ttk widgets, ttk.OptionMenu is automatically matches the look of the operating system.
But, besides looks, there is one more major difference between tk.OptionMenu and ttk.OptionMenu is how they handle default values:
When using the basic tk.OptionMenu, you need to manually set the default value by binding a StringVar before creating the menu.
variable = StringVar(value="Default")
option = OptionMenu(root, variable, "Option 1", "Option 2", "Option 3")
The ttk.OptionMenu simplifies this process. You can directly pass the default value as an argument when constructing the widget, making the code cleaner and easier to manage.
variable = StringVar()
option = ttk.OptionMenu(root, variable, "Option 1", "Option 1", "Option 2", "Option 3")
Here’s a quick comparison of both syntax:
tk.OptionMenu :
option = tk.OptionMenu(master, variable, *values)
ttk.OptionMenu :
option = ttk.OptionMenu(master, variable, default_value, *values)
As we move forward with ttk.OptionMenu, it’s essential to understand how to style it.
Style Your Dropdown Menus
Both ttk Option Menu and ttk Menubutton share the same default style class, "TMenubutton". This means that whenever you create an OptionMenu, it automatically adopts the styling from TMenubutton.
But if you want, you can create your own style classes that are based on TMenubutton. Here is a simple example:
Example:
from tkinter import *
from tkinter import ttk

# Create the main application window
root = Tk()
root.title("Favorite Animal Selector")
root.geometry("300x200")

# Create a custom style based on TMenubutton
style = ttk.Style()
style.configure("Animal.TMenubutton",
                background="#ffcc00",  # Bright yellow background
                foreground="#333333",  # Dark gray text
                font=("Comic Sans MS", 12, "bold"),  # Fun font style
                relief="raised",        # Raised appearance
                borderwidth=2)         # Border width

# Create a StringVar to hold the selected animal
selected_animal = StringVar()
selected_animal.set("Choose your favorite animal")

# Function to display the selected animal
def show_selection(value):
    selection_label.config(text=f"You selected: {value}")

# Create the OptionMenu with the custom style
animal_options = ["Cat", "Dog", "Rabbit", "Parrot", "Hamster", "Turtle"]
animal_menu = ttk.OptionMenu(root, selected_animal, animal_options[0], *animal_options,
                               command=show_selection, style="Animal.TMenubutton")
animal_menu.pack(pady=20)

# Create a label to display the selected animal
selection_label = Label(root, text="", font=("Arial", 14), foreground="#005500")
selection_label.pack(pady=10)

# Run the application
root.mainloop()
Output :
Some Key Methods to Use with OptionMenu
It is essential to know some key methods that you can use to interact with the OptionMenu effectively.
config() | Changes the options or appearance of the OptionMenu. |
get() | Retrieves the currently selected option. |
set() | Sets a new default or selected option. |
delete() | Removes an option from the dropdown menu. |
add_command() | Adds a new option to the menu programmatically. |
Example:
from tkinter import *
from tkinter import ttk

# Create the main application window
root = Tk()
root.title("Dynamic Fruit Selection Menu")
root.geometry("400x300")

# Create a StringVar to hold the selected fruit
selected_fruit = StringVar()
selected_fruit.set("Select a fruit")

# Function to display the selected fruit
def show_selection(value):
    selection_label.config(text=f"You selected: {value}")

# Function to update the available fruit options dynamically
def update_options():
    new_fruits = ["Mango", "Pineapple", "Strawberry"]
    fruit_menu['menu'].delete(0, 'end')  # Clear existing options
    for fruit in new_fruits:
        fruit_menu['menu'].add_command(label=fruit, command=lambda value=fruit: show_selection(value))
    selected_fruit.set("Mango")  # Set the first option as the new default

# Function to set the default selection to 'Banana'
def set_default_banana():
    selected_fruit.set("Banana")
    show_selection("Banana")

# Function to remove the first option from the dropdown
def remove_first_option():
    fruit_menu['menu'].delete(0)  # Remove the first option

# Function to add a new fruit option
def add_fruit():
    new_fruit = "Kiwi"
    fruit_menu['menu'].add_command(label=new_fruit, command=lambda: show_selection(new_fruit))
    selected_fruit.set(new_fruit)  # Set the new option as default

# Initial fruit options
fruit_options = ["Apple", "Banana", "Orange", "Grapes"]

# Create the OptionMenu
fruit_menu = ttk.OptionMenu(root, selected_fruit, fruit_options[0], *fruit_options, command=show_selection)
fruit_menu.pack(pady=20)

# Create label to display the selected fruit
selection_label = Label(root, text="", font=("Arial", 14), foreground="#333333")
selection_label.pack(pady=10)

# Buttons for performing different actions
update_button = Button(root, text="Update to Tropical Fruits", command=update_options)
update_button.pack(pady=5)

default_button = Button(root, text="Set Default to Banana", command=set_default_banana)
default_button.pack(pady=5)

remove_button = Button(root, text="Remove First Fruit", command=remove_first_option)
remove_button.pack(pady=5)

add_button = Button(root, text="Add New Fruit (Kiwi)", command=add_fruit)
add_button.pack(pady=5)

# Run the application
root.mainloop()
Output: