Tkinter Menubutton
A Menubutton in Tkinter is a clickable widget that typically displays a menu when clicked. It serves as a trigger for displaying a dropdown menu, providing users access to various options which can be commands, choices, or sub-menus. Visually, it looks like a regular button with a little arrow indicating that there’s more to see when you click it.
Table of Contents
- Setting Up a Menubutton in Tkinter
- Tkinter Menubutton Options
- Creative Designs for Tkinter Menubuttons
- Understanding ttk Menubuttons
- Styling ttk Menubuttons
- Customizing ttk Menubuttons for Toolbars
- Crafting ttk Menubuttons with Menus, Submenus, and More
- Real World Example – Building a Customizable Text Editor Interface with ttk Menubuttons
Setting Up a Menubutton in Tkinter
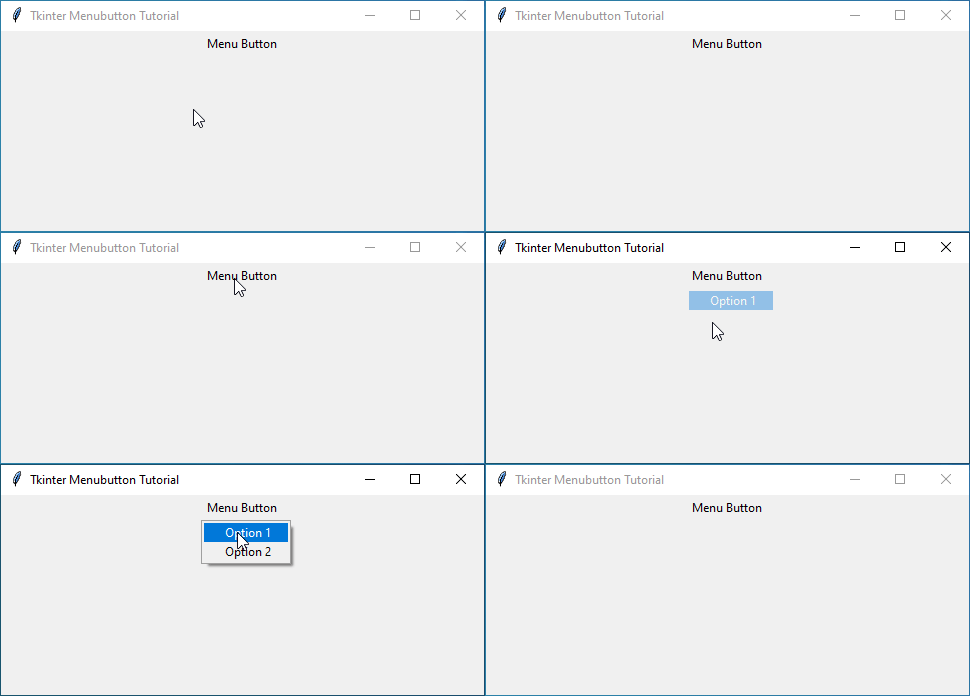
Let’s see how to create and set up a Menubutton in a Tkinter application.
Example:
import tkinter as tk

# Create the main application window
root = tk.Tk()
root.title("Tkinter Menubutton Tutorial")

# Create a Menubutton widget
menubutton = tk.Menubutton(root, text="Menu Button")
menubutton.pack()

# Create a Menu widget for the Menubutton
menu = tk.Menu(menubutton, tearoff=False)

# Add options to the menu
menu.add_command(label="Option 1")
menu.add_command(label="Option 2")

# Associate the menu with the Menubutton
menubutton.config(menu=menu)

# Run the Tkinter event loop
root.mainloop()
Output:
Tkinter Menubutton Options
When working with Tkinter Menubuttons in Python, several options allow you to customize their appearance and behavior. Here are some of the main options you’ll use most of the time:
| Option | Description | Possible Values |
|---|---|---|
menu | Links the button to its menu. | A menu widget |
direction | Determines where the menu appears. | ‘above’, ‘below’, ‘left’, ‘right’ |
height | Sets how tall the button is. | Any number (e.g., 2, 3, 4, etc.) |
width | Sets how wide the button is. | Any number (e.g., 10, 20, 30, etc.) |
indicatoron | Shows a little arrow on the button. | True or False |
state | Controls if the button can be clicked. | ‘normal’, ‘disabled’, ‘read-only’ |
Example:
import tkinter as tk

# Function to handle menu button clicks
def handle_click(menu_name, option_name):
    # Update the label text when an option is clicked
    label.config(text=f"Clicked on {option_name} of {menu_name}")

# Create the main application window
root = tk.Tk()
root.title("Tkinter Menubutton Example")

# Define the configurations for each menu button
menus = [
    ("Menu 1", "above", 2, 10, False),
    ("Menu 2", "below", 3, 15, True),
    ("Menu 3", "left", 4, 20, True)
]

# Create a label to display the clicked option
label = tk.Label(root, text="")
label.pack(pady=5)

# Loop through the list of menu configurations
for menu_name, direction, height, width, indicatoron in menus:
    # Create a Menubutton with the specified configurations
    menubutton = tk.Menubutton(root, text=menu_name, direction=direction, height=height, width=width, indicatoron=indicatoron)
    menubutton.pack(pady=5)

    # Create a Menu for the Menubutton
    menu = tk.Menu(menubutton)

    # Add commands to the Menu
    menu.add_command(label="Option 1", command=lambda: handle_click(menu_name, "Option 1"))
    menu.add_command(label="Option 2", command=lambda: handle_click(menu_name, "Option 2"))

    # Associate the Menu with the Menubutton
    menubutton.config(menu=menu)

# Run the Tkinter event loop
root.mainloop()
Output:
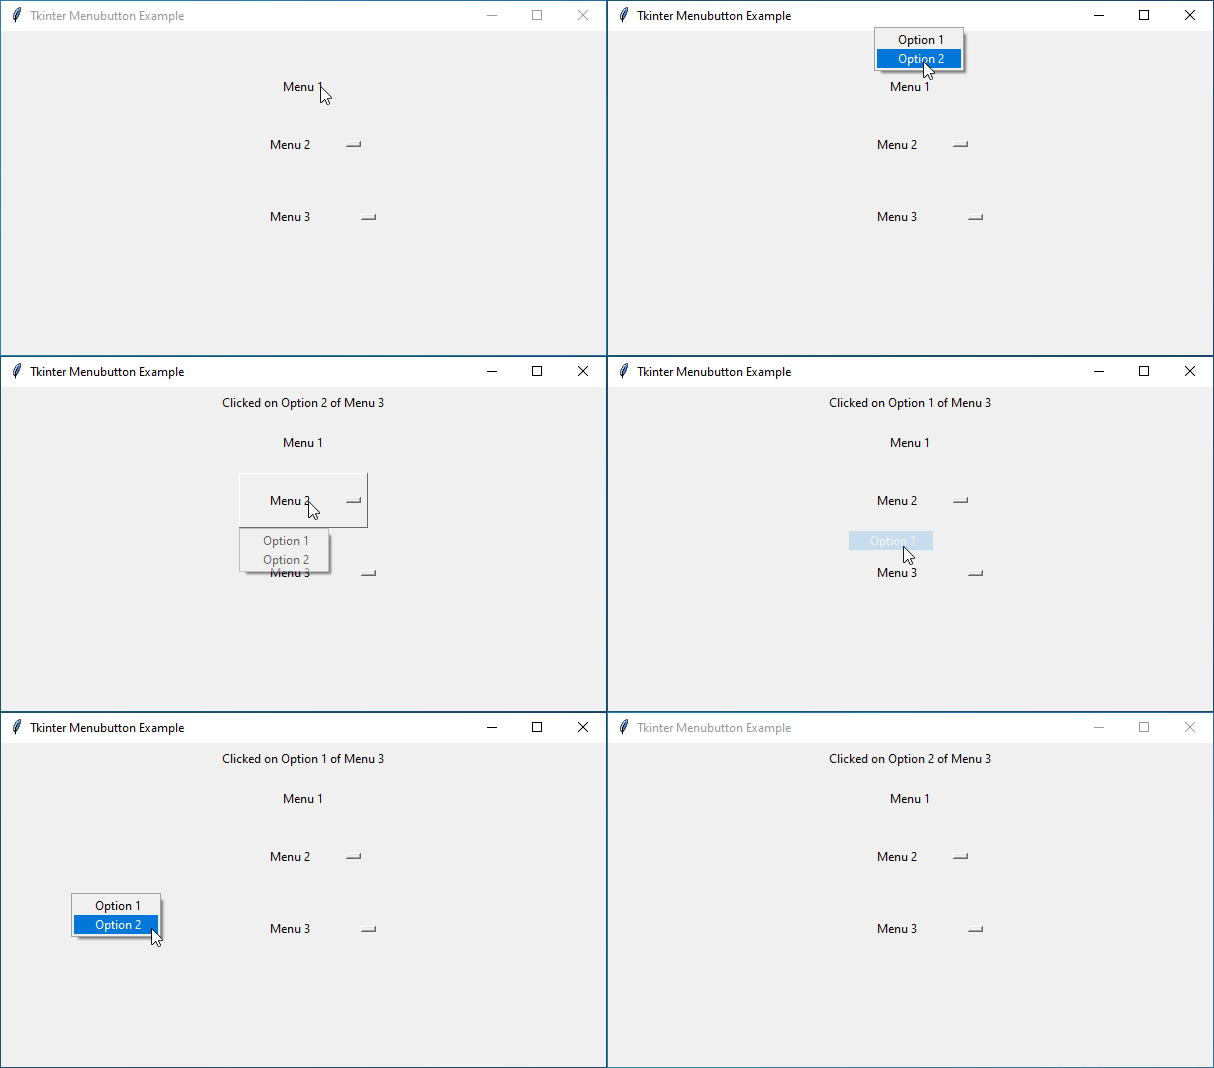
Standard Options for Tkinter Menubuttons
activebackground | activeforeground | anchor |
background (or bg) | bitmap | borderwidth |
compound | cursor | disabledforeground |
font | foreground (or fg) | highlightbackground |
highlightcolor | highlightthickness | image |
justify | padx | pady |
relief | takefocus | text |
textvariable | underline | wraplength |
To know more about these configuration options, see Tkinter Standard Options.
Creative Designs for Tkinter Menubuttons
Let’s explore some creative example for Tkinter Menubuttons.
Candy Dispenser: A Sweet Tkinter Menubutton Example
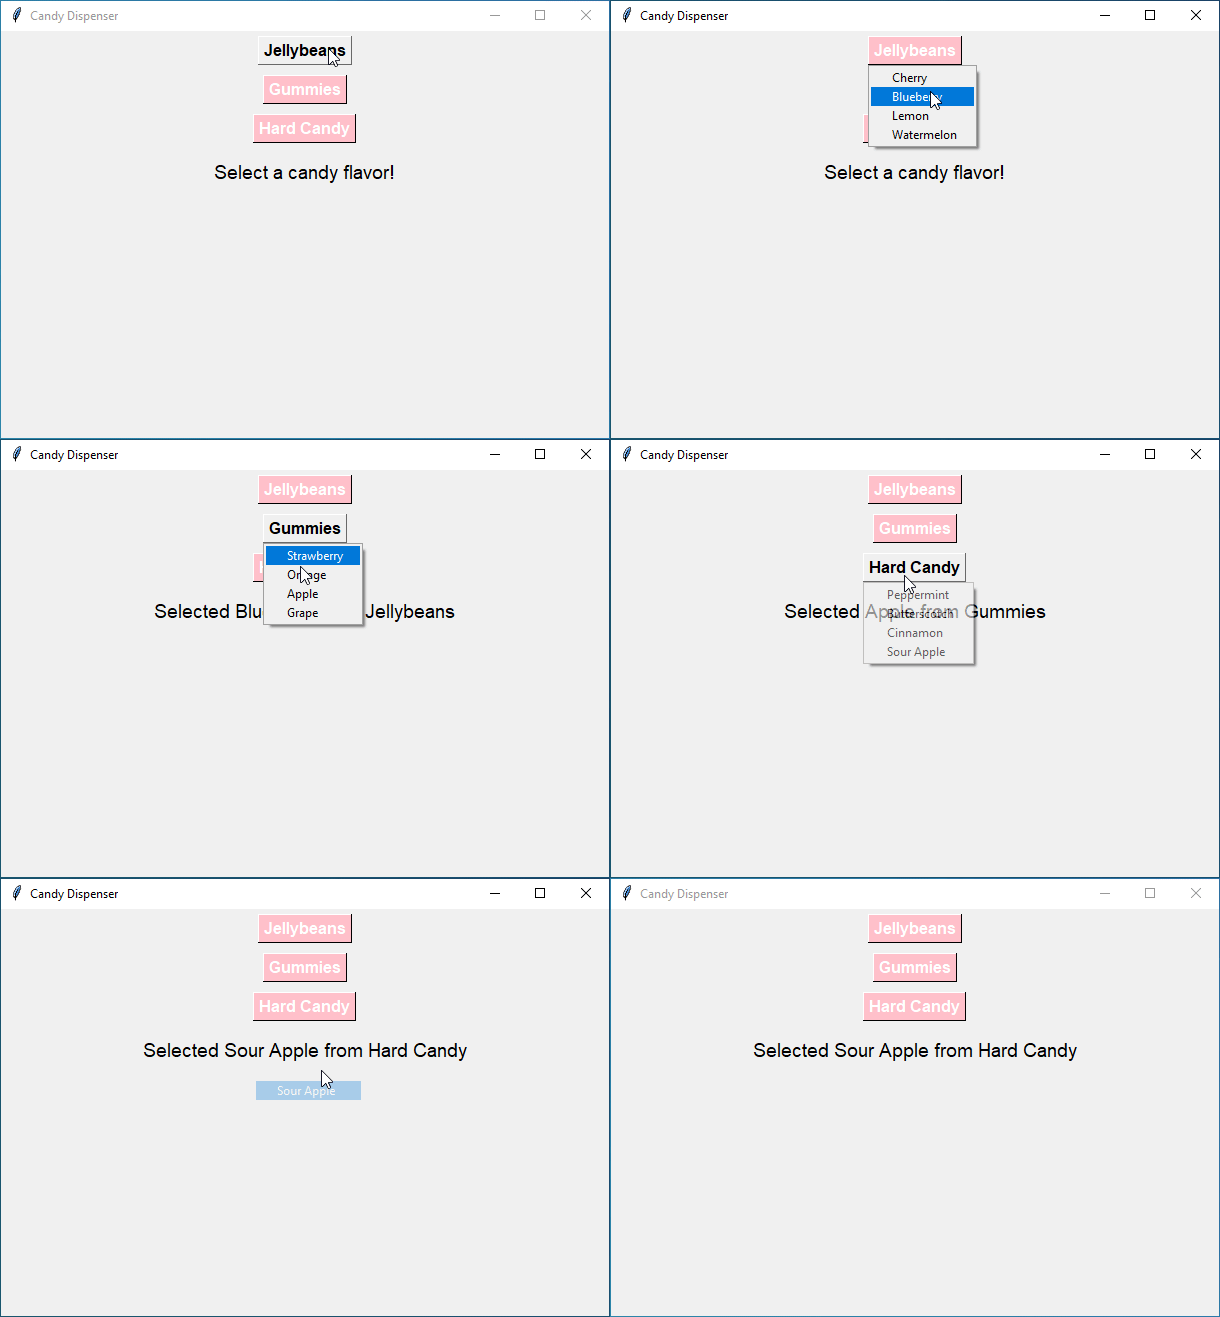
Let’s create a unique example of a Tkinter Menubutton with a design inspired by a colorful candy dispenser. In this example, each Menubutton will represent a different type of candy, and when clicked, it will display the available flavors.
Example:
import tkinter as tk

# Function to handle menu button clicks
def handle_click(menu_name, option_name):
    label.config(text=f"Selected {option_name} from {menu_name}")

# Create the main application window
root = tk.Tk()
root.title("Candy Dispenser")

# Define candy flavors for each menu
candy_menu_options = {
    "Jellybeans": ["Cherry", "Blueberry", "Lemon", "Watermelon"],
    "Gummies": ["Strawberry", "Orange", "Apple", "Grape"],
    "Hard Candy": ["Peppermint", "Butterscotch", "Cinnamon", "Sour Apple"]
}

# Function to create a candy menu
def create_candy_menu(menu_name, flavors):
    menubutton = tk.Menubutton(root, text=menu_name, bg="pink", fg="white", font=("Arial", 12, "bold"), relief=tk.RAISED)
    menubutton.pack(pady=5)

    menu = tk.Menu(menubutton, tearoff=False)
    for flavor in flavors:
        menu.add_command(label=flavor, command=lambda f=flavor: handle_click(menu_name, f))

    menubutton.config(menu=menu)

# Create candy menus
for candy, flavors in candy_menu_options.items():
    create_candy_menu(candy, flavors)

# Create a label to display the selected candy
label = tk.Label(root, text="Select a candy flavor!", font=("Arial", 14))
label.pack(pady=10)

# Run the Tkinter event loop
root.mainloop()
Output :
Emoji Selector: Choose Your Mood!
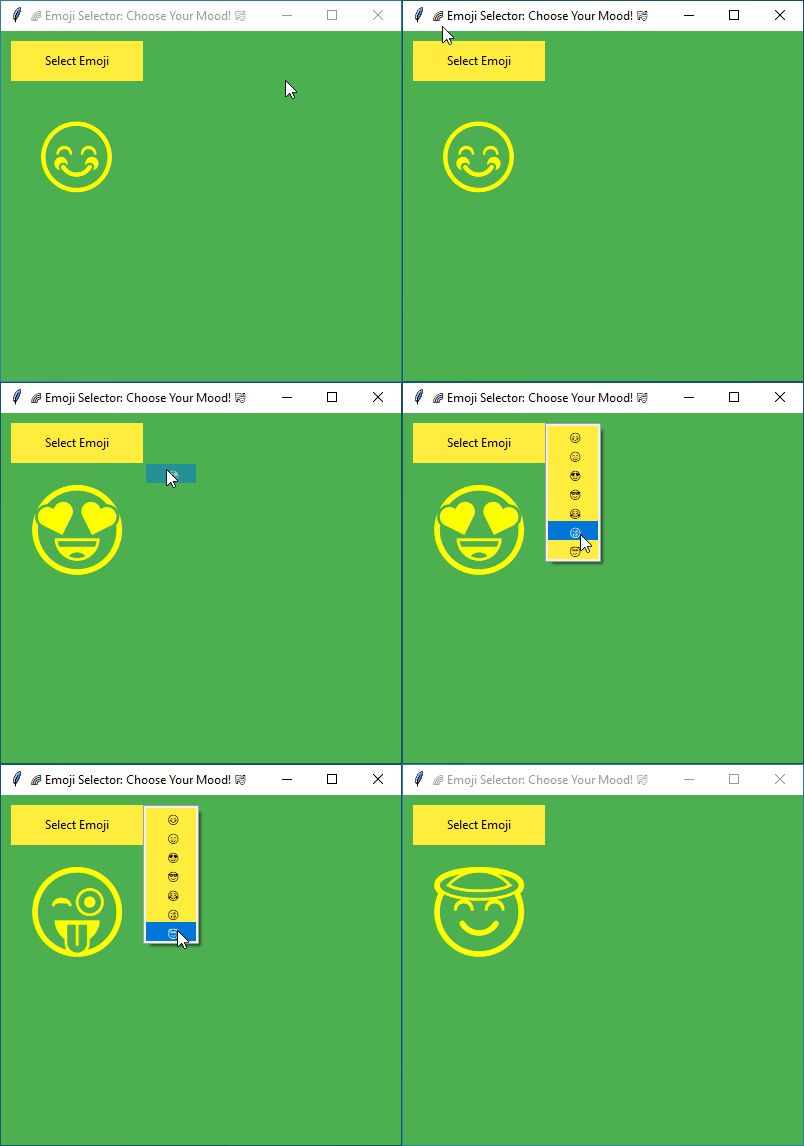
In this example, we’ll make a Menubutton that displays different emoji faces, and when clicked, it changes its appearance to reflect the selected emoji.
Example:
import tkinter as tk

# Function to change the emoji face
def change_emoji(face):
    emoji_label.config(text=face)

# Create the main application window
root = tk.Tk()
root.title("🌈 Emoji Selector: Choose Your Mood! 🎭")

# Set background color
root.configure(bg="#4CAF50")

# Set window size
root.geometry(f"400x350")

# Define the list of emoji faces
emoji_faces = ["😊", "😄", "😍", "😎", "😂", "😜", "😇"]

# Create a Menubutton to select emoji
emoji_btn = tk.Menubutton(root, text="Select Emoji", direction="right", width=20, height=2, bg="#FFEB3B", fg="#000000")
emoji_btn.grid(row=0, column=0, padx=10, pady=10)

# Create a Menu for the Menubutton
emoji_menu = tk.Menu(emoji_btn, tearoff=False, bg="#FFEB3B", fg="#000000")
emoji_btn.config(menu=emoji_menu)

# Populate the Menu with emoji faces
for face in emoji_faces:
    emoji_menu.add_command(label=face, command=lambda f=face: change_emoji(f))

# Create a label to display the selected emoji
emoji_label = tk.Label(root, text="", font=("Arial", 60), bg="#4CAF50", fg="yellow")
emoji_label.grid(row=1, column=0, padx=10, pady=10)

# Display an initial emoji face
change_emoji(emoji_faces[0])

# Run the Tkinter event loop
root.mainloop()
Output :
Understanding ttk Menubuttons
The ttk Menubuttons are similar to regular Tkinter Menubuttons but offer additional styling options and a more consistent appearance across different platforms.
Example:
import tkinter as tk
from tkinter import ttk

# Function to change the color scheme
def change_theme(theme):
    style.theme_use(theme)

# Create the main application window
root = tk.Tk()
root.title("ttk Menubutton Example")

# Create a ttk style
style = ttk.Style()

# Create a themed Menubutton
ttk_menubutton = ttk.Menubutton(root, text="Themes", width=10)
ttk_menubutton.pack(pady=20)

# Create a Menu for the Menubutton
menu = tk.Menu(ttk_menubutton, tearoff=False)
ttk_menubutton.config(menu=menu)

# Add color themes to the menu
themes = ["clam", "alt", "default", "vista", "xpnative", "winnative"]
for theme in themes:
    menu.add_command(label=theme.capitalize(), command=lambda t=theme: change_theme(t))

# Apply an initial theme
change_theme(themes[0])

# Run the Tkinter event loop
root.mainloop()
Output:

ttk Menubuttons Options
You can still use familiar options from Tkinter Menubuttons with ttk Menubuttons, such as menu and direction. Here’s a rundown of some additional options:
| Option | Description |
|---|---|
menu | Connects the Menubutton to its menu. |
direction | Determines where the menu pops up. |
compound | Specifies how the image and text are combined. |
cursor | Sets the cursor to be displayed when hovering. |
image | Displays an image alongside the text. |
state | Changes if the button can be clicked. |
style | Applies a specific style to the Menubutton. |
takefocus | Specifies whether the button can receive focus. |
text | Sets the text displayed on the Menubutton. |
textvariable | Links a variable to the text displayed. |
underline | Indicates which character is underlined. |
width | Sets the width of the Menubutton. |
Example:
import tkinter as tk
from tkinter import ttk

def change_color(color):
    root.configure(background=color)

# Create the main application window
root = tk.Tk()
root.title("Color Theme Picker")

# Define a list of color options
color_options = ["Red", "Green", "Blue", "Yellow"]

# Create a ttk Menubutton
theme_btn = ttk.Menubutton(root, text="Select Color Theme", width=20, compound="left", cursor="hand2")

# Create a Menu for the Menubutton
theme_menu = tk.Menu(theme_btn, tearoff=False)
theme_btn.config(menu=theme_menu)

# Populate the Menu with color options
for color in color_options:
    theme_menu.add_command(label=color, command=lambda c=color: change_color(c.lower()))

# Pack the Menubutton
theme_btn.pack(padx=20, pady=20)

# Run the Tkinter event loop
root.mainloop()
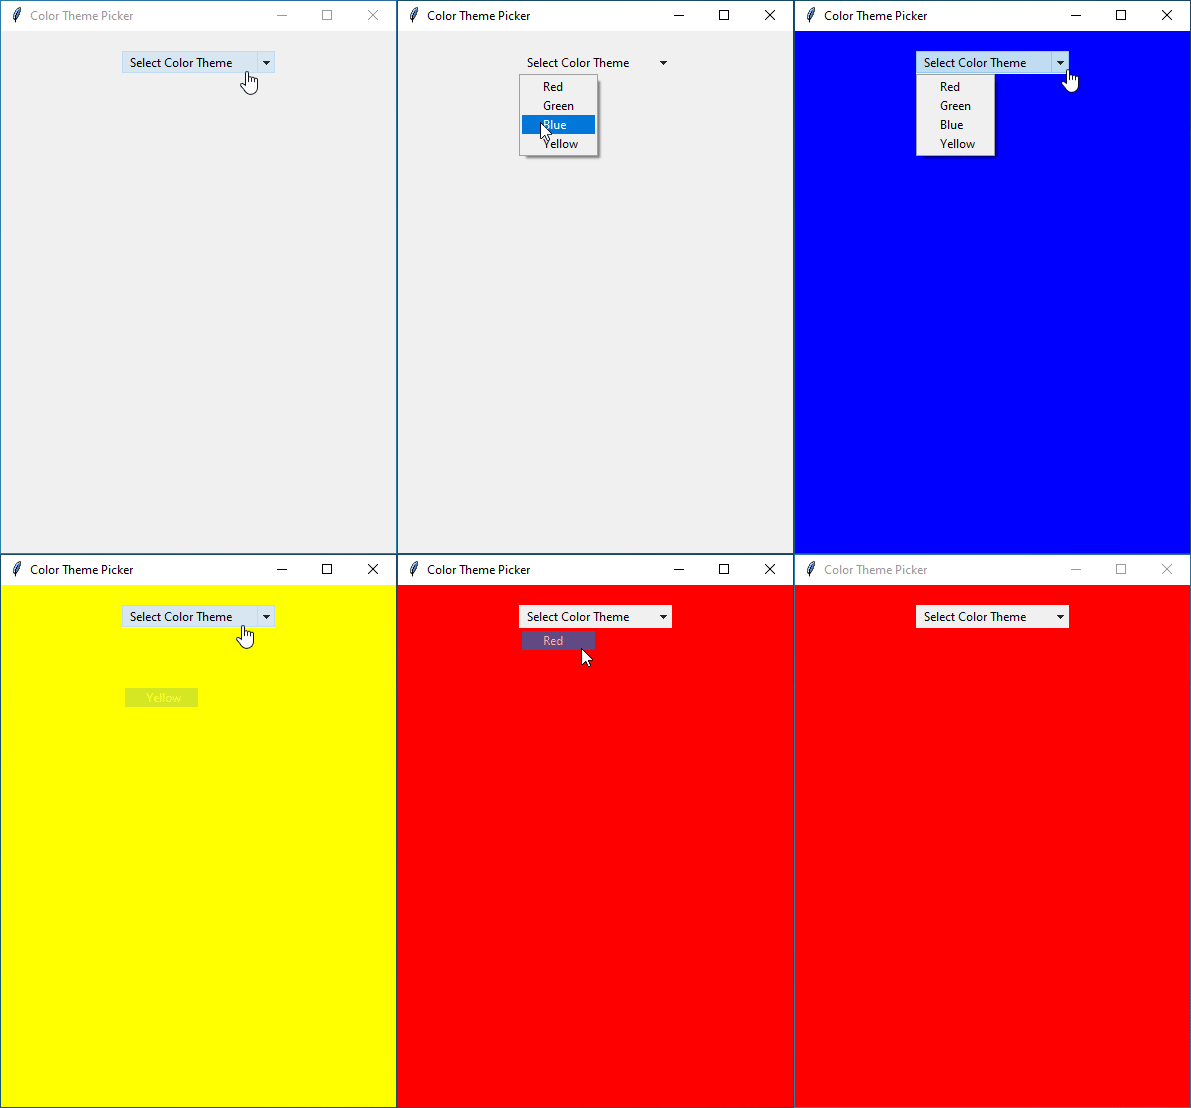
Output:
Styling ttk Menubuttons
To style ttk Menubuttons, you have to use the 'TMenubutton' class name with the ttk style(). This class name serves as a universal identifier for all ttk Menubutton widgets in your application. By targeting 'TMenubutton', you can apply consistent styling across all ttk Menubuttons.
But if you prefer to style specific ttk Menubuttons differently, you can create a custom class name for it and apply the desired styling options.
style.configure("Custom.TMenubutton", *arg)You can use the following style configuration options to customize the appearance of ttk Menubuttons.
| Style Option | Description | Example Values |
|---|---|---|
arrowsize | Sets the size of the arrow indicator. | Any integer value |
background | Specifies the background color of the ttk Menubutton. | Color name or HEX code |
foreground | Sets the color of the text and arrow indicator. | Color name or HEX code |
font | Defines the font style for the Menubutton text. | Font family and size |
padding | Determines the internal spacing of the Menubutton. | Tuple of integers |
relief | Sets the appearance of the Menubutton’s border. | ‘flat’, ‘raised’, etc. |
width | Sets the width of the Menubutton. | Integer value |
Just remember, some options might work differently depending on the theme you’re using.
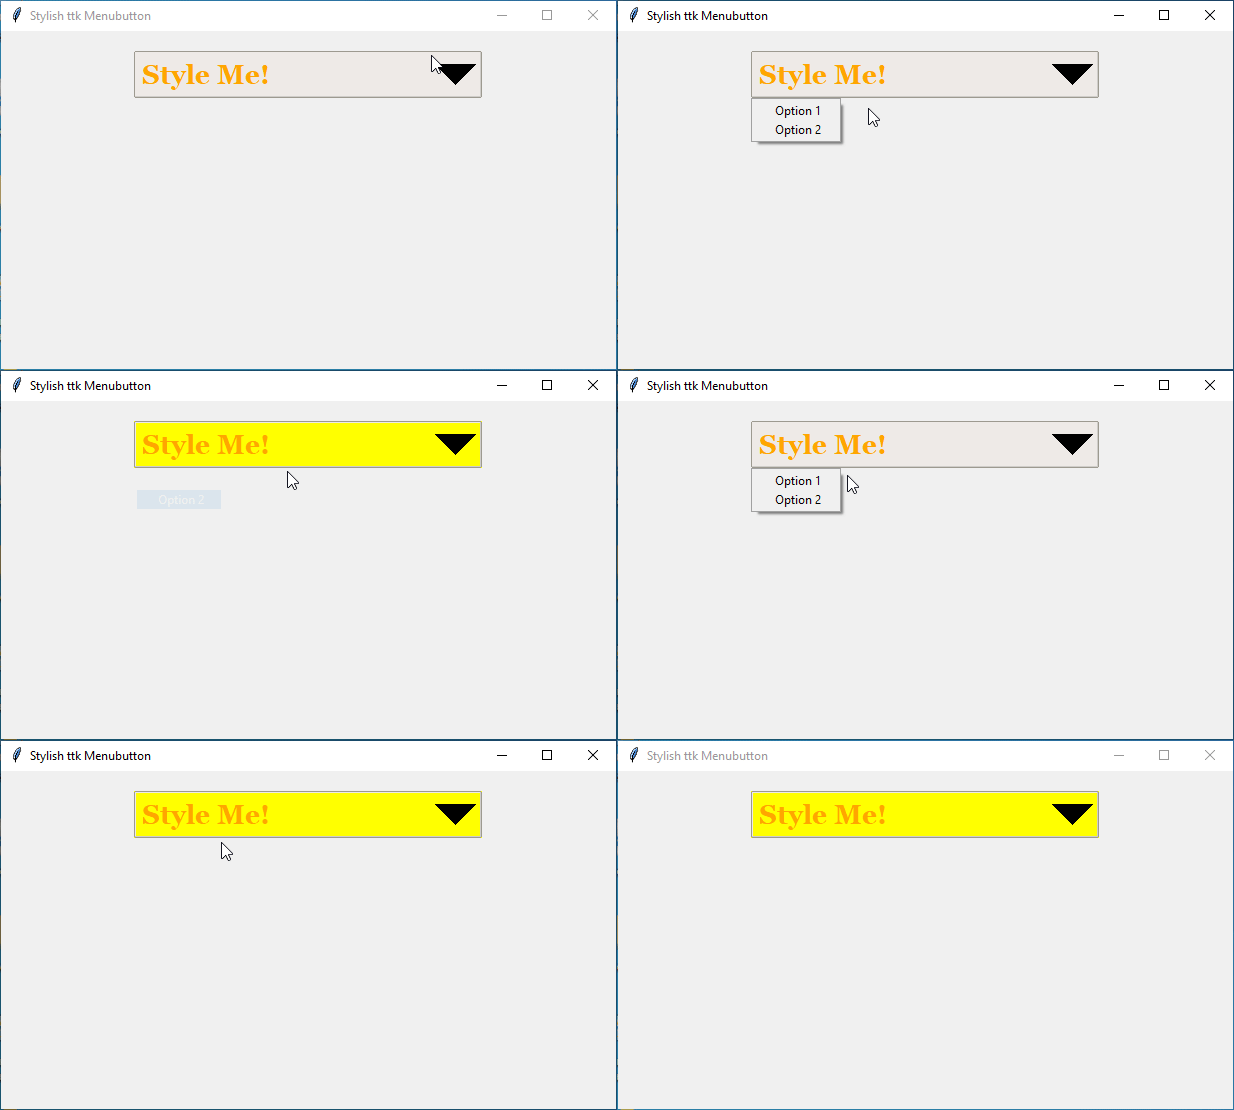
Here’s a example that shows you how to style ttk Menubutton.
Example:
import tkinter as tk
from tkinter import ttk

# Create the main application window
root = tk.Tk()
root.title("Stylish ttk Menubutton")

# Create a ttk Style object
style = ttk.Style()
style.theme_use("clam")
# Create a custom style for the Menubutton
style.configure("Custom.TMenubutton", background="yellow", foreground="orange", font=("georgia", 20, "bold"), borderwidth=2, relief="raised", width=15, arrowsize=20)

# Create a ttk Menubutton with the custom style
styled_btn = ttk.Menubutton(root, text="Style Me!", style="Custom.TMenubutton")

# Add options to the menu
menu = tk.Menu(styled_btn, tearoff=False)
menu.add_command(label="Option 1")
menu.add_command(label="Option 2")
styled_btn.config(menu=menu)

# Pack the Menubutton
styled_btn.pack(padx=20, pady=20)

# Run the Tkinter event loop
root.mainloop()
Output:
Customizing ttk Menubuttons for Toolbars
Did you know that you can easily style your ttk Menubuttons specifically for toolbars?
To style ttk Menubuttons for toolbars, you’ll use the Toolbutton class name instead of the default "TMenubutton" class name. This allows you to apply specific styling configurations tailored for toolbar contexts.
style.configure("Toolbutton", <styling_options>)Once you’ve configured the styling options, you can create ttk Menubuttons for your toolbar by specifying the style as "Toolbutton" when initializing them.
btn = ttk.Menubutton(toolbar_frame, text=text, style="Toolbutton")
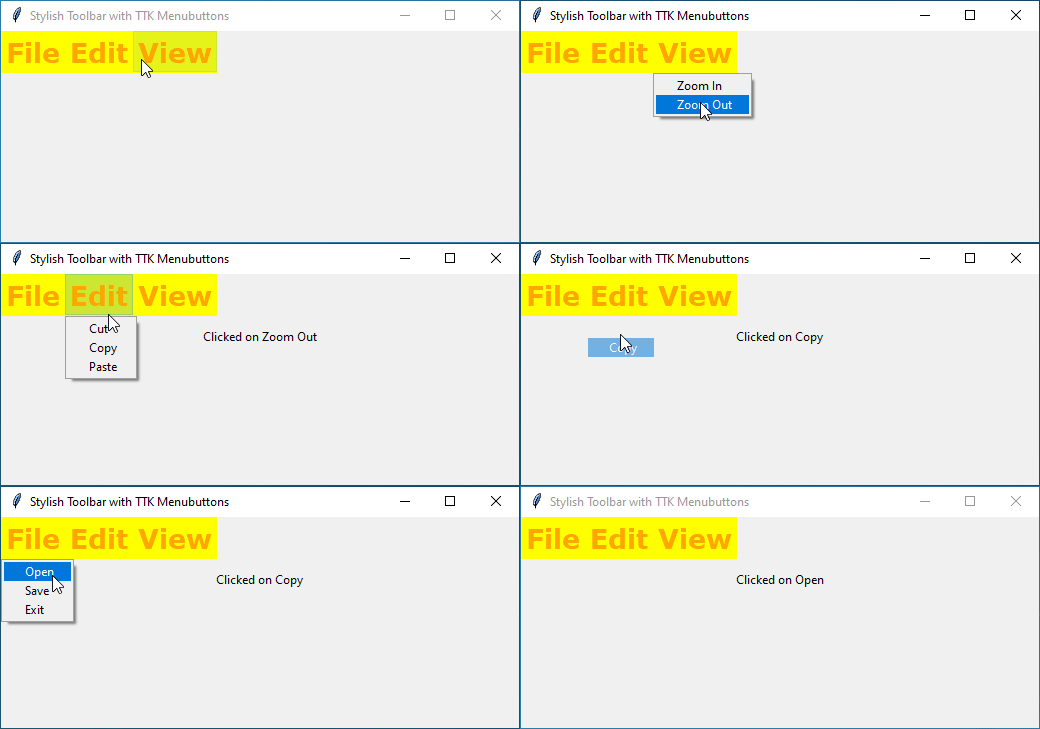
Here’s a complete example that shows how to create ttk Menubutton for toolbars.
Example
import tkinter as tk
from tkinter import ttk

# Function to handle menu item clicks
def handle_click(item):
    label.config(text=f"Clicked on {item}")

# Create the main application window
root = tk.Tk()
root.title("Stylish Toolbar with TTK Menubuttons")

# Create a ttk Style object
style = ttk.Style()

# Configure the Toolbutton style class
style.configure("Toolbutton", background="yellow", foreground="orange", font=("Verdana", 20, "bold"), borderwidth=2, relief="raised", padding=5)

# Create the toolbar frame
toolbar_frame = ttk.Frame(root)
toolbar_frame.pack(side=tk.TOP, fill=tk.X)

# Define menu items and their commands
menu_items = {
    "File": [("Open", lambda: handle_click("Open")), ("Save", lambda: handle_click("Save")), ("Exit", root.quit)],
    "Edit": [("Cut", lambda: handle_click("Cut")), ("Copy", lambda: handle_click("Copy")), ("Paste", lambda: handle_click("Paste"))],
    "View": [("Zoom In", lambda: handle_click("Zoom In")), ("Zoom Out", lambda: handle_click("Zoom Out"))]
}

# Create ttk Menubuttons for the toolbar
for text, items in menu_items.items():
    btn = ttk.Menubutton(toolbar_frame, text=text, style="Toolbutton")
    btn.pack(side=tk.LEFT)
    menu = tk.Menu(btn, tearoff=False)
    btn.config(menu=menu)
    for label, command in items:
        menu.add_command(label=label, command=command)

# Create a label to display clicked item
label = tk.Label(root, text="")
label.pack(padx=10, pady=10)

# Run the Tkinter event loop
root.mainloop()
Output:
Crafting ttk Menubuttons with Menus, Submenus, and More
Menus are containers for menu items, while submenus are nested menus that appear when a menu item is selected. By combining Menubuttons with menus and submenus, you can create powerful user interfaces with a wide range of options and functionalities.
Here’s a simple example of ttk Menubutton with menus and sub-menus.
Example
import tkinter as tk
from tkinter import ttk

# Function to handle menu commands
def menu_command(action):
    action_label.config(text=f"Selected action: {action}")

# Function to handle checkbutton commands
def check_command():
    if check_var.get():
        action_label.config(text="Checkbutton is checked")
    else:
        action_label.config(text="Checkbutton is unchecked")

# Function to handle radiobutton commands
def radio_command():
    action_label.config(text=f"Selected option: {radio_var.get()}")

# Create the main application window
root = tk.Tk()
root.title("Enhanced ttk Menubutton")

# Create a ttk Menubutton
menubutton = ttk.Menubutton(root, text="Menu", width=10)

# Create a Menu for the Menubutton
menu = tk.Menu(menubutton, tearoff=False)
menubutton.config(menu=menu)

# Add options to the Menu
menu.add_command(label="Open", command=lambda: menu_command("Open"))
menu.add_command(label="Save", command=lambda: menu_command("Save"))
menu.add_command(label="Close", command=lambda: menu_command("Close"))

# Add a submenu with additional options
submenu = tk.Menu(menu, tearoff=False)
menu.add_cascade(label="Edit", menu=submenu)
submenu.add_command(label="Cut", command=lambda: menu_command("Cut"))
submenu.add_command(label="Copy", command=lambda: menu_command("Copy"))
submenu.add_command(label="Paste", command=lambda: menu_command("Paste"))

# Add a separator between options
menu.add_separator()

# Add more options
menu.add_command(label="Help", command=lambda: menu_command("Help"))
menu.add_command(label="About", command=lambda: menu_command("About"))

# Add checkbutton option to the Menu
check_var = tk.BooleanVar()
menu.add_checkbutton(label="Check", variable=check_var, command=check_command)

# Add a submenu with radiobutton options
radio_var = tk.StringVar()
radio_submenu = tk.Menu(menu, tearoff=False)
menu.add_cascade(label="Options", menu=radio_submenu)
radio_submenu.add_radiobutton(label="Option 1", variable=radio_var, value="Option 1", command=radio_command)
radio_submenu.add_radiobutton(label="Option 2", variable=radio_var, value="Option 2", command=radio_command)
radio_submenu.add_radiobutton(label="Option 3", variable=radio_var, value="Option 3", command=radio_command)

# Create a label to display the selected action
action_label = tk.Label(root, text="Selected action: None")
action_label.pack(pady=10)

# Pack the Menubutton
menubutton.pack(padx=20, pady=20)

# Run the Tkinter event loop
root.mainloop()
Output:

Real World Example – Building a Customizable Text Editor Interface with ttk Menubuttons
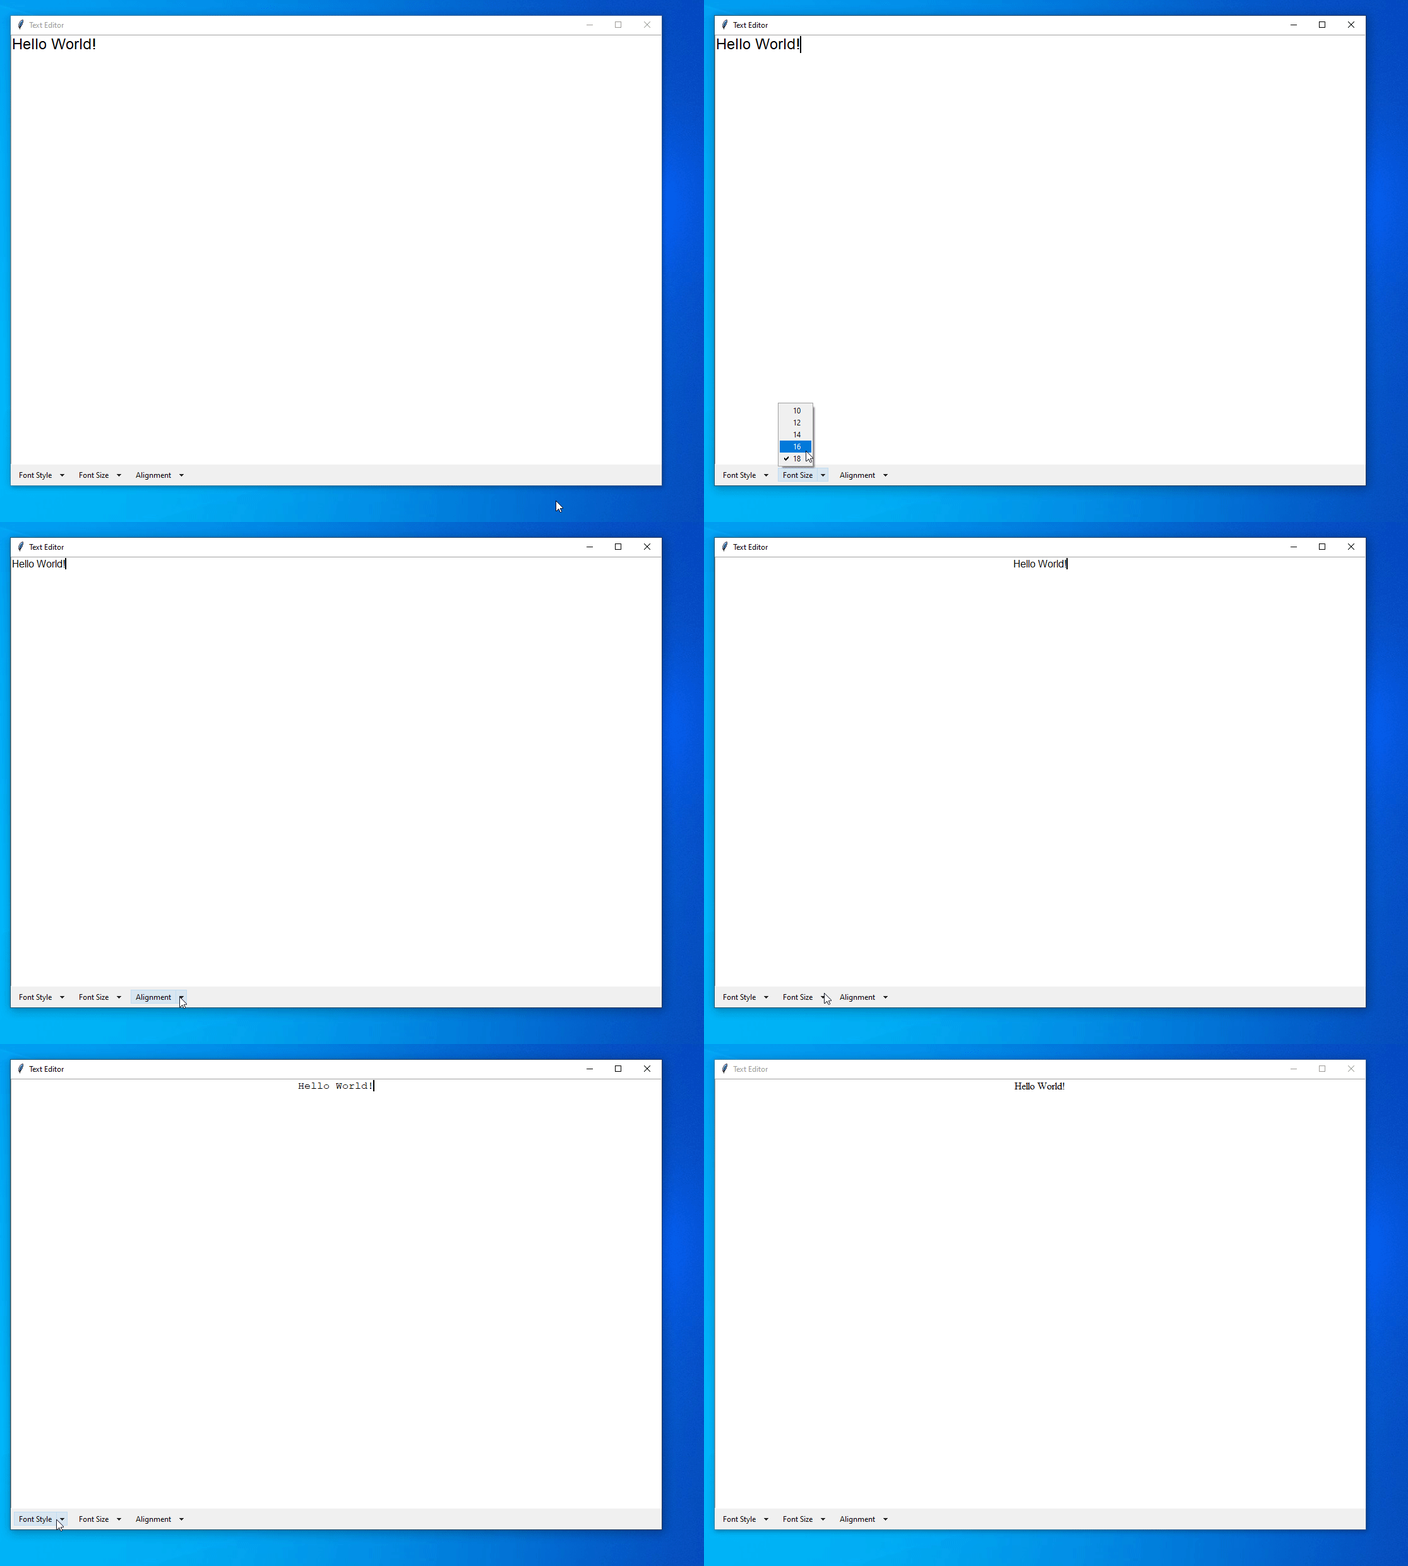
Let’s imagine a scenario where you’re developing a text editor application. In this text editor, you want to include a toolbar with a ttk Menubutton for formatting options, such as font style, size, and alignment.
Here’s how you could implement it:
Example:
import tkinter as tk
from tkinter import ttk

# Function to handle menu item clicks
def handle_font_style(style):
    text.config(font=(style, current_font_size.get()))

def handle_font_size(size):
    text.config(font=(current_font_style.get(), size))

def handle_alignment(align):
    text.tag_configure("align", justify=align)
    text.tag_add("align", "1.0", "end")

# Create the main application window
root = tk.Tk()
root.title("Text Editor")

# Create a text widget
text = tk.Text(root, wrap="word")
text.pack(fill="both", expand=True)

# Create a toolbar frame
toolbar_frame = ttk.Frame(root)
toolbar_frame.pack(side=tk.TOP, fill=tk.X)

# Define font style options
font_styles = ["Arial", "Times New Roman", "Courier New"]

# Define font size options
font_sizes = [10, 12, 14, 16, 18]

# Create a ttk Menubutton for font styles
font_style_btn = ttk.Menubutton(toolbar_frame, text="Font Style", direction="above")
font_style_btn.pack(side=tk.LEFT, padx=5, pady=5)
font_style_menu = tk.Menu(font_style_btn, tearoff=False)
font_style_btn.config(menu=font_style_menu)
current_font_style = tk.StringVar()
for style in font_styles:
    font_style_menu.add_radiobutton(label=style, variable=current_font_style, value=style, command=lambda s=style: handle_font_style(s))
current_font_style.set("Arial")  # Default font style

# Create a ttk Menubutton for font sizes
font_size_btn = ttk.Menubutton(toolbar_frame, text="Font Size", direction="above")
font_size_btn.pack(side=tk.LEFT, padx=5, pady=5)
font_size_menu = tk.Menu(font_size_btn, tearoff=False)
font_size_btn.config(menu=font_size_menu)
current_font_size = tk.IntVar()
for size in font_sizes:
    font_size_menu.add_radiobutton(label=str(size), variable=current_font_size, value=size, command=lambda s=size: handle_font_size(s))
current_font_size.set(12)  # Default font size

# Create a ttk Menubutton for text alignment
alignment_btn = ttk.Menubutton(toolbar_frame, text="Alignment", direction="above")
alignment_btn.pack(side=tk.LEFT, padx=5, pady=5)
alignment_menu = tk.Menu(alignment_btn, tearoff=False)
alignment_btn.config(menu=alignment_menu)
alignment_menu.add_command(label="Left", command=lambda: handle_alignment("left"))
alignment_menu.add_command(label="Center", command=lambda: handle_alignment("center"))
alignment_menu.add_command(label="Right", command=lambda: handle_alignment("right"))

# Run the Tkinter event loop
root.mainloop()
Output:
