Tkinter Fonts
Have you ever wanted to make your text in a Tkinter application look more attractive or easier to read? That’s where Tkinter’s Font Module comes in handy. It’s a tool that allows you to customize the fonts and styles of text in your Tkinter projects.
In this tutorial, we’ll dive deeper into the Font Module’s functionalities and learn how to utilize them effectively in your Tkinter projects.
Exploring the families() Function in Font Module
So are you ready to learn about the first essential function in Tkinter’s Font Module? Let’s talk about families().
The families()
Fonts are like different handwriting styles. Just like how some people have elegant cursive writing and others have bold print, fonts have their own personality and look. You can choose the font that matches the mood and style of your app.
For example, if you’re making a fun app, you might want to use a playful font like “Comic Sans MS” or “Chalkduster.” But for a professional app, sleek fonts like “Arial” or “Helvetica” might be a better fit.
Here’s how you can use the families()
Example:
import tkinter as tk
from tkinter import font

root = tk.Tk()

# Get all available font families
available_families = font.families()

# Print the font families
print("Available Font Families:", available_families)
This code will display a list of font families in the Python console, helping you explore and choose the right font for your Tkinter project.
Font() Constructor in Tkinter Font Module
Ok, now we will talk about the Font() constructor of the Font Module.
The Font() constructor in Tkinter is like a special tool for changing how text looks in your app. It helps you create custom fonts that you can control. With Font(), you can choose things like the font style, size, and whether it’s bold or italic. Then, you can use these custom fonts on labels, buttons, or other parts of your app to make them look just the way you want.
Alright, let’s make our very first custom font!
Code:
import tkinter as tk
from tkinter import font

# Create a cool font
cool_font = font.Font(family="Comic Sans MS", size=16, weight="bold", slant="italic")
In this code, we’ve defined a font named cool_font
Now, let’s put this font to work in your Tkinter GUI. Let’s say you want to use it for a label:
Complete Code:
import tkinter as tk
from tkinter import font

root = tk.Tk()

# Create a cool font
cool_font = font.Font(family="Comic Sans MS", size=16, weight="bold", slant="italic")

label = tk.Label(root, text="Hello, Font Magic!", font=cool_font)
label.pack()

root.mainloop()
Output:
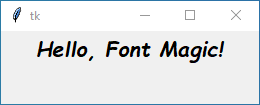
And that’s it! Your label is now showing off your font style.
But wait, there’s more! You can keep customizing to make it even better!
Font Customization Options
Now, let’s break down the Font() constructor options for customizing fonts:
family
This is like choosing the style of the text. You pick a family that matches the look you want for your app.
Values – “Arial”, “Verdana”, “Comic Sans MS”, and many more.
custom_font = font.Font(family="Verdana", ...)
size
Here, you decide how big or small the text should be. You can make it large for headings or small for fine print.
Values – Any positive integer for font size.
custom_font = font.Font(..., size=30, ...)
weight
This is about how thick or bold the text appears. You use this to make certain words stand out more.
Values – "normal" or "bold".
custom_font = font.Font(..., weight="bold", ...)
slant
Think of this as tilting the text slightly. It adds a stylish touch, making your text look cool or fancy.
Values – "roman" or "italic".
custom_font = font.Font(..., slant="italic", ...)
underline & overstrike
These options let you add lines under or through your text. It’s like highlighting or adding a strikethrough effect for emphasis or decoration.
Values – 0 (not present) or 1 (present).
custom_font = font.Font(..., underline=1, overstrike=1)
So, when you’re customizing your font, think about the style, size, emphasis, style tilt, and decorative touches you want to add for that extra pop in your app!
Complete Example:
import tkinter as tk
from tkinter import font

root = tk.Tk()

# Create a custom font
custom_font = font.Font(family="Verdana", size=30, weight="bold", slant="italic", underline=1, overstrike=1)

label = tk.Label(root, text="Hello, Customized Font!", font=custom_font)
label.pack()

root.mainloop()
Output:

Making Font Twins
Imagine you’ve designed a cool font, but now you’re thinking, “What if I want a similar font with just a small change?” You can use a handy trick called the copy() function to make font variations without altering the original.
Let’s say you have your base font, which we’ll call base_font, and you want a slightly different version, like custom_font. With the copy() method, you can clone your base font without changing the original:
Code:
base_font = font.Font(family="Arial", size=12, weight="normal", slant="roman")
custom_font = base_font.copy()
See? You’ve duplicated your base font into a custom one without messing up the original.
Now that you have your custom font, you can give it a unique touch. Want it to be bigger? Bolder? Or maybe with italics? You can easily make these changes:
Code:
custom_font.configure(size=18, weight="bold", slant="italic", underline=1, overstrike=1)
And there you go! Your font is now customized just the way you want it.
Now that you know how to create font variations, you can use them anywhere you want in your app. Whether it’s on a label, button, or any other part of your interface.
Complete Code:
import tkinter as tk
from tkinter import font

root = tk.Tk()

base_font = font.Font(family="Arial", size=12, weight="normal", slant="roman")

custom_font = base_font.copy()
custom_font.configure(size=18, weight="bold", slant="italic", underline=1, overstrike=1)

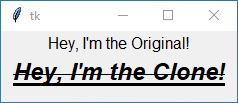
label_1 = tk.Label(root, text="Hey, I'm the Original!", font=base_font)
label_1.pack()

label_2 = tk.Label(root, text="Hey, I'm the Clone!", font=custom_font)
label_2.pack()

root.mainloop()
Output:
Real World Example: Font Playground
Let’s see how the Font() constructor works in a real-life example! Imagine we’re building a simple Tkinter app where users can pick a font from a dropdown menu, and the text changes instantly to show how it looks.
Code:
from tkinter import *
from tkinter.ttk import *
from tkinter import font

# Create the main window
root = Tk()
root.title("Font Customization Magic")
root.geometry("500x300")  # Set your preferred window size

# Get a list of available font families
font_list = list(font.families())

# Function to apply the selected font
def choose_font(event):
    selected_font = font_option.get()
    custom_font_data = font.Font(family=f'{selected_font}', size=30, weight='bold', slant='italic', underline=1, overstrike=0)
    display_label.config(font=custom_font_data)

# Dropdown for selecting a font
font_option = Combobox(root, values=font_list, state='readonly')
font_option.pack(pady=10)

# Binding the function to the selection event
font_option.bind('<<ComboboxSelected>>', choose_font)

# Display label with initial text
display_label = Label(root, text='Hello Font Magic!', font=('Arial', 12))  # Set a default font
display_label.pack(pady=20)

# Run the GUI
root.mainloop()
In this code:
- First, we create the main window of our app and give it the title “Font Customization Magic”. We also decide how big our main window should be.
- Next, we fetch a list of available font families and create a Combobox (dropdown) for users to choose from.
- Now, let’s talk about the
choose_fontfunction. When a user picks a font, this function creates a custom font with specific attributes (size, weight, slant, etc.) and applies it to the display label. By using thebind(), we connect this function with the dropdown. - We start with a default label that says ‘Hello Font Magic!’ in the Arial font. This label shows what the text will look like in the chosen font.
Output:
