Tkinter Place Geometry Manager
The Place geometry manager in Tkinter provides a way to precisely position widgets within a container using absolute or relative coordinates. While the Pack and Grid managers rely on packing widgets into a block or arranging them in rows and columns, the Place manager gives you fine-grained control over the exact placement of each widget.
And unlike Pack and Grid, Place does not automatically resize widgets based on their content or the size of their container. Instead, you have complete control over the size of each widget.
Since Place allows widgets to be placed at specific pixel coordinates, widgets can overlap if their coordinates conflict. So, it’s important to plan to avoid any messy overlaps.
Simple Example using Place Geometry Manager
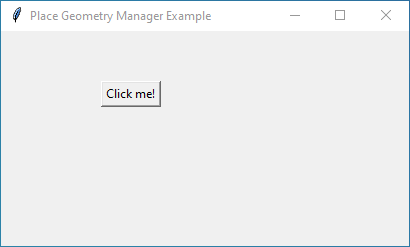
Okay, so first see this simple example in which we’ll create a basic Tkinter window with a button positioned at a specific location using the Place Geometry Manager.
Example:
import tkinter as tk

# Create the main application window
root = tk.Tk()

# Set the window title
root.title("Place Geometry Manager Example")

# Create a button widget
button = tk.Button(root, text="Click me!")

# Use the .place() method to position the button at coordinates (100, 50)
button.place(x=100, y=50)

# Run the Tkinter event loop
root.mainloop()
Output:
Place Options for Positioning Widgets in Tkinter
The Place geometry manager has several options to precisely position widgets within a container. Now let’s explore those options.
x and y
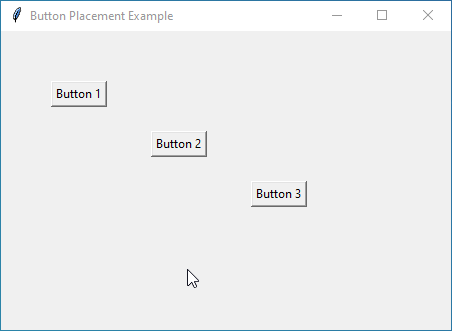
With these x and y options, you can specify the exact coordinates (in pixels) where you want a widget to appear within its container. For example, you can set the x (x-coordinate) to 100 and the y (y-coordinate) to 50 to position a widget 100 pixels from the left and 50 pixels from the top of its container.
Let’s create a simple GUI with multiple buttons placed at different coordinates within the window.
Example:
import tkinter as tk

# Create the main application window
root = tk.Tk()

# Set the window title
root.title("Button Placement Example")

# Create multiple buttons with different positions
button1 = tk.Button(root, text="Button 1")
button1.place(x=50, y=50)  # Place Button 1 at coordinates (50, 50)

button2 = tk.Button(root, text="Button 2")
button2.place(x=150, y=100)  # Place Button 2 at coordinates (150, 100)

button3 = tk.Button(root, text="Button 3")
button3.place(x=250, y=150)  # Place Button 3 at coordinates (250, 150)

# Run the Tkinter event loop
root.mainloop()
Output:
relx and rely
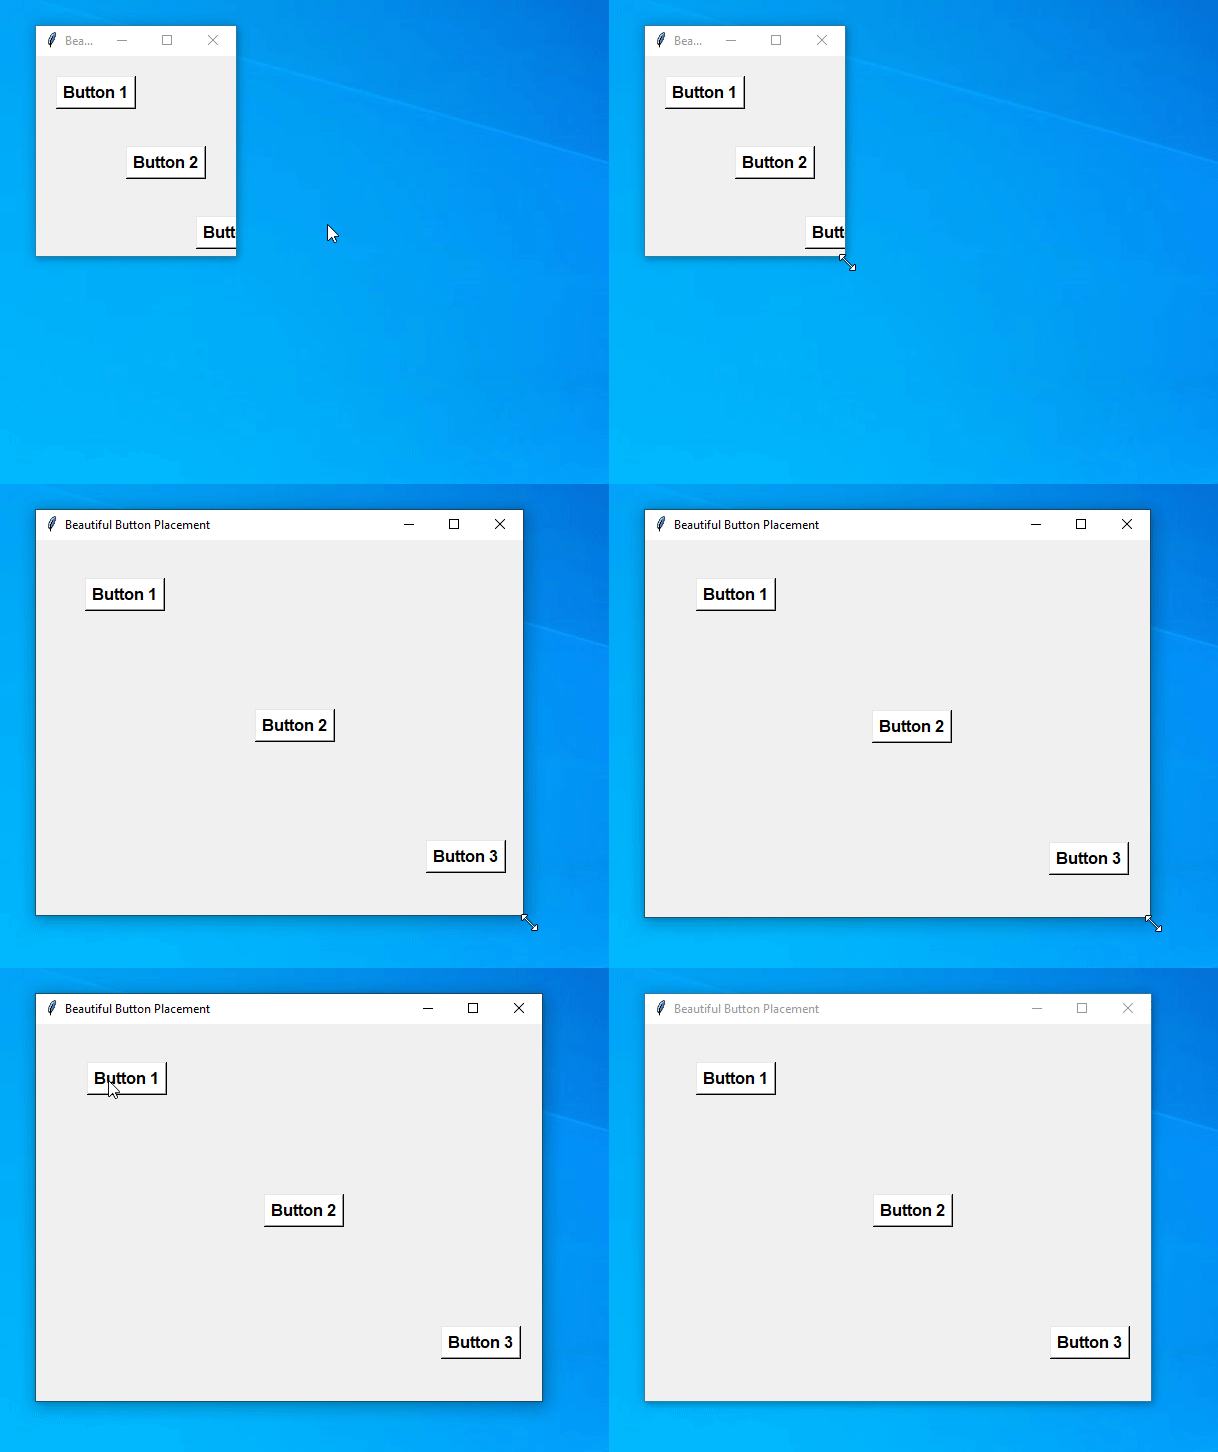
The relx (relative x) and rely (relative y) let you position widgets relative to the size of their container.
Imagine you have a widget placed in the center of a window using relative coordinates. Now, if you resize the window (make it larger or smaller), Tkinter will automatically adjust the position of the widget so that it stays in the center proportionally to the new size of the window.
These options accept floating-point values between 0.0 and 1.0, representing the proportion of the container’s width (relx) or height (rely) where the widget should be placed. For example, setting relx=0.5 and rely=0.5 will position the widget at the center of its container horizontally and vertically.
Let’s create a simple GUI with buttons placed relative to the window size, giving it a responsive and dynamic layout.
Example:
import tkinter as tk
from tkinter.font import Font

# Create the main application window
root = tk.Tk()

# Set the window title
root.title("Beautiful Button Placement")

# Define a custom font for the buttons
button_font = Font(family="Helvetica", size=12, weight="bold")

# Create buttons with relative positions
button1 = tk.Button(root, text="Button 1", font=button_font, bg="#ffffff", fg="#000000", activebackground="#FFD700", activeforeground="#ffffff")
button1.place(relx=0.1, rely=0.1)

button2 = tk.Button(root, text="Button 2", font=button_font, bg="#ffffff", fg="#000000", activebackground="#FFD700", activeforeground="#ffffff")
button2.place(relx=0.45, rely=0.45)

button3 = tk.Button(root, text="Button 3", font=button_font, bg="#ffffff", fg="#000000", activebackground="#FFD700", activeforeground="#ffffff")
button3.place(relx=0.8, rely=0.8)

# Run the Tkinter event loop
root.mainloop()
Output:
anchor
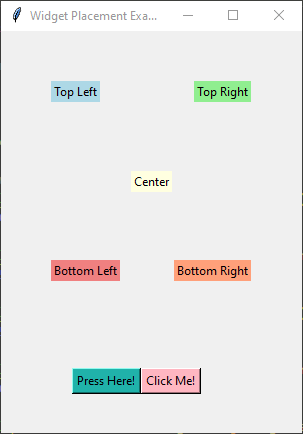
The anchor option in Tkinter decides where your widget should stick inside its allocated space.
It accepts values such as tk.N, tk.S, tk.E, tk.W, tk.NE, tk.NW, tk.SE, tk.SW, and tk.CENTER.
For instance, if you set anchor=tk.NW, it means you want the widget to stick at its top-left corner. But if you set anchor=tk.CENTER, it’ll stick right in the middle of its space.
Let’s create a simple example that demonstrates the use of the anchor option along with multiple widgets in Tkinter.
Example:
import tkinter as tk

# Create the main application window
root = tk.Tk()

# Set the window title
root.title("Widget Placement Example")

# Create labels with different anchor points
label1 = tk.Label(root, text="Top Left", bg="lightblue")
label1.place(x=50, y=50, anchor=tk.NW)  # Anchored at top-left corner

label2 = tk.Label(root, text="Top Right", bg="lightgreen")
label2.place(x=250, y=50, anchor=tk.NE)  # Anchored at top-right corner

label3 = tk.Label(root, text="Center", bg="lightyellow")
label3.place(x=150, y=150, anchor=tk.CENTER)  # Anchored at center

label4 = tk.Label(root, text="Bottom Left", bg="lightcoral")
label4.place(x=50, y=250, anchor=tk.SW)  # Anchored at bottom-left corner

label5 = tk.Label(root, text="Bottom Right", bg="lightsalmon")
label5.place(x=250, y=250, anchor=tk.SE)  # Anchored at bottom-right corner

# Create buttons with different anchor points
button1 = tk.Button(root, text="Click Me!", bg="lightpink")
button1.place(x=140, y=350, anchor=tk.W)  # Anchored at west (left)

button2 = tk.Button(root, text="Press Here!", bg="lightseagreen")
button2.place(x=140, y=350, anchor=tk.E)  # Anchored at east (right)

# Run the Tkinter event loop
root.mainloop()
Output:
Place Options for Setting Size of Widgets
Now, let’s explore the key options for setting the size of widgets with Place:
width and height
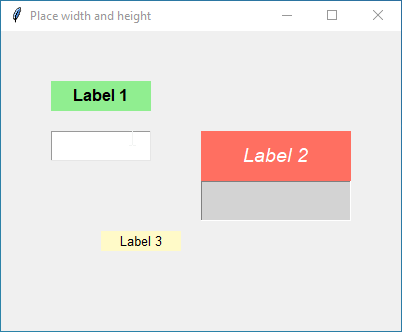
The width and height helps you to set the exact size of a widget in pixels.
For example, if you want a button to be 100 pixels wide and 50 pixels tall, you’d set width=100 and height=50.
Let’s create a simple example that shows the use of width and height in the Tkinter place() method.
Example:
import tkinter as tk

# Create the main application window
root = tk.Tk()

# Set the window title
root.title("Place width and height")

# Configure window size and background color
root.geometry("400x300")
root.configure(bg="#f0f0f0")

# Create labels with custom styles and sizes
label1 = tk.Label(root, text="Label 1", bg="#90ee90", font=("Arial", 12, "bold"))
label1.place(x=50, y=50, width=100, height=30)  # Place label1 at (50, 50) with width 100 and height 30

label2 = tk.Label(root, text="Label 2", bg="#ff6f61", fg="white", font=("Arial", 14, "italic"))
label2.place(x=200, y=100, width=150, height=50)  # Place label2 at (200, 100) with width 150 and height 50

label3 = tk.Label(root, text="Label 3", bg="#fffac8", font=("Arial", 10))
label3.place(x=100, y=200, width=80, height=20)  # Place label3 at (100, 200) with width 80 and height 20

# Create entry fields with custom styles and sizes
entry1 = tk.Entry(root, bg="white", font=("Arial", 12))
entry1.place(x=50, y=100, width=100, height=30)  # Place entry1 at (50, 100) with width 100 and height 30

entry2 = tk.Entry(root, bg="lightgrey", font=("Arial", 14))
entry2.place(x=200, y=150, width=150, height=40)  # Place entry2 at (200, 150) with width 150 and height 40

# Run the Tkinter event loop
root.mainloop()
Output:
relwidth and relheight
Now, what if you want a more flexible approach to sizing your widgets?
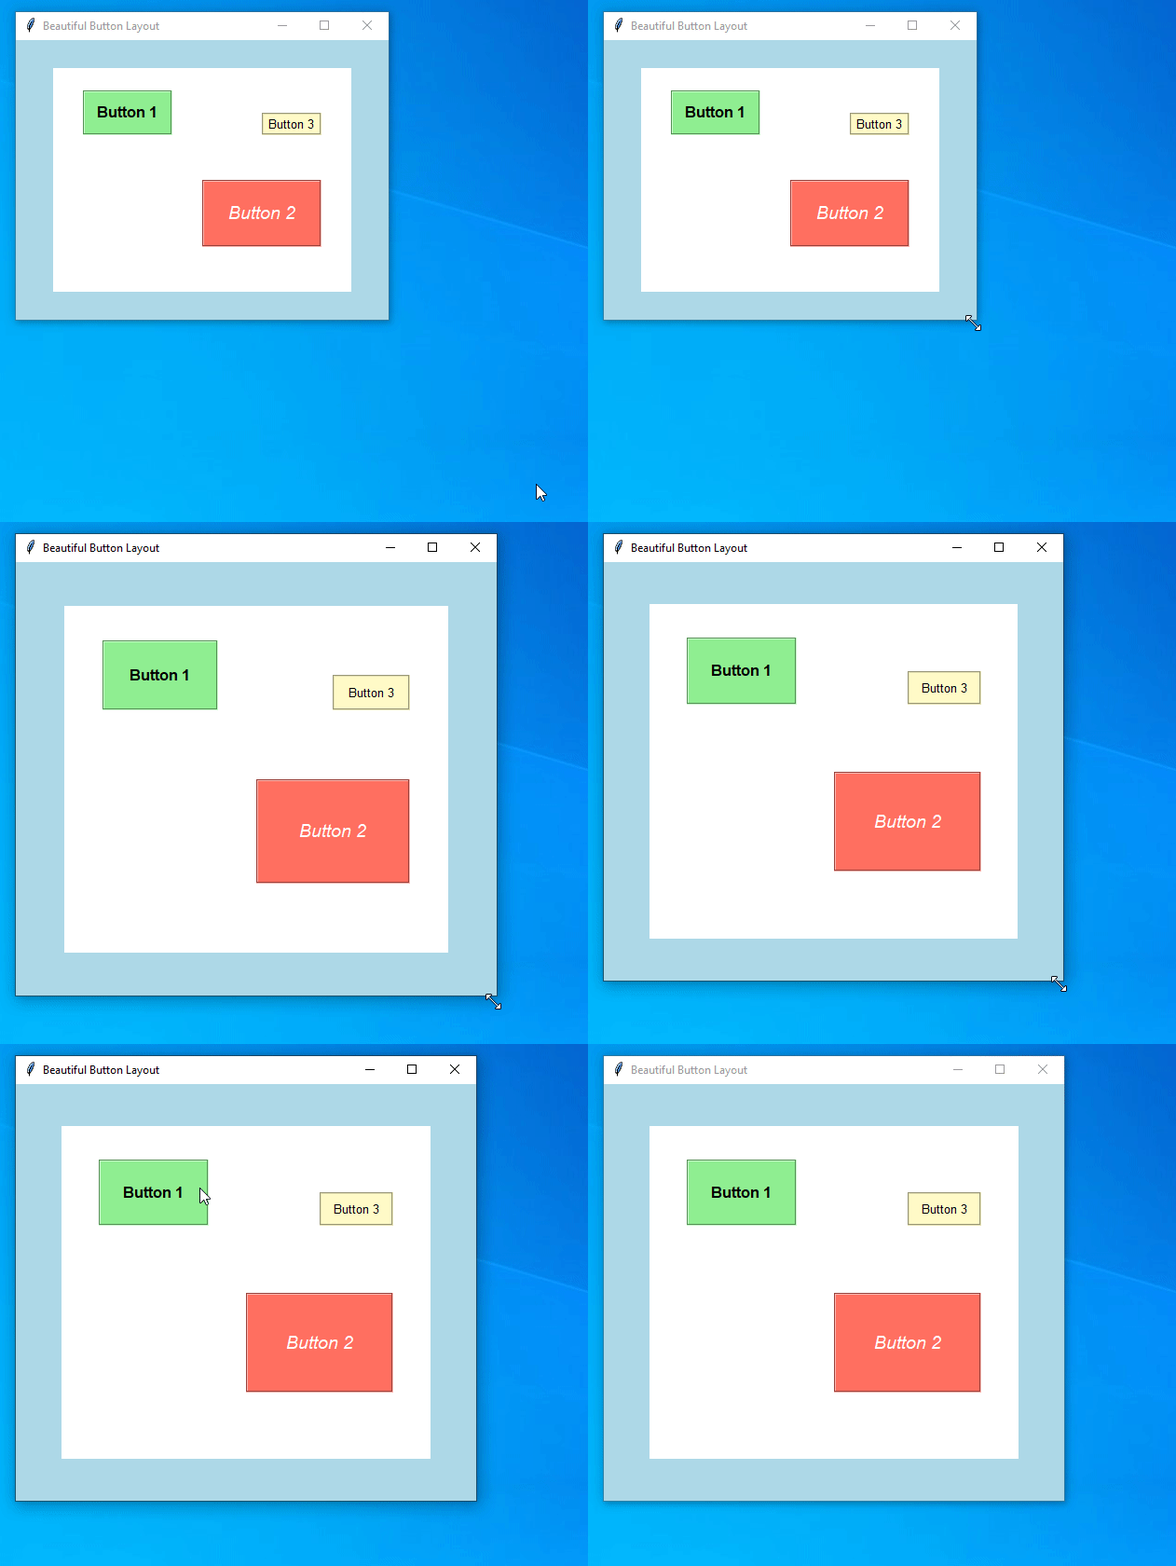
You can use relwidth and relheight to make the size of the widget relative to its container. Instead of pixels, you specify a fraction between 0.0 and 1.0.
For example, setting relwidth=0.5 and relheight=0.5 would make the widget half as wide and half as tall as its container.
Let’s apply the concept of relative width and height (relwidth and relheight) to the example provided:
Example:
import tkinter as tk

# Create the main application window
root = tk.Tk()

# Set the window title
root.title("Beautiful Button Layout")

# Configure window size and background color
root.geometry("400x300")
root.configure(bg="lightblue")

# Create a frame to hold the buttons
frame = tk.Frame(root, bg="white")
frame.place(relx=0.1, rely=0.1, relwidth=0.8, relheight=0.8)  # Frame occupies 80% of the window's width and height, starting from 10% offset

# Create buttons with different relative sizes and positions
button1 = tk.Button(frame, text="Button 1", bg="#90ee90", fg="black", font=("Arial", 12, "bold"), borderwidth=2, relief="groove")
button1.place(relx=0.1, rely=0.1, relwidth=0.3, relheight=0.2)  # Button 1 is positioned at 10% from the left and 10% from the top of the frame, with width 30% and height 20%

button2 = tk.Button(frame, text="Button 2", bg="#ff6f61", fg="white", font=("Arial", 14, "italic"), borderwidth=2, relief="groove")
button2.place(relx=0.5, rely=0.5, relwidth=0.4, relheight=0.3)  # Button 2 is positioned at 50% from the left and 50% from the top of the frame, with width 40% and height 30%

button3 = tk.Button(frame, text="Button 3", bg="#fffac8", fg="black", font=("Arial", 10), borderwidth=2, relief="groove")
button3.place(relx=0.7, rely=0.2, relwidth=0.2, relheight=0.1)  # Button 3 is positioned at 70% from the left and 20% from the top of the frame, with width 20% and height 10%

# Run the Tkinter event loop
root.mainloop()
Output:
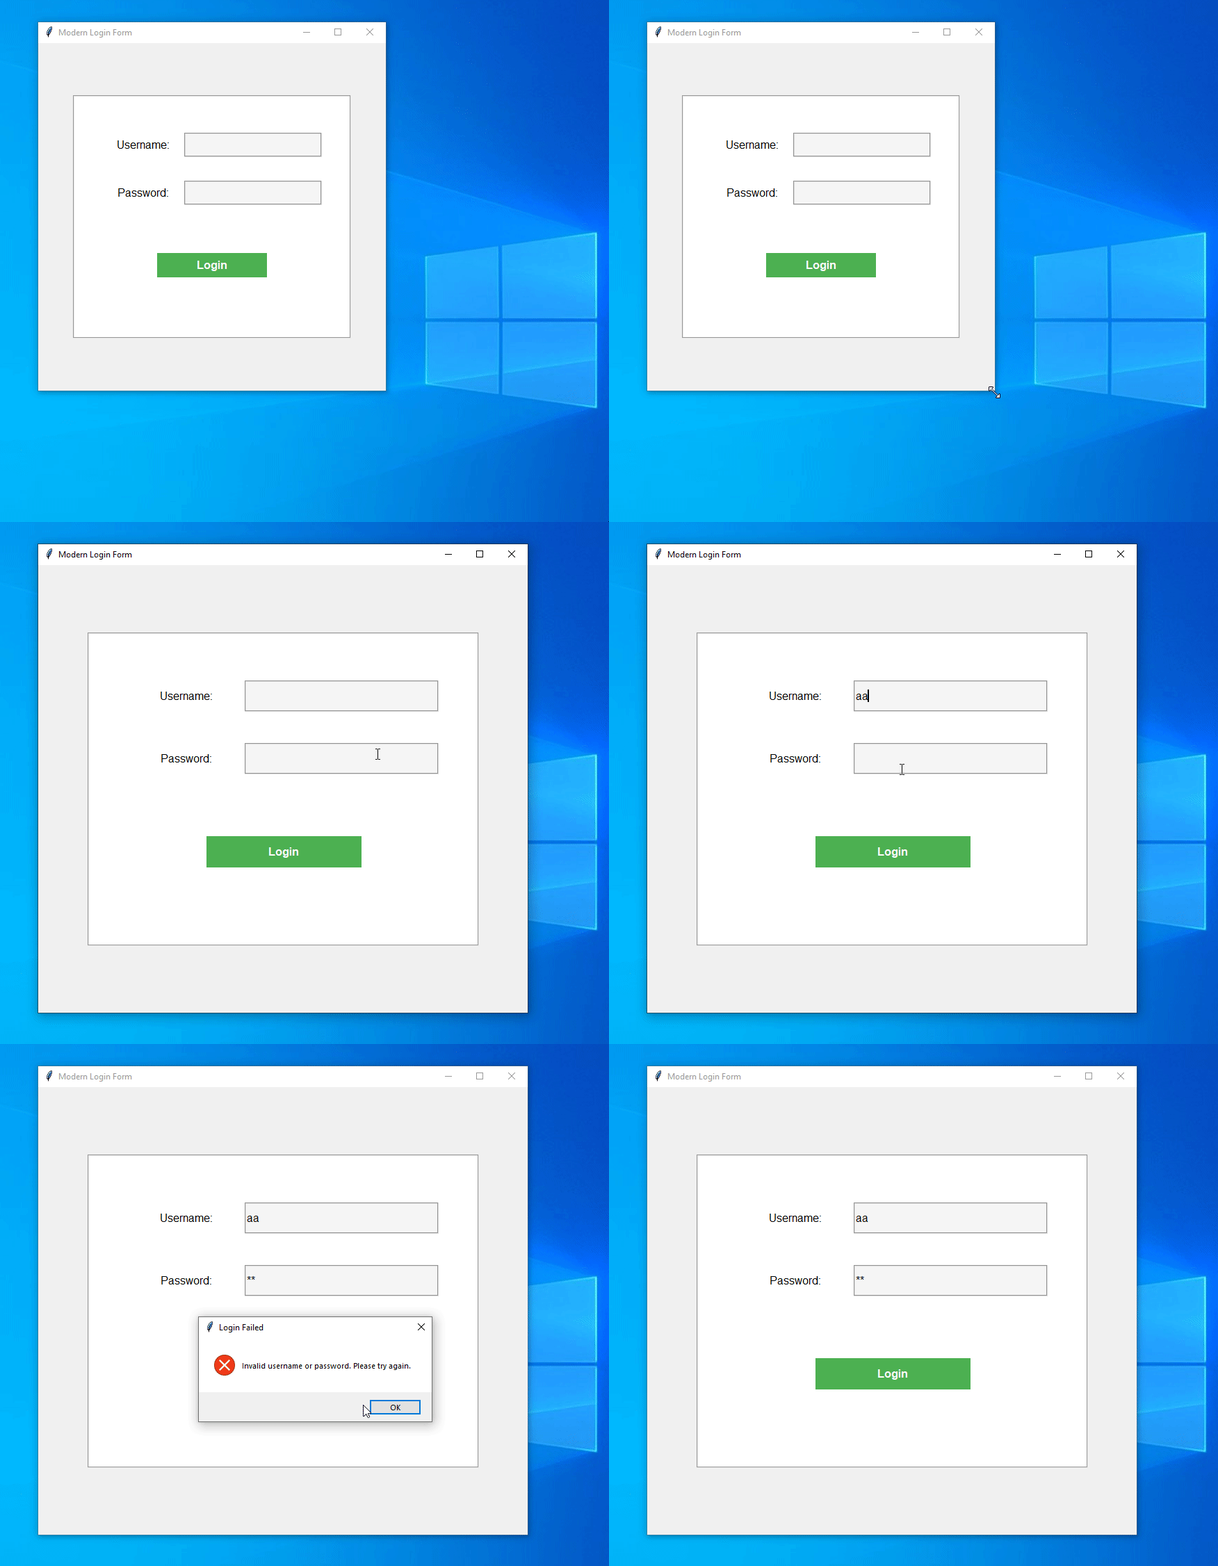
Creating a Beautiful Login Form with Tkinter’s Place Geometry Manager
Let’s build a sleek and user-friendly login form using Tkinter’s place() method! This form will provide a simple yet elegant interface for users to enter their credentials and log in securely.
Example:
import tkinter as tk
from tkinter import messagebox

# Function to validate login credentials
def login():
    username = entry_username.get()
    password = entry_password.get()

    # Check if username and password are correct
    if username == "admin" and password == "password":
        messagebox.showinfo("Login Successful", "Welcome, admin!")
    else:
        messagebox.showerror("Login Failed", "Invalid username or password. Please try again.")

# Create the main application window
root = tk.Tk()

# Set the window title
root.title("Modern Login Form")

# Configure window size and background color
root.geometry("500x500")
root.configure(bg="#f0f0f0")

# Create a frame to hold the login form
frame = tk.Frame(root, bg="#ffffff", bd=2, relief=tk.GROOVE)
frame.place(relx=0.5, rely=0.5, anchor=tk.CENTER, relwidth=0.8, relheight=0.7)

# Create labels for username and password
label_username = tk.Label(frame, text="Username:", bg="#ffffff", font=("Arial", 12), pady=5)
label_username.place(relx=0.1, rely=0.2, anchor=tk.W, relwidth=0.3, relheight=0.1)

label_password = tk.Label(frame, text="Password:", bg="#ffffff", font=("Arial", 12), pady=5)
label_password.place(relx=0.1, rely=0.4, anchor=tk.W, relwidth=0.3, relheight=0.1)

# Create entry fields for username and password
entry_username = tk.Entry(frame, bg="#f5f5f5", font=("Arial", 12), bd=2, relief=tk.GROOVE)
entry_username.place(relx=0.4, rely=0.2, anchor=tk.W, relwidth=0.5, relheight=0.1)

entry_password = tk.Entry(frame, show="*", bg="#f5f5f5", font=("Arial", 12), bd=2, relief=tk.GROOVE)
entry_password.place(relx=0.4, rely=0.4, anchor=tk.W, relwidth=0.5, relheight=0.1)

# Create a login button
button_login = tk.Button(frame, text="Login", command=login, bg="#4CAF50", fg="#ffffff", font=("Arial", 12, "bold"), bd=0, relief=tk.FLAT)
button_login.place(relx=0.5, rely=0.7, anchor=tk.CENTER, relwidth=0.4, relheight=0.1)

# Run the Tkinter event loop
root.mainloop()
Output:
Place Geometry Manager Methods
When you’re using the Place geometry manager to position widgets, you have some handy methods available to manage those widgets more effectively. Let’s explore these methods.
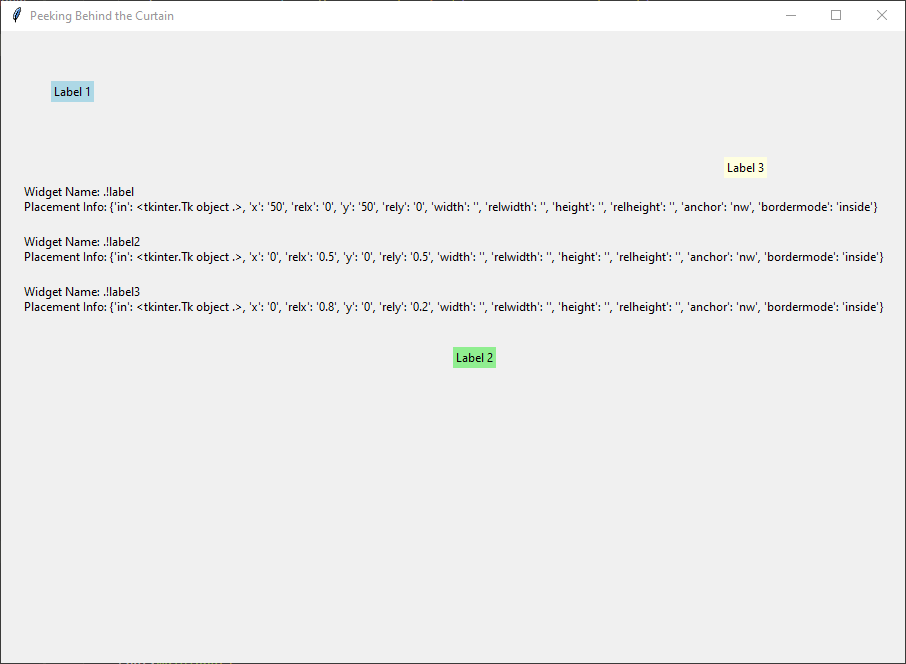
place_info()
The place_info() method helps you find out specific details about how a widget is positioned. You can get information like where it’s placed (x, y coordinates), its size, and how it’s anchored.
Here’s an example that showcases the place_info() method in action.
Example:
import tkinter as tk

# Function to display placement info for a widget
def display_placement_info(widget, info_label):
    # Retrieve placement info for the widget
    info = widget.place_info()
    # Format the placement info
    placement_info = f"Widget Name: {widget}\nPlacement Info: {info}\n"
    # Update the label with the placement info
    info_label.config(text=placement_info)

# Create the main application window
root = tk.Tk()

# Set the window title
root.title("Peeking Behind the Curtain")

# Create labels with different configurations
label1 = tk.Label(root, text="Label 1", bg="lightblue")
label1.place(x=50, y=50)

label2 = tk.Label(root, text="Label 2", bg="lightgreen")
label2.place(relx=0.5, rely=0.5)

label3 = tk.Label(root, text="Label 3", bg="lightyellow")
label3.place(relx=0.8, rely=0.2)

# Create labels to display placement info
info_label1 = tk.Label(root, text="", justify=tk.LEFT)
info_label1.place(x=20, y=150)

info_label2 = tk.Label(root, text="", justify=tk.LEFT)
info_label2.place(x=20, y=200)

info_label3 = tk.Label(root, text="", justify=tk.LEFT)
info_label3.place(x=20, y=250)

# Display placement info for each label
display_placement_info(label1, info_label1)
display_placement_info(label2, info_label2)
display_placement_info(label3, info_label3)

# Run the Tkinter event loop
root.mainloop()
Output:
place_slaves()
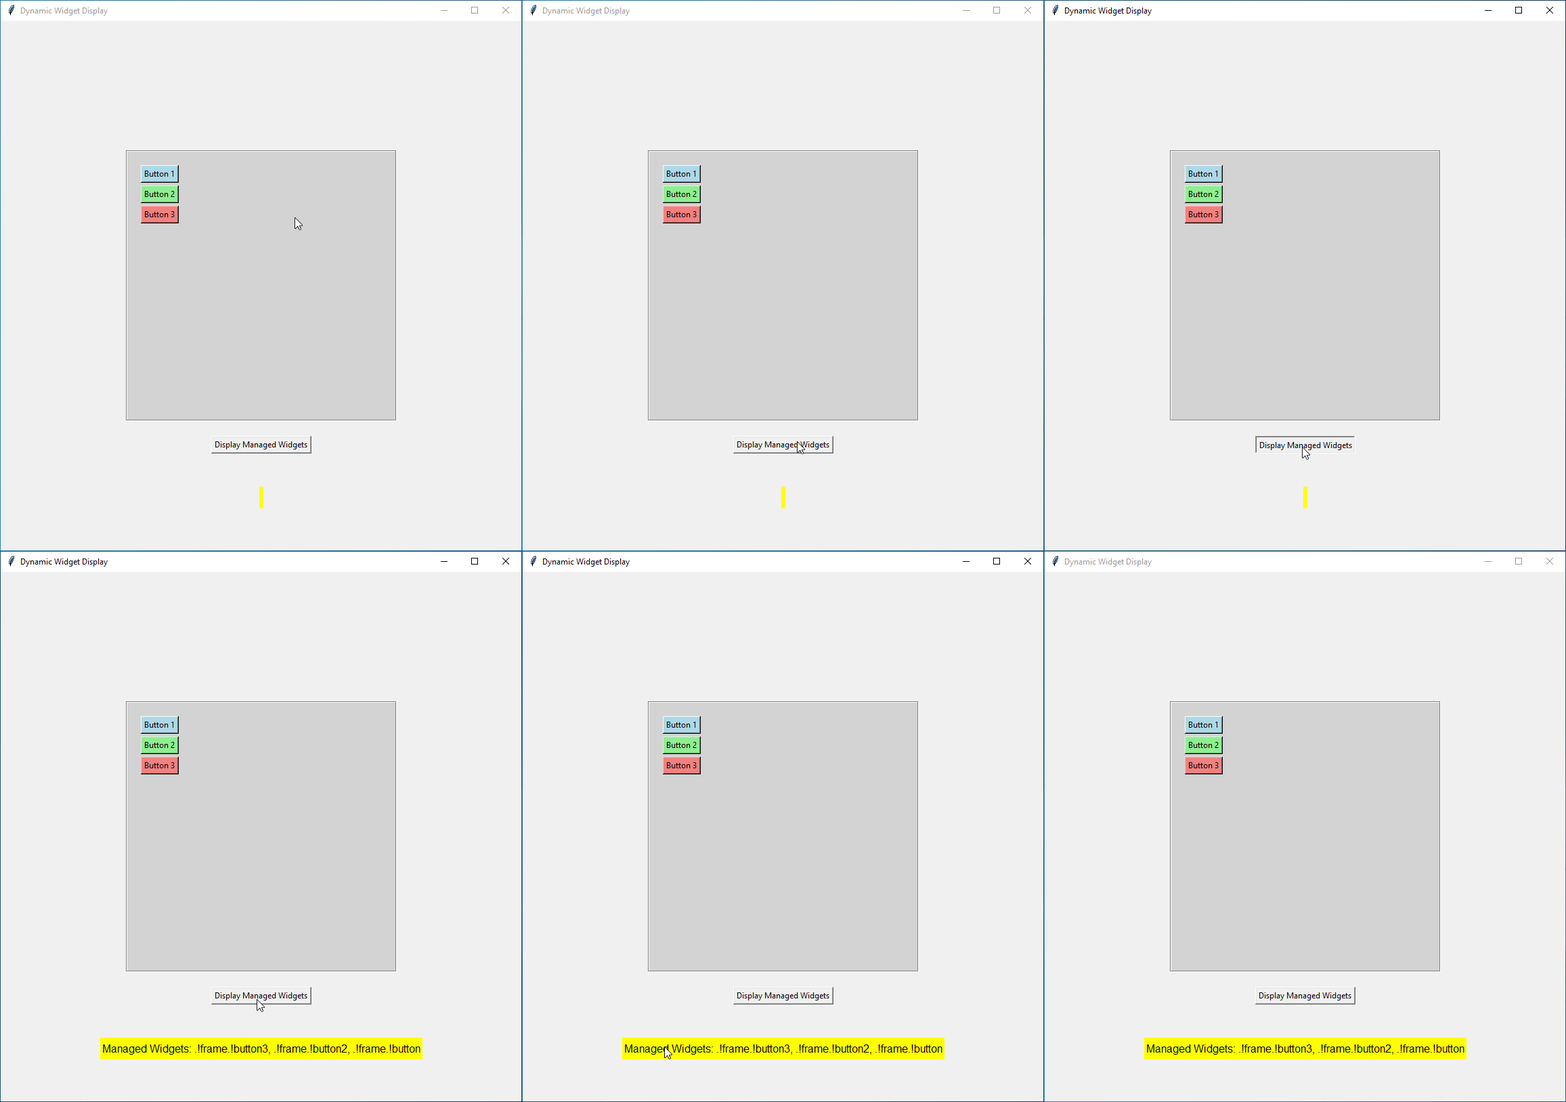
The place_slaves() method returns a list of all widgets managed by the Place geometry manager within a specified container. It’s handy when you want to do something with all those widgets together, like moving or hiding them.
Let’s create a simple example that demonstrates the place_slaves() method in Tkinter.
Example:
import tkinter as tk

# Function to display names of managed widgets
def display_managed_widgets():
    # Get a list of all widgets managed by the Place Geometry Manager within the frame
    managed_widgets = frame.place_slaves()

    # Concatenate the names of managed widgets
    widgets_names = ', '.join(str(widget) for widget in managed_widgets)

    # Update the label with the names of managed widgets
    label_widgets.config(text=f"Managed Widgets: {widgets_names}")

# Create the main application window
root = tk.Tk()

# Set the window title
root.title("Dynamic Widget Display")

# Create a frame to hold the buttons
frame = tk.Frame(root, bg="lightgrey", bd=2, relief=tk.GROOVE, width=400, height=400)
frame.place(relx=0.5, rely=0.5, anchor=tk.CENTER)  # Place the frame in the center of the window

# Create buttons within the frame
button1 = tk.Button(frame, text="Button 1", bg="lightblue")
button1.place(x=20, y=20)  # Position Button 1

button2 = tk.Button(frame, text="Button 2", bg="lightgreen")
button2.place(x=20, y=50)  # Position Button 2

button3 = tk.Button(frame, text="Button 3", bg="lightcoral")
button3.place(x=20, y=80)  # Position Button 3

# Create a label to display managed widgets
label_widgets = tk.Label(root, text="", bg="yellow", font=("Arial", 12), pady=5)
label_widgets.place(relx=0.5, rely=0.9, anchor=tk.CENTER)  # Place the label at the bottom center of the window

# Create a button to trigger display of managed widgets
button_display_widgets = tk.Button(root, text="Display Managed Widgets", command=display_managed_widgets)
button_display_widgets.place(relx=0.5, rely=0.8, anchor=tk.CENTER)  # Place the button above the label

# Run the Tkinter event loop
root.mainloop()
Output:
place_forget()
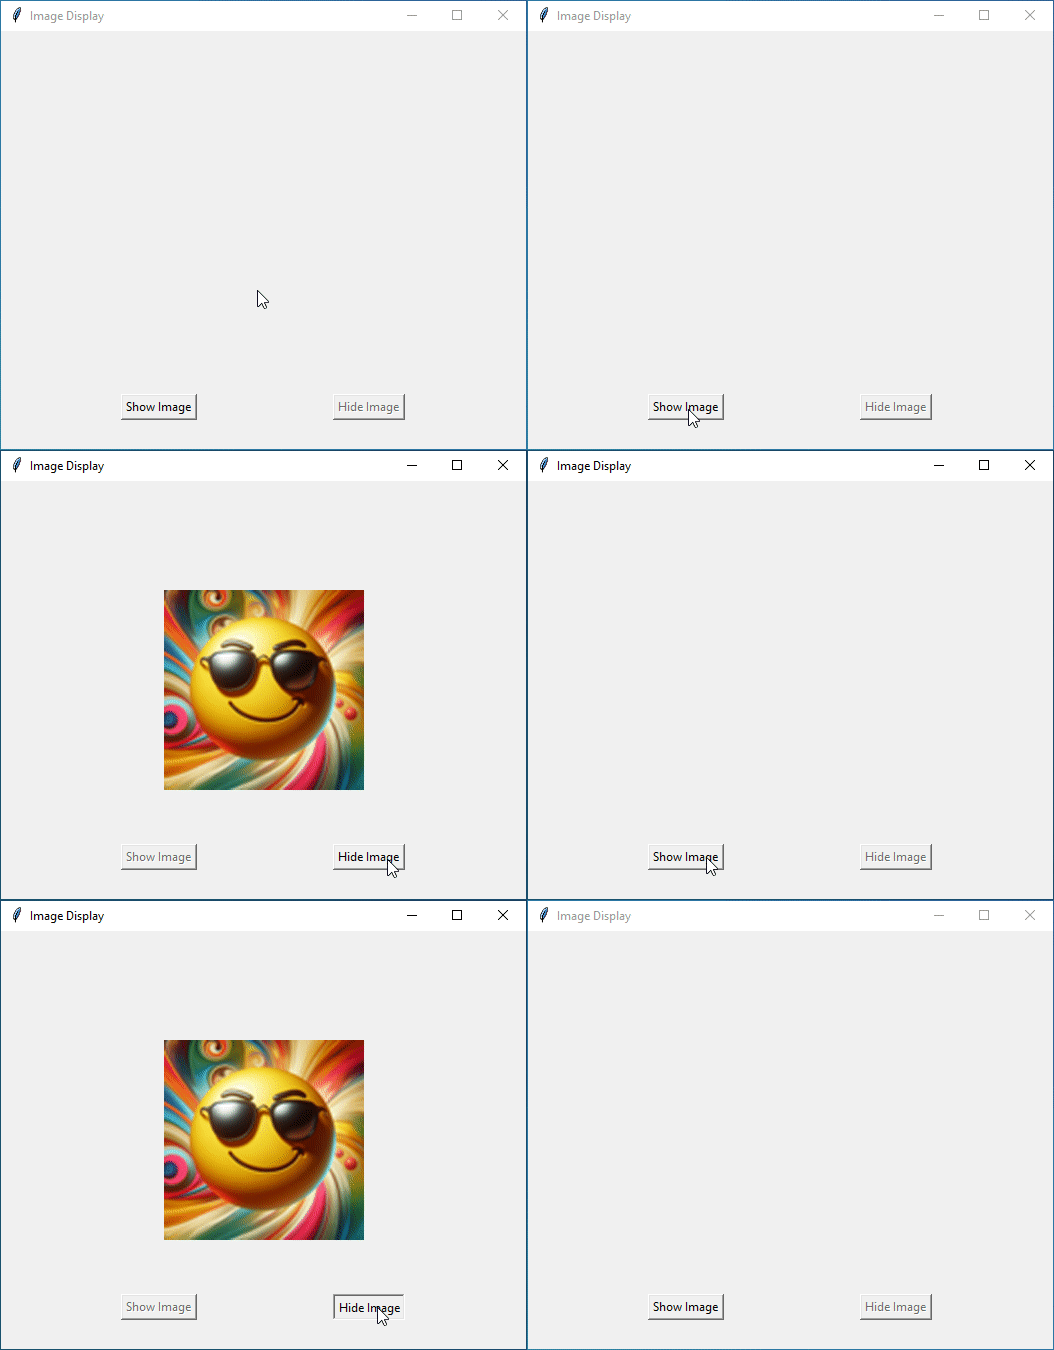
The place_forget() method removes a widget from the layout managed by the Place geometry manager. It does not destroy the widget; instead, it simply hides the widget from view, allowing you to later re-place it within the layout if needed.
Let’s create an example showcasing the place_forget() method. We’ll build a simple application with two buttons: one to display an image and another to hide it.
Example:
import tkinter as tk

# Function to display the image
def show_image():
    # Place the image label at the center of the window
    image_label.place(relx=0.5, rely=0.5, anchor=tk.CENTER)
    # Disable the "Show Image" button
    show_button.config(state=tk.DISABLED)
    # Enable the "Hide Image" button
    hide_button.config(state=tk.NORMAL)

# Function to hide the image
def hide_image():
    # Hide the image label
    image_label.place_forget()
    # Enable the "Show Image" button
    show_button.config(state=tk.NORMAL)
    # Disable the "Hide Image" button
    hide_button.config(state=tk.DISABLED)

# Create the main application window
root = tk.Tk()

# Set the window title
root.title("Image Display")

# Configure window size and background color
root.geometry("400x300")
root.configure(bg="#f0f0f0")

# Load an image
image = tk.PhotoImage(file="cool.png")

# Create a label to display the image
image_label = tk.Label(root, image=image)

# Create a button to display the image
show_button = tk.Button(root, text="Show Image", command=show_image)
show_button.place(relx=0.3, rely=0.9, anchor=tk.CENTER)  # Position the button at the bottom left

# Create a button to hide the image
hide_button = tk.Button(root, text="Hide Image", command=hide_image, state=tk.DISABLED)
hide_button.place(relx=0.7, rely=0.9, anchor=tk.CENTER)  # Position the button at the bottom right

# Run the Tkinter event loop
root.mainloop()
Output:
