Flask Basics: Structure, Server Setup, and Debugging Explained
Hey there, readers! Welcome back to the Flask tutorial series. In the previous post, we set up our development environment and created our first Flask application together. I hope you found that part exciting and straightforward!
Now, it’s time to cover the foundational aspects of Flask that you’ll need to know as you start building more complex applications. We’ll learn how Flask organizes your code, how to configure the server settings, and how to spot and fix errors in your code in no time.

Here’s what we’ll explore:
Flask Application Structure
When you start with Flask, your application can follow a single-module structure, which works well for smaller projects. But as your application grows and you add more features, you’ll want to transition to a multi-module structure.
Let’s walk through both of these structures.
Single-Module Structure
In the earlier post, we worked with a simple single-module structure, where everything was placed in one file (app.py). This approach works well for small projects since all your code resides in one place, making it easy to use and maintain. Here’s a quick recap of what this structure looked like:
/your-project-directory
    /venv
    app.py        # Contains all the app logic
In app.py, we wrote the Flask code to create a simple “Hello, World!” application. This basic structure is ideal for beginner projects or when you’re just experimenting with Flask.
Multi-Module Structure
As your application grows and you start adding more features to the Blog Application, managing all the code in a single file can quickly become messy and confusing. That’s why switching to a multi-module structure for larger projects is a good idea. This structure helps keep everything organized and makes it easier to manage your code.
In a multi-module structure, you break your application into smaller parts based on their function—like routes, templates, and models. Each part gets its file or folder. For example:
/your-project-directory
    /venv             # Virtual environment
    /app              # Main application folder
        /templates    # HTML templates for rendering views
        /static       # Static files like CSS, JS, images
        __init__.py   # Initializes the Flask app and other modules
        routes.py     # Contains route definitions for your app
        models.py     # Contains data models, if needed (e.g., for blog posts)
    app.py            # Entry point of the app that runs it
In this structure:
-
staticfolder will store static assets such as CSS, JavaScript, and image files. -
app.pyfile will act as the entry point to start the Flask application. -
__init__.pyfile will initialize your Flask app and import the necessary components. -
routes.pyfile will contain the routes for handling requests and returning responses. -
models.pyfile (optional) will store any data models (like blog posts) if you decide to integrate a database. -
templatesfolder will store all your HTML templates.
This setup makes your application more scalable and you can focus on the part you’re working on, without worrying about accidentally breaking something else.
Configuring the Flask Development Server
Now that we’ve covered both structures, we only need a simple single-module setup for our Blog Application. Let’s stick with that for now and move on to learning how to configure and run the Flask development server efficiently.
Configuring Environment Variables
Flask applications often rely on environment variables to control their behavior during development. These variables control how Flask behaves, such as which file to use as the app entry point, whether to run in debug mode and more.
Let’s go over how to configure them.
First, create a .flaskenv file in the root folder of your project. This file will store your environment variables.
FLASK_APP=app.py
FLASK_ENV=development
FLASK_DEBUG=1
This is what each setting does:
FLASK_APP: Points to the file that Flask should run. For us, it’sapp.py.FLASK_ENV: Sets Flask’s environment todevelopmentfor easier debugging.FLASK_DEBUG: Turns on debug mode, so if something breaks, we’ll see detailed error messages.
To make sure Flask loads these settings automatically, you’ll need a little helper called python-dotenv. It’s a simple package that helps load environment variables.
Run this command to install it:
pip install python-dotenv
Now Flask will automatically read from your .flaskenv file every time you run your application.
Using the flask run Command
The flask run command is the primary way to start your development server and see your app in action.
flask run
By default, this starts the server on your local machine at http://127.0.0.1:5000/. Open this link in your browser to view your application.
Customizing the Server
Flask also gives you options to customize how the server runs. Here are some useful ones:
Enable Debug Mode: Add the --debug flag to turn on debug mode manually:
flask run --debug
This is especially helpful if you don’t want to rely on FLASK_DEBUG=1 in your .flaskenv file.
Change the Host: By default, Flask runs on 127.0.0.1 (localhost). To make the app accessible on your local network, use the --host option:
flask run --host=0.0.0.0
Change the Port: The default port is 5000. To use a different port, add the --port flag:
flask run --port=8080
Using Flask’s Built-In Debugger
Debugging is a vital part of application development, and Flask makes it easier with its built-in debugger. Now, let’s learn how this debugger helps identify and resolve errors.
We have already learned how we can enable Flask’s debugger by setting the environment variable (FLASK_DEBUG=1).
To check whether the debug mode is active or not, run your Flask application using the flask run command. When debug mode is active, the terminal will display a message like this:
 * Debug mode: on
 * Debugger PIN: 123-456-789
When an error occurs in your Flask application, the debugger provides valuable insights to help you fix it quickly.
How the Debugger Helps Identify and Resolve Errors
To better understand Flask’s debugger, we’ll introduce an intentional error in our Hello, World! app.
from flask import Flask

app = Flask(__name__)

@app.route("/")
def hello_world():
    # Intentional error: misspelled variable name
    return "Welcome to " + app_name

if __name__ == "__main__":
    app.run()
Intentional Error: The variable app_name is used but not defined, causing a NameError.
Now, when you visit the homepage, you’ll see an error page similar to this:
NameError: name 'app_name' is not defined
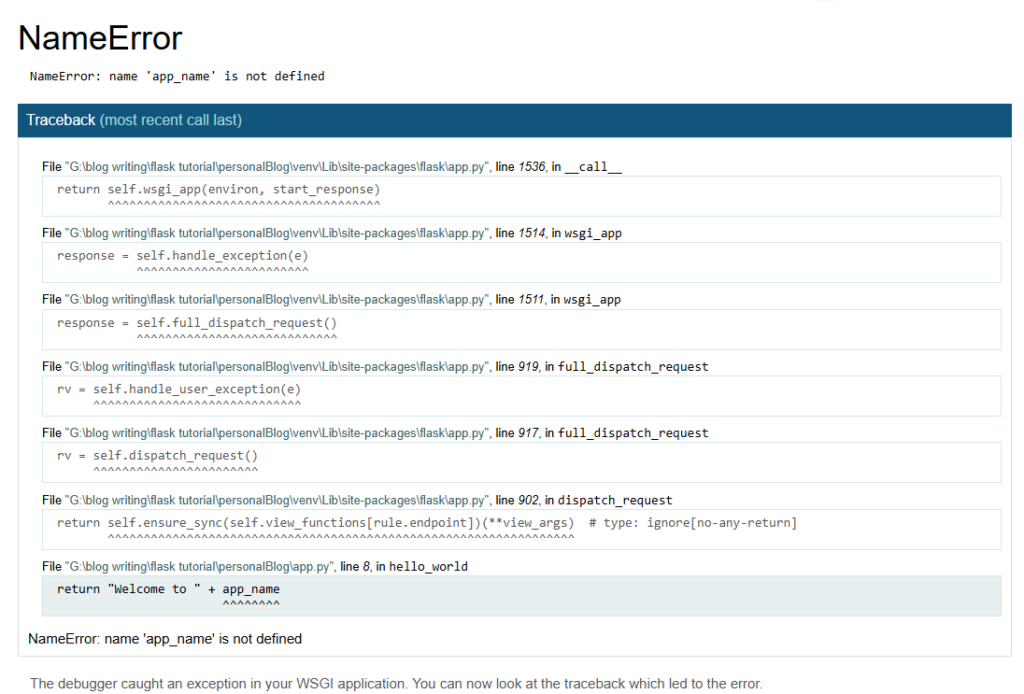
The error page includes:
- Stack Trace: A detailed log showing where the error occurred.
- Error Context: Highlights the specific line (line 8) causing the issue.
Demonstrating Interactive Debugging in Flask
One of the most powerful features of Flask’s debugger is its interactive debugging tool, which provides an option to open an interactive Python shell right in your browser.
This shell allows you to:
- Investigate the cause of the error without restarting the application.
- Inspect variables and their values.
- Test snippets of Python code.
To ensure secure debugging, Flask may ask you for the debugger PIN before using the interactive shell. You can open the console by clicking on the console icon like this:

Now, you can run the Python commands directly in the browser to inspect and troubleshoot. Here’s how:

Let’s try to fix this error by updating our code:
from flask import Flask

app = Flask(__name__)

@app.route("/")
def hello_world():

    app_name = "My Flask App"
    return "Welcome to " + app_name

if __name__ == "__main__":
    app.run()
After this, your app will look like this:

With this hands-on example, you’ve seen how Flask’s built-in debugger simplifies error detection and resolution. Now, you can confidently troubleshoot issues in your Blog Application or any Flask project.
And remember one thing – Never enable debug mode in production. Debug mode is a development tool and can expose sensitive information.